As activity on BNB Chain continues to concentrate around fast-moving tokens and retail-driven flows, Banana Gun has extended its execution infrastructure to support BNB Chain inside Banana Pro, its browser-based trading terminal built for speed-critical markets.
The update allows traders to execute BNB Chain trades from the same interface used for other supported networks, eliminating the need to juggle multiple tools during high-volatility sessions.
“Traders do not need more dashboards. They need faster, cleaner execution across every chain they touch,” said Daniel, CEO and Co Founder of Banana Gun. “BNB Chain going live on Banana Pro is a step toward making Banana the execution layer traders rely on when it matters most.”
One Terminal, Built for Execution First
Banana Pro’s BNB Chain support is not positioned as a feature add-on, but as part of a broader execution-first architecture. The platform is designed to minimize latency, reduce failed transactions, and maintain responsiveness during congestion — conditions that are common on BNB Chain during active trading periods.
From a single customizable terminal, traders can now:
Execute BNB-native token trades without switching platforms
Access BSC Trenches for rapid token discovery
Place swaps, limit orders, and DCA strategies in one workflow
Trade newly launched assets with Four.meme integration
Layouts, widgets, and data views can be adjusted to match individual trading styles, allowing users to prioritize speed over visual noise.
Banana Gun’s execution stack has processed over $15 billion in cumulative on-chain trading volume, spanning periods of extreme volatility, memecoin surges, and network congestion. That same infrastructure now underpins Banana Pro’s BNB Chain deployment.
Key safeguards available to BNB Chain traders include:
MEV-aware execution routing
Automated anti-rug and honeypot detection
Non-custodial wallet control, keeping users in charge of their assets
Telegram-based execution on BNB Chain continues to be optimized alongside the web terminal, ensuring consistent performance regardless of interface.
Why BNB Chain Fits the Roadmap
BNB Chain has remained one of the most active environments for retail trading, even during broader market slowdowns. Banana Pro’s expansion reflects a strategy centered on following liquidity and trader behavior rather than chasing short-lived trends.
By consolidating execution, trade management, and discovery into a single interface, Banana Gun is positioning Banana Pro as a long-term execution layer for traders who need to act quickly as opportunities rotate across ecosystems.
The BNB Chain rollout marks another step toward a multichain future built around execution quality, not complexity.
In this post, I will show you how to use insMind’s AI image generator to improve clarity and trust in cybersecurity content.
In cybersecurity, trust depends on clarity. Complex threats, abstract attack flows, and invisible system processes are difficult to explain using text alone.
As security content becomes more technical and audiences more diverse, visual communication plays an increasingly important role. Readers expect explanations that are not only accurate but also easy to understand and apply.
InsMind is an all-in-one AI image generation and photo editing platform. Its AI Image Generator helps cybersecurity writers and educators create clearer, more trustworthy visual content that supports effective learning and decision-making.
Part 1: Why AI-Generated Visuals Matter in Cybersecurity Communication
Cybersecurity topics often describe processes that cannot be directly observed, such as data breaches, phishing attacks, malware execution, or network vulnerabilities. These concepts are abstract by nature, and when they are explained without visual support, readers may struggle to fully understand how threats operate or how defenses protect systems.
AI-generated visuals offer a practical and scalable solution. Using an AI Image Generator, content creators can produce custom illustrations, diagrams, and conceptual images that match the exact scenario being discussed. Instead of relying on generic stock photos that add little educational value, writers can create visuals that directly reinforce their explanations.
Clear visuals improve comprehension by helping readers form mental models of complex security concepts. They also increase engagement, as readers are more likely to stay focused when information is presented in multiple formats.
For cybersecurity blogs, training materials, and awareness campaigns, AI-generated visuals support both understanding and credibility.
Part 2: How to Use insMind’s AI Image Generator for Cybersecurity Content
Using insMind’s AI Image Generator does not require advanced design skills or complex workflows. For cybersecurity writers and educators, the goal is not artistic experimentation but clarity and accuracy.
By following a simple and repeatable process, AI-generated visuals can be integrated naturally into articles, tutorials, and training materials without disrupting existing content workflows.
Take guidance from the steps given below to learn how to apply insMind’s AI Image Generator:
Step 1: Upload an Image or Start From Text
Upon accessing the insMind’s “AI Image Generator” website, click the “Gallery” icon to upload your original photo.
The AI Image Generator supports both text to image and image to image workflows. This flexibility allows you to either generate visuals entirely from written descriptions or transform existing materials into clearer, more refined images.
Step 2: Enter Your Clear Prompt
Next, enter clear instructions to describe the image you want to generate and press the “Generate” button. With text to image, written descriptions are transformed directly into visuals.
With image to image, existing visuals are refined or reinterpreted while preserving their original structure. Clear instructions help the AI generate images that align closely with your content narrative and technical intent.
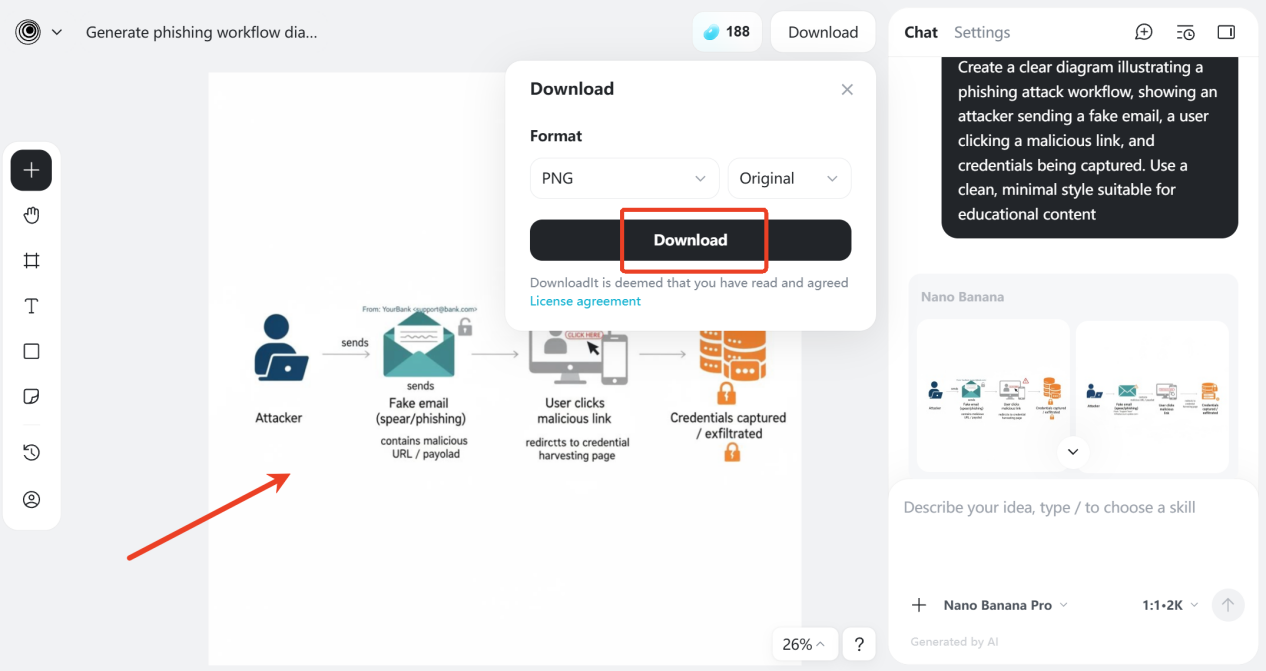
Step 3: Download the Generated Image
Once the image is generated, review it carefully for accuracy and clarity. Then press the “Download” button to save it on your device.
Part 3: Practical Use Cases of AI Image Generator in Cybersecurity
AI image generation can be applied across a wide range of cybersecurity content scenarios. Educational articles benefit from visuals that explain threats and defensive strategies in a clear and structured way.
Tutorials become easier to follow when complex steps are illustrated visually. Security awareness materials are more engaging when images clearly demonstrate real-world risks and consequences.
Because AI-generated visuals can be created without exposing real systems, infrastructure, or sensitive data, they are especially suitable for public-facing cybersecurity content.
This reduces the risk of accidental information disclosure while maintaining strong instructional value. For organizations concerned about compliance and privacy, this is a significant advantage.
Part 4: What Else You Can Do With insMind
Beyond AI image generation, insMind offers additional tools that further support cybersecurity content creation and refinement.
AI Background Remover helps isolate key elements in an image by removing unnecessary or distracting backgrounds. This improves visual focus in security tutorials, guides, and documentation, ensuring readers concentrate on the most relevant information.
AI Photo Editor allows you to make precise adjustments after an image has been generated or cleaned. You can crop visuals, adjust layout, remove remaining distractions, or highlight specific areas of interest without altering the core technical meaning of the image. This is especially helpful for preparing visuals for step-by-step guides, security documentation, or presentations where accuracy and clarity are critical.
AI Image Enhancer improves image quality by increasing sharpness, resolution, and overall readability. This is particularly useful for low-quality screenshots, compressed images, or visuals captured from virtual environments commonly used in technical documentation.
Together, these tools allow cybersecurity professionals to create clean, consistent, and high-quality visuals without relying on multiple platforms or complex design workflows.
Conclusion: Clear Visuals Build Trust in Cybersecurity Content
In an environment where accuracy and trust are critical, how cybersecurity information is presented matters as much as the information itself. Tools like insMind make it easier for security writers and educators to communicate complex concepts with clarity and control. By using insMind AI Image Generator to create visuals through text to image and image to image workflows, professionals can explain abstract threats and processes without relying on real systems or sensitive data.
When supported by features such as AI Background Remover, AI Photo Editor, and AI Image Enhancer, these visuals become cleaner, more focused, and easier to understand across blogs, documentation, and training materials by using AI image generation with GPT Image 2.
As cybersecurity challenges continue to evolve, clear and well-prepared visuals help audiences better grasp risks, follow best practices, and take informed action. In this context, AI-powered visual tools are not just a convenience, but a practical asset for building trust in modern cybersecurity communication.
In this post, you will learn why synergy between automation testing and DevOps is the key to modern software scaling.
In the modern digital landscape, the pressure to deliver software at “light speed” has moved from a competitive advantage to a baseline requirement. However, speed often comes at the cost of stability.
For organizations looking to scale without breaking their systems, the integration of Automation Testing within robust devops development services has become the gold standard for high-performing engineering teams.
The Evolution of Quality: Beyond Manual Intervention
Traditionally, quality assurance (QA) was the “final gatekeeper”—a manual process that occurred at the end of the development cycle. In an era of monthly updates, this worked. In the era of daily (or hourly) deployments, it is a bottleneck.
This is where Automation Testing changes the game. By converting repetitive, high-volume test cases into executable scripts, businesses can achieve a level of consistency that human testers simply cannot match. Automated suites don’t suffer from fatigue or oversight; they execute the same logic with 100% precision every single time.
For a company like Jalasoft, treating automation as a core development project—rather than just a task—is what allows their “Athletes” (top-tier engineers) to ensure that every code commit is validated against the highest standards of functionality and performance.
DevOps: The Engine of Continuous Delivery
If automation is the fuel, thendevops development services are the engine. DevOps is more than just a set of tools like Jenkins, Docker, or Kubernetes; it is a cultural shift that dissolves the silos between those who write the code and those who maintain the infrastructure.
Modern DevOps services focus on the “Continuous” loop:
Continuous Deployment (CD): Automating the release of validated code to production.
Continuous Monitoring: Real-time visibility into system health and user experience.
When these services are implemented correctly, the result is a “Shift-Left” approach—where testing and operational considerations happen at the very beginning of the lifecycle, not the end.
The Intersection: Why One Needs the Other
The true magic happens when you embed Automation Testing directly into the heart of your DevOps pipeline. Without automation, DevOps is just a fast way to ship bugs. Without DevOps, automation is a powerful tool that lacks a delivery mechanism.
1. Accelerated Feedback Loops
In a manual environment, a developer might wait days for a QA report. In a DevOps-driven environment, an automated test suite can provide feedback within minutes of a code push. This allows developers to fix errors while the logic is still fresh in their minds, drastically reducing the “cost of repair.”
2. Infrastructure as Code (IaC)
A common challenge in testing is the “it works on my machine” syndrome. Devops development services utilize Infrastructure as Code to spin up identical, ephemeral test environments. When your Automation Testing scripts run in an environment that perfectly mirrors production, you eliminate false positives and environment-related glitches.
3. Scaling with Confidence
As applications grow in complexity—incorporating microservices, APIs, and cloud-native architectures—the number of potential failure points grows exponentially. Automation allows for massive parallel testing that would be physically impossible for a human team to execute, ensuring that new features don’t break legacy functionality (Regression Testing).
Choosing the Right Partner for the Journey
Building these capabilities in-house is a significant undertaking. It requires not just tools, but a deep pool of specialized talent. Many North American firms are turning to nearshore partners like Jalasoft to bridge this gap.
By leveraging the top 2% of engineering talent in Latin America, Jalasoft provides more than just “staffing”; they provide a mature ecosystem where Automation Testing and devops development services are woven into the fabric of the delivery model. This ensures time-zone alignment, cultural fit, and—most importantly—technical excellence that drives measurable ROI.
Conclusion: The Path Forward
The goal of modern software engineering isn’t just to write code; it’s to deliver value reliably. By investing in Automation Testing to ensure precision and devops development services to ensure speed, organizations can transform their software department from a cost center into a powerful engine of innovation.
In 2026 and beyond, the companies that win will be those that stop choosing between “fast” and “good” and start automating the path to both.
This post will show you 6 ways to optimize your DevOps team productivity.
Every DevOps team benefits significantly from the optimization that maximizes the performance of the individual members of the group.
There are many different ways to achieve excellent performance through optimization. Below are six great methods you can begin implementing immediately.
Like any group of individuals working together, a DevOps team requires chemistry to function at the highest level of productivity possible. Suppose members of the team have drastically different ways of doing things.
In that case, they will clash in their work, causing delays in how long it takes them to finish development and decreasing the quality of the end product.
When looking for employees to join the team, set aside some specific qualities to help you better identify the right talent, doing this will significantly increase your chances of landing candidates with the most relevant skills for the job.
2. Automate when you can
While you never want to over-automate a process as delicate as software development, you want to find ways to implement automation when possible.
Not only can you remove some of the more menial tasks by doing this, but you can also give your DevOps teams more time to focus on the parts of development that aren’t automatable, like implementing cluster management with hosted Kubernetes.
3. Keep up with the technology of the times
In the ever-changing software development landscape, It’s essential not to fall behind in the technology department. You want your DevOps team’s best DevOps tools on hand because it allows them to utilize their skills best.
Old technology is sometimes far more limiting than you may realize, so it’s crucial to know the best available tools at any given time.
Your DevOps team members will also thank you for it, as all developers enjoy working with the most up-to-date technology.
While the quality of a project depends on the DevOps team members, there must also be a healthy amount of involvement from whoever supervises the team. A feedback loop between the developers and a supervisor is a fantastic way to optimize your DevOps team’s productivity because it will keep the team on track with their work.
Remember that there are many different project areas to keep track of, so problems will slip through the cracks. When this happens, a feedback loop can catch said problems and address them before the project is complete.
Polishing a project after initial completion will ensure that it meets a high standard in terms of quality. To get the most out of your DevOps team’s talents, emphasize plenty of reviewing and revising.
While the team may not uncover any significant issues with the project they’re working on, there’s always potential room for improvement.
6. Don’t crunch
Deadlines exist to ensure the project finishes on time. However, there are situations where things don’t go as planned, and something delays the original time of a project’s completion.
Sometimes, your DevOps team can work overtime to complete the project on time still, but you should only take this approach after consulting the team members to see if they are okay with it.
Otherwise, you risk burning them out and getting an end product that’s lower quality than what it could be.
Ways To Optimize Your DevOps Team Productivity: FAQs
DevOps teams strive for efficiency and speed in delivering applications. Here are some answers to frequently asked questions on optimizing DevOps team productivity:
What are the core principles of a DevOps approach?
Collaboration: Breaking down silos between development and operations teams to work together throughout the software development lifecycle.
Automation: Automating repetitive tasks like testing, deployment, and infrastructure provisioning to free up time for innovation.
Continuous Integration and Delivery (CI/CD): Frequent code integration and automated testing to ensure rapid and reliable deployments.
How can communication be improved within a DevOps team?
Shared Tools and Platforms: Use communication platforms like Slack or collaboration tools to keep everyone informed.
Regular Meetings: Schedule daily stand-up meetings or code reviews to discuss progress and identify roadblocks.
Open Communication Culture: Encourage open communication and feedback loops to address issues and share knowledge.
What are some key DevOps metrics to track?
Deployment Frequency: How often are new features or bug fixes deployed?
Lead Time for Changes: How long does it take to go from code commit to deployment?
Change Failure Rate: How often do deployments fail?
Mean Time to Restore (MTTR): How long does it take to recover from a deployment failure?
How can automation improve DevOps team productivity?
Automated Testing: Automate unit tests, integration tests, and performance tests to catch bugs early and improve code quality.
Infrastructure as Code (IaC): Manage infrastructure configuration as code, allowing for automated provisioning and deployment of infrastructure environments.
Configuration Management: Automate the configuration of servers and applications to ensure consistency and reduce manual errors.
What do DevOps teams commonly use some tools?
Version Control Systems (VCS): Git, Subversion (SVN) for managing code changes.
CI/CD Pipelines: Jenkins, GitLab CI/CD, Azure DevOps Pipelines for automating builds, tests, and deployments.
Configuration Management Tools: Ansible, Chef, Puppet for automating server configuration.
Containerization Tools: Docker and Kubernetes for creating portable and isolated application environments.
How can I measure the impact of DevOps initiatives?
Track the DevOps metrics mentioned earlier (deployment frequency, lead time, etc.) before and after implementing changes. This will help quantify the improvements in efficiency and delivery speed.
How can I foster a culture of continuous learning in a DevOps team?
Encourage participation in conferences and workshops.
Provide resources for learning new tools and technologies.
Organize internal knowledge-sharing sessions.
How can I handle security concerns in a DevOps environment?
Breaking down silos between development and operations.
Keeping up with the rapid pace of change in technologies and tools.
Ensuring security without compromising speed and agility.
How can I build a successful DevOps team?
Focus on hiring individuals with both development and operations skills or a willingness to learn.
Create a culture of collaboration and shared ownership.
Invest in training and continuous learning.
In short
By implementing these practices and addressing common challenges, you can optimize your DevOps team’s productivity and achieve faster software delivery with high quality.
In addition to the methods brought up here, there are many more ways to optimize your DevOps team’s productivity.
Because each team has a different set of individuals, try out several optimization methods and see which ones yield the best results.
In this post, I will talk about proactive vulnerability management and how to building a resilient security posture in the age of advanced threats.
In an era where cyberattacks make headlines daily and the average cost of a data breach has surpassed $4.45 million according to IBM’s 2023 Cost of a Data Breach Report, organizations can no longer afford reactive approaches to security.
The traditional model of periodic vulnerability scanning and patch-when-convenient remediation has proven inadequate against adversaries who weaponize vulnerabilities within hours of disclosure.
The modern threat landscape demands continuous, proactive vulnerability management that identifies weaknesses before attackers can exploit them. This shift from reactive to proactive security represents one of the most significant evolutions in cybersecurity strategy, requiring new tools, processes, and mindsets across security teams.
This comprehensive guide explores the strategies, technologies, and best practices for building a mature vulnerability management program that strengthens organizational resilience against evolving threats.
From understanding the vulnerability lifecycle to implementing automated remediation workflows, we’ll examine how leading organizations are transforming their approaches to identifying and addressing security weaknesses.
Understanding the Modern Vulnerability Landscape
The vulnerability landscape has grown exponentially more complex over the past decade. The National Vulnerability Database recorded over 25,000 new CVEs (Common Vulnerabilities and Exposures) in 2023 alone, representing a continuing upward trend that shows no signs of slowing.
Security teams face the impossible task of addressing this flood of vulnerabilities while maintaining operational continuity.
Vulnerability Statistics and Trends
Metric
2021
2022
2023
Trend
Total CVEs Published
20,171
23,964
25,227
Increasing 15% annually
Critical Vulnerabilities (CVSS 9+)
2,034
2,847
3,156
Growing faster than total
Average Time to Exploit
15 days
12 days
7 days
Rapidly decreasing
Zero-Day Exploits Detected
66
55
97
Highly variable, trending up
Mean Time to Remediate
60 days
58 days
55 days
Slowly improving
These statistics reveal a concerning reality: vulnerabilities are being discovered faster than ever, attackers are weaponizing them more quickly, and organizations struggle to keep pace with remediation. The window between vulnerability disclosure and active exploitation has compressed dramatically, making speed of detection and response critical.
The Evolution of Vulnerability Management
Vulnerability management has evolved through several distinct phases, each representing increased maturity and effectiveness. Understanding this evolution helps organizations assess their current state and chart a path toward more advanced capabilities.
Vulnerability Management Maturity Model
Maturity Level
Characteristics
Typical Practices
Limitations
Level 1: Ad Hoc
Reactive, incident-driven scanning
Occasional scans after incidents
No systematic approach, major gaps
Level 2: Managed
Regular scheduled scanning
Monthly/quarterly scans, basic reporting
Scan coverage gaps, slow remediation
Level 3: Defined
Risk-based prioritization
Asset inventory, severity-based remediation
Manual processes, limited automation
Level 4: Quantified
Metrics-driven, SLA compliance
KPIs tracked, remediation SLAs enforced
Point-in-time visibility only
Level 5: Optimized
Continuous, automated, predictive
Real-time scanning, automated remediation
Requires significant investment
Most organizations today operate at Level 2 or 3, conducting regular scans but struggling with prioritization and remediation timelines. The journey to Level 5 maturity requires investment in automation, integration, and cultural change that makes security a shared responsibility across IT and development teams.
Building a Comprehensive Vulnerability Management Program
An effective vulnerability management program encompasses far more than running periodic scans. It requires a systematic approach that covers asset discovery, continuous assessment, intelligent prioritization, efficient remediation, and ongoing verification.
Phase 1: Asset Discovery and Inventory
You cannot protect what you don’t know exists. Asset discovery forms the foundation of any vulnerability management program, ensuring that all systems—on-premises servers, cloud instances, containers, network devices, and IoT endpoints—are identified and catalogued.
Key asset discovery considerations include:
Automated discovery that identifies new assets as they come online
Classification of assets by criticality, data sensitivity, and exposure
Tracking of asset ownership for accountability in remediation
Integration with CMDB and IT service management systems
Organizations managing complex hybrid environments benefit from partnering with enterprise IT operations specialists who maintain comprehensive visibility across cloud and on-premises infrastructure. This unified view ensures that no systems fall through the cracks of vulnerability assessments.
Phase 2: Continuous Vulnerability Assessment
Modern vulnerability assessment has moved far beyond scheduled scans to embrace continuous monitoring that provides real-time visibility into security posture. This shift recognizes that point-in-time assessments quickly become outdated as environments change and new vulnerabilities emerge.
Identify exposed services and known vulnerabilities
Continuous/Daily
All networked assets
Authenticated Scans
Deep inspection of system configurations
Weekly
Critical systems, servers
Web Application Scans
Find OWASP Top 10 and application-specific vulnerabilities
Continuous/Daily
All web applications
Container Image Scans
Detect vulnerabilities in container images
On build/deploy
All container registries
Cloud Configuration Scans
Identify misconfigurations in cloud resources
Continuous
All cloud environments
Compliance Scans
Verify adherence to security standards
Weekly/Monthly
Regulated systems
Implementing comprehensive scanning across diverse environments requires robust tooling. Modern vulnerability scanning platforms provide AI-driven detection capabilities that automatically assess cloud environments, servers, and applications, delivering continuous visibility into security weaknesses across the entire technology estate.
Phase 3: Risk-Based Prioritization
With thousands of vulnerabilities identified across typical enterprise environments, effective prioritization becomes essential. Not all vulnerabilities represent equal risk, and limited security resources must be directed toward addressing the issues that matter most.
Risk-based prioritization considers multiple factors beyond raw CVSS scores:
Asset criticality—vulnerabilities on critical systems demand faster attention
Exposure level—internet-facing systems face higher risk than internal systems
Compensating controls—existing mitigations may reduce effective risk
Business context—systems supporting critical processes warrant priority
Phase 4: Efficient Remediation
Identifying vulnerabilities has limited value without effective remediation processes. Organizations must establish clear workflows, responsibilities, and timelines for addressing discovered issues.
Severity Level
Remediation SLA
Escalation Trigger
Exception Process
Critical (CVSS 9.0+)
24-72 hours
12 hours without action
CISO approval required
High (CVSS 7.0-8.9)
7-14 days
7 days without progress
Director approval
Medium (CVSS 4.0-6.9)
30-60 days
30 days without progress
Manager approval
Low (CVSS < 4.0)
90 days or next patch cycle
90 days without action
Standard exception process
Automation plays an increasingly important role in remediation, with organizations implementing automated patching, configuration correction, and even code fixes for certain vulnerability classes. Integration between vulnerability management and IT operations platforms enables seamless handoff from detection to resolution.
Cloud Vulnerability Management Challenges
Cloud environments introduce unique vulnerability management challenges that traditional approaches struggle to address. The dynamic nature of cloud infrastructure, shared responsibility models, and the diversity of services across AWS, Azure, and GCP require adapted strategies.
Cloud-Specific Vulnerability Categories
Infrastructure misconfigurations—public S3 buckets, overly permissive security groups
IAM vulnerabilities—excessive permissions, unused credentials, missing MFA
API security gaps—exposed endpoints, authentication weaknesses
Organizations with multi-cloud deployments face amplified complexity. Working with managed cloud security providers that specialize in AWS, Azure, and GCP environments helps ensure consistent security coverage and expertise across all platforms.
Integrating Vulnerability Management with DevSecOps
Modern software development practices demand that vulnerability management integrate seamlessly with DevSecOps pipelines. Shifting security left—identifying and addressing vulnerabilities during development rather than in production—dramatically reduces remediation costs and risk exposure.
Pipeline Integration Points
Pipeline Stage
Security Integration
Tools/Techniques
Action on Findings
Code Commit
Secrets scanning, linting
Git hooks, pre-commit scanners
Block commit if secrets detected
Build
SAST, dependency scanning
SonarQube, Snyk, OWASP DC
Fail build on critical findings
Test
DAST, container scanning
OWASP ZAP, Trivy
Gate deployment on high severity
Deploy
IaC scanning, compliance checks
Checkov, Cloud Custodian
Prevent non-compliant deployments
Production
Runtime protection, monitoring
RASP, continuous scanning
Alert and auto-remediate where possible
Measuring Vulnerability Management Effectiveness
Effective measurement enables continuous improvement and demonstrates program value to stakeholders. Key metrics should span detection, remediation, and overall risk posture.
Essential Vulnerability Management KPIs
Mean Time to Detect (MTTD)—how quickly new vulnerabilities are identified
Mean Time to Remediate (MTTR)—average time from detection to resolution
Vulnerability Density—vulnerabilities per asset or per thousand lines of code
SLA Compliance Rate—percentage of vulnerabilities remediated within defined timeframes
Scan Coverage—percentage of assets under active vulnerability assessment
Age of Open Vulnerabilities—distribution of vulnerability ages to identify backlog issues
Leveraging comprehensive security scanning solutions with robust reporting capabilities enables security teams to track these metrics effectively, demonstrate program maturity, and identify areas requiring additional focus.
Emerging Trends in Vulnerability Management
The vulnerability management landscape continues to evolve rapidly. Security leaders should monitor several emerging trends that will shape future approaches.
AI-Powered Vulnerability Intelligence
Artificial intelligence is transforming vulnerability management through improved threat intelligence, predictive prioritization, and automated analysis. AI systems can correlate vulnerability data with threat intelligence feeds, identify exploitation patterns, and predict which vulnerabilities are most likely to be weaponized.
Attack Surface Management
Attack surface management (ASM) extends traditional vulnerability management to encompass external-facing assets that may not be known to security teams. ASM solutions continuously discover internet-exposed assets and assess their security posture from an attacker’s perspective.
Automated Remediation
Organizations are increasingly implementing automated remediation for certain vulnerability classes, reducing the burden on human operators and accelerating time to resolution. This includes automated patching, configuration correction, and even AI-assisted code fixes.
Conclusion: Building Resilience Through Proactive Security
Proactive vulnerability management has become a cornerstone of modern cybersecurity strategy. Organizations that excel at identifying and remediating vulnerabilities before attackers can exploit them build resilience that protects assets, reputation, and bottom line.
Success requires commitment across the organization—from executive support for security investments to developer ownership of secure coding practices to operations teams embracing security as a shared responsibility. Technology alone cannot solve the vulnerability challenge; it must be coupled with mature processes, clear accountability, and a culture that prioritizes security.
As you advance your vulnerability management program, focus on continuous improvement rather than perfection. Measure what matters, automate where possible, and maintain relentless focus on reducing risk to acceptable levels. The organizations that thrive in today’s threat landscape will be those that make proactive security a fundamental aspect of how they operate.
Here, I will show you key pro tips for managing software vulnerabilities.
Vulnerability management is the process of identifying, analyzing, and fixing defects in computer hardware or software that may be exploited by hostile actors to launch cyberattacks.
A vulnerability refers to a security flaw in a system. An attacker may exploit a vulnerability to gain unauthorized access to resources, steal sensitive data, disrupt corporate operations, or destroy an organization’s systems.
Vulnerability management must be continuous and iterative due to threats’ ever-changing nature, especially when dealing with log4j vulnerability issues. As a result, we will detail the best practices to assist you in managing vulnerabilities effectively.
Create a Vulnerability Management Strategy
Creating a vulnerability management plan is suggested for several reasons. One of the most essential reasons is to ensure compliance with all security regulations and industry standards, such as PCI DSS and ISO 27001.
The vulnerability management approach is also important because it gives a full view of an organization’s information technology (IT) infrastructure.
It helps businesses respond to possible security threats more swiftly and effectively. It is very unlikely that an inadequate vulnerability management approach would defend an organization against attacks.
A solid strategy for controlling vulnerabilities should incorporate comprehensive security safeguards and access controls.
Scanning the network frequently aids in discovering new vulnerabilities, thereby mitigating the continuous threat. Identifying and fixing vulnerabilities as soon as feasible is critical if the risk of their being exploited is to be reduced.
A network may be safeguarded in various ways, one of which is allocating enough resources to network security maintenance and detect new security issues.
When the proper settings are in place, you can ensure that all patches and upgrades will be completed quickly and precisely.
Another way to find and fix security issues is to use security scanners to check the organization’s current security settings, equipment, applications, and processes. To avoid any challenges, businesses must use reactive and proactive solutions, such as intrusion detection systems (IDS), firewalls, and antivirus software.
To put it another way, addressing existing security vulnerabilities is a more efficient technique than relying on a strong perimeter defense. It enables teams to analyze vulnerabilities better and protect the network and applications.
The vulnerability scan results are analyzed as part of the vulnerability assessment process. This approach aims to identify vulnerabilities that pose a significant risk to your firm.
A vulnerability assessment provides a study of the vulnerabilities that must be corrected in order of priority.
During a vulnerability assessment, the vulnerability’s potential impact on the organization, the likelihood that the flaw will be exploited, the level of complexity involved in exploiting the vulnerability, and the type of asset at risk should all be considered.
Remediate Vulnerabilities
Before remediation can begin, the discovered vulnerabilities must be patched or resolved. Both automated tools and hand-operated techniques may be employed in the remediation process.
It is critical to identify repair priorities based on the severity of the vulnerability, the asset, and the potential impact on the firm. After vulnerabilities have been remedied, you must validate that the remediation was successful and the vulnerability has been fixed.
It is in every company’s best interest to evaluate whether or not there are any remaining threats or possibilities before implementing their vulnerability management programs.
So, one of the most important parts of a strategy for managing vulnerability is looking for new risks and opportunities. While developing your vulnerability management strategy, you may use a variety of approaches to keep an eye out for new risks and possibilities.
Many businesses and organizations opt to hire independent assessment agencies to conduct regular security posture assessments. They may be useful to you in identifying possible weaknesses in your organization and develop plans to address them before they become public knowledge.
Make it a practice to visit security news websites regularly. You will have a greater chance of recognizing and avoiding risks and vulnerabilities if you keep your knowledge about ongoing risks and vulnerabilities up to date.
Moreover, you must ensure everyone is informed of what is happening in their particular groups. For example, if a team member is working on a new product or feature, ensure they are aware of any possible risks, such as privacy and security.
Pro Tips for Managing Software Vulnerabilities: FAQs
Software vulnerabilities are like cracks in your digital armor. Left unaddressed, they can open the door to cyberattacks. Here are some essential tips to keep your systems secure:
What’s the Big Deal About Vulnerabilities?
Software vulnerabilities are weaknesses in code that attackers can exploit to gain unauthorized access to systems, steal data, or cause disruptions. Regular patching is crucial to plug these holes and keep your software up-to-date.
How Do I Find These Vulnerabilities?
There are two main approaches: vulnerability scanning and penetration testing. Vulnerability scanners use automated tools to identify weaknesses in your software. Penetration testing simulates real-world attacks to uncover deeper issues.
Not All Vulnerabilities Are Created Equal: How to Prioritize?
Not every vulnerability poses the same threat. Prioritize based on severity (how easily exploited) and exploitability (how likely it is to be attacked). Factors like the software’s criticality and the value of the data it stores also play a role.
The most common way is to apply software patches released by the vendor. These updates fix the vulnerabilities and strengthen your defenses. Workarounds or temporary mitigations may sometimes be necessary until a permanent patch is available.
How Do I Stay on Top of Things?
Managing vulnerabilities is a continuous process. Here are some best practices:
Automate vulnerability scanning: Schedule regular scans to identify new vulnerabilities as they emerge.
Centralize vulnerability management: Use a central system to track identified vulnerabilities, prioritize them, and assign remediation tasks.
Stay informed: Subscribe to security advisories from software vendors to be notified of new vulnerabilities and available patches.
Final Thoughts
By following these pro tips, you can significantly reduce your risk of software vulnerabilities and keep your systems safe from cyberattacks. Security is an ongoing process, so stay vigilant and keep your defenses up!
Adopting an appropriate strategy for managing risks and vulnerabilities is a key building block of any security program, and it is required to meet the many regulatory or compliance obligations that may be imposed.
An effective vulnerability management plan enables organizations to deal with an expanding number of cyber threats while remaining confident in the integrity of their physical infrastructure and the safety of their systems and data.
In this post, I will show you what happens in a data breach when your password gets stolen.
When people hear the words data breach, they often imagine something loud. Alarms. Locked screens. Big warnings. But real breaches are quiet. Most times, you do not notice anything at all. Your phone still works. Your email still opens. Life continues like normal.
That is what makes a stolen password dangerous. It leaves without noise. And when it is gone, it does not always get used right away.
Sometimes it waits.
What Happens the Moment a Password Is Taken
When a password leaks, it usually does not go straight to action. It is copied. Stored. Saved with many others. Hackers collect passwords like people collect phone numbers. They wait until they have enough before trying anything.
At this stage, nothing feels wrong. No alerts. No strange messages. No money missing. Your life stays the same. That silence makes people think they are safe, but they are not.
Many stolen passwords come from small sites people forget about. Old forums. Shopping accounts. Games. Even sites where people only log in once in a while. Someone who likes to play roulette online might not think much about that account, but the password still matters. It is often the same one used elsewhere. That is the door hackers try next.
Why Hackers Test Your Password Everywhere
Once a password is taken, it gets tested on other sites. Email. Social media. Online stores. Work tools. This happens fast and quietly. If you reuse passwords, one breach becomes many.
Most people do reuse them. Not because they are careless, but because it is easier. Remembering many passwords is hard. Hackers know this, so they depend on it.
If your email password works, everything changes. Reset links can be used. Messages can be read. Other accounts fall one by one.
How the Damage Grows Without You Knowing
The worst part of a stolen password is time. The longer it goes unnoticed, the more damage can happen. Hackers do not rush. They move slow and careful. They look for patterns. They learn how you use your accounts. They wait for the right moment.
Sometimes they read emails only. Sometimes they change settings quietly. Sometimes they collect personal details. They build a picture of your life without you knowing.
You might only notice when something feels off. A strange login alert. A message you did not send. A purchase you did not make. By then, the breach has been active for days or weeks.
Why Silence Is the Biggest Danger
People expect trouble to be loud. But silence is what lets hackers stay hidden. No warning means no reaction. And no reaction means more access.
This is why breaches grow big. People think nothing happened because nothing looks broken. But behind the screen, things are moving.
Even accounts that seem unimportant can help. A small account can show your email. Your habits. Your name. That is enough to connect the dots.
How Daily Habits Make Breaches Worse
Most breaches are not caused by smart hackers. They are helped by normal habits. Using the same password everywhere. Staying logged in on shared devices. Clicking links when tired. Using public Wi Fi without thinking. These things feel harmless, but they make stealing easy.
People trust their phones too much. They forget that phones can be lost. Shared. Or hacked. When a device holds saved passwords, one mistake can open many doors.
Another problem is delay. Many people wait too long to change passwords. They hope the problem goes away. It never does.
What To Do When You Think Something Is Wrong
If you think your password has been stolen, start with your email. Change that first. Then change the rest. Log out of all sessions. Check account activity. Watch your inbox closely for strange messages.
Do not wait. Waiting gives more time to the person who took it. After that, use different passwords for different accounts. It feels annoying at first, but it saves stress later. Even one extra step can block a lot of damage.
Here, I will show you helpful tips for navigating legal business challenges…
Knowing how to control legal risks well can mean the difference between success and failure. Whether your company is new or well-established, knowing legal tactics well and out helps shield it from certain dangers.
Protecting your company’s interests requires following these crucial guidelines, which range from keeping up with regulatory developments to putting strong contracts in place and giving data privacy top priority.
Gaining a firm grasp of these principles will enable you to overcome legal obstacles with courage and determination.
Remain Up to Date
Stay informed by routinely reviewing industry news and pertinent legal updates for your line of business. Participating in legal experts’ webinars, seminars, or workshops can offer insightful information on how regulations are changing over time.
Sign up for newsletters or legal journals that provide in-depth reporting on alterations to the legal scene. Being vigilant about your knowledge will help you foresee future legal problems and take preventative action to safeguard your company’s interests.
By taking a proactive stance, you may minimize operational disruptions and maintain regulatory compliance while being well-equipped to handle legal difficulties as they emerge.
Invest in Legal Advice
A knowledgeable company lawyer with experience in your sector can offer customized counsel and advice.
You can make sure your legal counsel understands your business objectives and can assist you in making decisions that adhere to the law by building a solid working relationship with them.
Prior to making important business decisions, you can evaluate possible risks and investigate ways to mitigate them by consulting with legal specialists. This proactive approach improves your ability to operate within regulatory frameworks and protects your company from legal hazards.
A competent legal counsel can provide strategic recommendations safeguarding your rights and encouraging sustained success in your company ventures.
To safeguard your company’s interests and reduce legal risks, you must have clear and comprehensive contracts.
It is essential to work with a qualified legal expert who can guarantee precision and clarity in outlining rights, duties, and obligations while creating or evaluating contracts.
Well-written contracts, which explicitly state the terms that all parties agree to uphold, help avoid misunderstandings and disagreements. The inclusion of explicit provisions for dispute settlement methods further strengthens the efficiency of the contract in effectively resolving problems.
Companies can build a strong legal base that facilitates seamless operations by devoting time and resources to crafting strong contracts.
Give Privacy and Data Protection Top Priority
Respecting data protection regulations guarantees that personal and company data is handled appropriately. These rules may include the CCPA or GDPR, depending on where you live.
Strong cybersecurity measures, like encrypted networks and encryption, can help stop data breaches and illegal access. Employee education on data privacy is crucial, as is conducting frequent audits to make sure internal rules and regulatory standards are being followed.
Businesses may mitigate the dangers connected with data breaches and maintain their credibility as reliable entities in the market by placing a high priority on data protection and privacy.
Effectively Handle Conflicts
Creating explicit internal policies and processes for resolving conflicts inside your company is essential to preserving business continuity.
To settle disputes quickly and affordably while minimizing the demand on time and resources, take into consideration other dispute resolution procedures like mediation or arbitration.
Maintaining comprehensive documentation of correspondence and exchanges can bolster your stance in court, guaranteeing openness and responsibility.
In more complicated matters, consulting with legal experts or using trusted expert witness services can yield insightful testimony that will support your position. Businesses can reduce disruptions by resolving disputes proactively.
Conclusion
You can reduce risks and guarantee compliance by keeping up with the latest legal developments, hiring reputable legal counsel, and putting in place unambiguous contracts.
Maintaining the reputation and operational sustainability of your organization also depends on giving data protection a top priority and handling conflicts skillfully.
Recall that taking a thoughtful and proactive approach to handling legal issues safeguards your interests and builds stakeholder confidence.
You will be able to confidently overcome legal difficulties and concentrate on building your company in a manner that is both ethical and compliant if you pay regular attention to these rules and follow them consistently.
In this Gold & Goblins guide, I will show you how to mine, merge Goblins, and build a powerful empire.
Gold & Goblins is a mobile game that combines idle mining mechanics with clever merge strategies, creating a fun and addictive experience. At its core, you manage a team of little goblins who dig for gold, clear obstacles, and unlock deeper mines. Unlike typical idle games, Gold & Goblins adds a merge mechanic, letting players combine lower-level goblins to form stronger, faster workers.
The appeal lies in its balance of casual gameplay and strategic planning. You can log in for a few minutes or dive deep for hours, watching your goblins grow in power and efficiency. The colorful graphics, quirky goblin personalities, and satisfying mining animations make progress feel rewarding. This combination of idle mechanics, merging, and visual feedback keeps players coming back, as every session offers the chance to see tangible growth in your mining empire.
Understanding the Core Gameplay Mechanics in Gold & Goblins
Gold & Goblins relies on a simple yet engaging gameplay loop. Your goblins mine gold from rocks and ore deposits, generating resources needed to upgrade your workforce and expand your operation. Gold is the main currency, used to buy more goblins, enhance mining tools, and unlock deeper mine levels.
The merge mechanic is central to progression. Two Level 1 goblins can be combined into a Level 2 goblin, which mines faster and carries more gold. Repeating this process creates a hierarchy of increasingly powerful goblins. Players must balance buying new goblins with merging existing ones strategically.
Resource management is another key component. Mines are finite, and deeper levels introduce more challenging obstacles. Efficient planning, timely merges, and strategic upgrades keep your mining empire growing steadily, making Gold & Goblins both approachable for casual players and rewarding for those seeking mastery.
How to Mine Gold Faster and Clear Rocks Efficiently
Mining efficiency is essential in Gold & Goblins. The faster your goblins mine, the quicker you can gather gold and progress. Start by prioritizing upgrades for mining speed and tool efficiency. Faster picks and hammers reduce the time required to break rocks, allowing your goblins to collect more gold in less time.
Clearing rocks in strategic order matters, too. Focus on clusters of high-yield rocks and areas that unlock additional space for more goblins. Some rocks block access to gold-rich zones, so targeting these first can maximize long-term rewards.
Additionally, power-ups and boosts can temporarily increase mining speed or gold collection. Use them wisely, saving them for deeper mine levels or high-reward sections. With careful planning and upgrades, you’ll see a steady increase in your gold income, which fuels faster merging and expansion in Gold & Goblins.
Merging Goblins: Best Practices for Stronger Workers
Merging goblins is the heart of Gold & Goblins’ strategy. Higher-level goblins are exponentially more efficient than multiple low-level goblins. Start by merging lower-level goblins rather than continuously purchasing new ones, as this strengthens your mining workforce faster.
Timing merges is crucial. Wait until you have a few goblins of the same level before merging to optimize space and gold usage. Also, balance merges across your mine, ensuring each area has enough high-level goblins to maintain mining efficiency.
Some events or missions may reward extra goblins or special boosts. Save merges for these opportunities to quickly increase power without overspending gold. Mastering the merge system ensures that your goblins are always working at peak efficiency, accelerating growth and keeping your Gold & Goblins empire thriving.
Expanding Your Mine and Unlocking New Areas
Progression in Gold & Goblins is tied to expanding your mine. Each new area comes with more resources, higher-value rocks, and the space to deploy additional goblins. Expanding strategically is essential; don’t unlock new areas before you have enough strong goblins to mine efficiently.
Focus first on areas that provide the highest gold return or unlock critical upgrades. Use deeds or in-game currency carefully, prioritizing expansion paths that maximize output. Additionally, certain mines contain obstacles or special event resources. Planning expansion around these opportunities ensures your gold production continues to grow steadily.
Balancing expansion with goblin upgrades and merges is key. Overextending too quickly can stall progress. By pacing expansion, you maintain a strong, sustainable empire and make the most of your Gold & Goblins resources.
Advanced Strategies to Build a Powerful Empire in Gold & Goblins
Once you’ve mastered the basics, advanced strategies can accelerate empire growth. First, plan your offline mining. Gold & Goblins continues generating gold when you’re away, so position your highest-level goblins on high-yield rocks before logging out.
Prioritize upgrades that amplify mining speed and efficiency. Faster goblins and tools compound over time, giving massive returns in the long run. Use the forge and crafting features to boost goblin abilities, creating specialized miners for tough rocks or high-reward areas.
Participate in events to earn exclusive goblins or boosts. Efficiently completing event mines can give your empire a significant advantage. Lastly, balance spending across goblins, tools, and expansions to maintain steady growth. Combining these strategies ensures a powerful, resilient, and highly productive Gold & Goblins empire.
Conclusion
Gold & Goblins offers a unique blend of idle gameplay, strategic merging, and empire-building that keeps players engaged for hours. By understanding core mechanics, mining efficiently, merging goblins strategically, and expanding mines thoughtfully, players can grow a powerful mining empire.
The game’s charm comes not only from its strategic depth but also from its approachable design, colorful graphics, and goblin antics. Advanced tactics like offline planning, crafting, and event optimization further enhance progression. Whether you play casually or aim for mastery, Gold & Goblins rewards thoughtful planning and consistent management. With the right strategies, you can build a thriving empire that continually produces gold, supports stronger goblins, and unlocks new areas, making every session both fun and rewarding.


")


")