Home Blog Page 89

Tor Snowflake evolves to Proxy Extension for Chrome and Firefox Browsers

0

In the latest development, Tor Snowflake has evolved into a proxy extension for Chrome and Firefox browsers.

The Tor Project, a champion of online privacy and anonymity, has taken a significant step forward in the battle against censorship with the introduction of Tor Snowflake.

This innovative solution leverages proxy extensions for Chrome and Firefox browsers, empowering users in free countries to become bridges of connectivity for those residing in regions with restricted internet access.

READ ALSO: Tor+VPN Guide: How to Combine Tor Browser With VPN

Understanding Tor: The Foundation of Anonymity

Understanding Tor: The Foundation of Anonymity

Before diving into Tor Snowflake, it’s crucial to grasp the core functionality of the Tor network itself. Tor operates through a complex network of servers known as relays.

These relays work together to anonymize a user’s online activity by encrypting and bouncing internet traffic through multiple nodes before reaching its final destination.

This multi-layered encryption effectively masks a user’s location and browsing habits, safeguarding online privacy.

The Tor network comprises three critical server types:

  • Guard Servers: These act as entry points to the network, directing users’ traffic into the anonymous maze.
  • Relay Servers: These form the backbone of the Tor network, forwarding and bouncing traffic between entry and exit points, further anonymizing the user’s connection.
  • Exit Servers: These are the final stop on the Tor journey, where traffic exits the anonymized network and reconnects to the regular internet.

The Tor Project publishes the IP addresses of guard servers on its website, allowing Tor clients (primarily the Tor browser) to establish secure connections to the network.

However, some countries have caught on to Tor’s capabilities and implemented blocks to restrict access entirely.

Combating Censorship: The Rise of Tor Bridges

The Tor Project didn’t back down from the censorship challenge. They developed a Tor bridges solution – essentially, guard servers with deliberately unlisted IP addresses.

This cloak of secrecy makes it more challenging for governments to detect and block them, allowing users in censored regions to establish a connection to the Tor network.

READ ALSO: Dark Web 101: How To Access The Dark Web

Tor Snowflake: A Collaborative Bridge to Freedom

Tor Snowflake: A Collaborative Bridge to Freedom

Tor Snowflake leverages the concept of bridge relays and injects a collaborative element. Here’s how it works:

  • For Users in Free Countries: Individuals residing in regions with unrestricted internet access can install the Tor Snowflake extension for Chrome or Firefox. This extension transforms their browser into a proxy server, essentially acting as a bridge for users in censored countries.
  • For Users in Censored Countries: Individuals in regions with restricted internet access cannot directly download and install the Tor Snowflake extension. However, they can modify their Tor browser’s network settings to utilize the Tor Snowflake bridge functionality. This configuration allows them to connect to the Tor network through the proxy servers established by users in free countries who have installed the Snowflake extension.

Windows Compatibility: Expanding the Bridge Network

Initially, Tor Snowflake was only accessible to Tor browser users on Linux and later macOS versions. However, a recent update from the Tor Project in October 2019 has expanded its reach, integrating Snowflake bridge support into the Tor browser for Windows users.

This inclusion broadens the pool of potential bridge servers, strengthening the overall network and offering more comprehensive connectivity options for those seeking to circumvent censorship.

READ ALSO: Browser Compartmentalization: How To Compartmentalize Your Web Browsers

Tor Snowflake Chrome Extension: FAQs

What is the Snowflake Chrome extension?

The Snowflake Chrome extension is a tool developed by the Tor Project that allows users in countries with unrestricted internet access to help those residing in censored regions connect to the Tor network. It transforms your Chrome browser into a bridge, relaying traffic for users in censored countries who cannot directly access the Tor network.

Is the Snowflake Chrome extension safe?

It is generally considered safe for users in free countries installing the Snowflake extension. The extension itself does not anonymize your browsing activity. However, it’s essential to maintain good internet hygiene practices, such as using a reputable antivirus and keeping your browser software updated.

What is the difference between Tor and Snowflake?

  • Tor: The Tor network is a complex system of servers that anonymizes internet traffic by bouncing it through multiple relays. It requires dedicated software like the Tor browser to access.
  • Snowflake: Snowflake is a Chrome extension that leverages the existing Tor network by turning user browsers into bridge servers. It helps users in censored countries connect to the Tor network through bridges established by users in free countries with the Snowflake extension installed.

Does Tor use a proxy?

Technically, the Tor network itself doesn’t rely on traditional proxies. It utilizes a network of relays to anonymize traffic. However, the Snowflake extension is a bridge proxy, allowing users in censored countries to connect to the Tor network.

What is a Snowflake proxy?

In the context of Tor Snowflake, a Snowflake proxy refers to the functionality provided by the Chrome extension. When you install the Snowflake extension, your browser becomes a bridge server, an intermediary for users in censored countries to connect to the Tor network.

How to use Snowflake proxy?

Here’s a breakdown of how Snowflake is used:

  • For Users in Free Countries: Install the Snowflake extension for Chrome. This transforms your browser into a bridge server, aiding users in censored countries.
  • For Users in Censored Countries: You cannot install the Snowflake extension directly. However, you can modify your Tor browser settings to utilize the Snowflake bridge functionality. This allows you to connect to the Tor network through bridge servers established by users in free countries with the Snowflake extension.

Conclusion: A United Front Against Censorship

Tor Snowflake represents a significant step forward in the fight for online freedom. By fostering collaboration between users in free and censored countries, it creates a robust network of bridge servers, making it increasingly difficult for governments to control access to information.

This innovative tool empowers individuals to reclaim their right to browse the internet freely, fostering a more open and informed global community.

Note: This was initially published in October 2019 but has been updated for freshness and accuracy.


RELATED POSTS

How To Lock And Unlock Your Windows PC With A Pendrive (Like A Pro!)

Do you want to encrypt your Windows PC with a Pen drive or USB drive?

Ever wished you could add a touch of secret agent flair to your PC security? Imagine locking your computer simply by removing a pen drive and unlocking it with its swift insertion – just like a high-tech key.

Well, with the help of readily available software, you can turn this fantasy into reality! This guide explores two popular methods for locking and unlocking your Windows PC using a pen drive:

In this post, I will show you how to use your flash drive to lock and unlock your PC. This tutorial will guide you through the process.

READ ALSO: 5 Do’s and Don’ts For Using USB Flash Drives

How To Lock And Unlock Your PC With A Pen Drive

lock and unlock your pc

Method 1: Using Predator

Predator is a free and user-friendly software that transforms your pen drive into a physical security key. Here’s how to use it:

Download and Installation

  1. Head to the Source: Download Predator from a reputable source. A quick Google search for “Predator USB Lock software” should lead you to the developer’s website. Avoid downloading from untrusted sources to ensure software legitimacy and avoid potential malware.

  2. Installation Simplicity: Once downloaded, run the installation file. The installation process is typically straightforward – just follow the on-screen instructions. Predator will likely ask for administrative privileges during installation. Granting these permissions is necessary for the software to function correctly.

READ ALSO: What Programming Skills Do Pen Testers Need?

Setting Up Your Pen Drive Key

How To Lock And Unlock Your PC With A Pen Drive

  1. Launch Predator: Once installed, locate and launch the Predator program on your PC. The interface should be reasonably intuitive, even for non-technical users.

  2. Choose Your Guardian: Predator refers to your pen drive as the “Guardian Key.” Locate the option to “Create Guardian Key” or similar wording within the software’s interface.

  3. Insert and Select: With Predator running, insert your desired pen drive into a USB port on your computer. The software should automatically detect the pen drive. Select the detected pen drive from the options presented within Predator.

  4. Password Backup (Optional): While Predator relies on the physical presence of the pen drive for access, creating a backup password is a wise precaution. This password can be used if you lose your pen drive or encounter technical issues. Look for an option to “Set Backup Password” and choose a robust and unique password that you can remember easily.

  5. Activation: Once you’ve selected your pen drive and chosen a password (if desired), follow the on-screen prompts to activate your pen drive as the guardian key. This might involve a brief formatting process on the pen drive, so ensure it doesn’t contain any critical data.

Locking and Unlocking with Your Pen Drive

  1. Automatic Lock: With the Predator set up, your PC automatically locks whenever you remove the pen drive from the USB port. This is ideal for situations where you need to step away from your computer for a short while and want to ensure instant security.

  2. Unlocking with the Key: Simply insert the designated pen drive back into the USB port to unlock your PC. Predator will detect the pen drive and automatically unlock your computer, granting you access.

  3. Backup Password (if set): In case you lose your pen drive or encounter issues with automatic unlocking, you can use the backup password you created earlier. Look for Predator’s “Unlock with Password” option and enter your backup password to regain access.

READ ALSO: Is Windows Defender Enough for 2024?

Method 2: Using Rohos Logon Key

Rohos Logon Key offers a more feature-rich solution than Predator. Most importantly, it allows you to lock PC effortlessly. While it comes with a free trial, unlocking its full potential requires a paid license.

Here’s a breakdown of using Rohos Logon Key:

Download and Installation

  1. Official Source: Download the Rohos Logon Key from the official website (a quick web search for “Rohos Logon Key” should get you there). Downloading from the developer’s homepage ensures software authenticity and avoids potential security risks.

  2. Installation: Run the downloaded installation file and follow the on-screen instructions. The installation process might request administrative privileges necessary for the software to function correctly.

Using Rohos Logon Key

Setting Up Your Pen Drive Key

  1. Launch Rohos: Once installed, locate and launch the Rohos Logon Key program on your PC. The interface might be slightly more complex than Predator’s, but it still caters to user-friendliness.

  2. Wizard Guidance: Rohos will likely guide you through a setup wizard. Follow the on-screen instructions carefully.

  3. Choose Your Guardian: Similar to Predator, Rohos uses the term “USB Key” to refer to your pen drive. Look for the option to “Create USB Key” or similar wording within the wizard.

  4. Insert and Select: With Rohos running, insert your desired pen drive into a USB port on your computer. The software should automatically detect the pen drive. Select the detected pen drive from the options presented within Rohos.

  5. Password Options: Rohos offers more flexibility than Predator regarding passwords. You can choose to:

    • Enable Automatic Login with USB Key: This option functions similarly to Predator, where the PC unlocks automatically upon pen drive insertion.
    • Set a Login Password: In addition to the pen drive, you can create a traditional password for login redundancy. This allows you to access your PC even if you lose your pen drive, provided you remember the password.
    • Two-Factor Authentication (2FA): For enhanced security, Rohos allows you to enable two-factor authentication. This requires the pen drive and a unique code from your smartphone app to unlock the PC, offering an extra layer of protection.
  6. Encryption (Optional): Rohos offers the option to encrypt a hidden partition on your pen drive. This encrypted partition can be used to store sensitive data that is only accessible when you unlock your PC with the pen drive.
  7. Activation: Once you’ve chosen your pen drive, password options (if applicable), and any encryption settings (optional), follow the on-screen prompts to complete the setup process. This might involve a brief formatting process on the pen drive, so ensure it doesn’t contain any critical data.

READ ALSO: How To Download And Install CyberGhost VPN On Your PC [Windows & Mac]

Locking and Unlocking with Your Pen Drive

  1. Locking Options: Rohos offers more control over locking behaviour. You can choose to:

    • Automatic Lock on System Idle: The PC will lock automatically after a period of inactivity you defined.
    • Manual Lock via Hotkey: You can assign a keyboard shortcut to lock your PC manually whenever needed.
  2. Unlocking with the Key: Depending on your chosen settings:

    • Automatic Unlock: If you opt for automatic login with the pen drive, your PC will unlock automatically upon pen drive insertion.
    • Manual Unlock with Password: If you set a login password, you can unlock the PC by entering the password after inserting the pen drive.
    • Two-Factor Authentication: For enhanced security, you’ll need the pen drive and the unique code from your smartphone app to unlock the PC.

Essential Considerations Before You Begin

Essential Considerations Before You Begin

  • Data Backup: Always back up any critical data stored on the pen drive you plan to use, as it might be formatted during setup.
  • Losing the Key: While convenient, consider the implications of losing your pen drive. Ensure you have a backup password or recovery method (if applicable) to avoid getting locked out of your PC.
  • Software Choice: Predator offers a free and straightforward solution, while Rohos provides more features but requires a paid license for full functionality. Choose the option that best suits your needs and comfort level.
  • Technical Knowledge: While both methods are user-friendly, some basic computer knowledge might be helpful during setup, especially with Rohos Logon Key.

READ ALSO: How To Secure Your USB Flash Drive

Beyond the Pen Drive: Additional Security Measures

Locking your PC with a pen drive adds a layer of physical security. However, consider these additional measures for a comprehensive security posture:

  • Strong Passwords: Create strong and unique passwords for your Windows account and other online services.
  • Automatic Updates: Enable automatic updates for your Windows operating system and software to ensure you have the latest security patches.
  • Antivirus and Anti-malware Software: Install a reputable antivirus and anti-malware program to protect your PC from malicious software and online threats.
  • Two-Factor Authentication (2FA): Enable two-factor authentication wherever possible for added security beyond just passwords.

Conclusion

Locking your PC with a pen drive offers a convenient and unique way to enhance physical security.

By following the steps outlined above and considering the additional security measures, you can create a more robust defence against unauthorized access to your computer.

I want you to know that security is an ongoing process. Stay informed about evolving threats and maintain reasonable security practices to protect your digital life.

Were you able to unlock your Windows PC with a pen drive? Let us know by commenting below.

Note: This was initially published in October 2019 but has been updated for freshness and accuracy.


RELATED POSTS

How To Check Your IP Address [Quick Methods]

In this post, we will show how to check your IP address by using three quick and easy methods.

In today’s interconnected world, your IP address is your unique online identifier. It’s a numerical label assigned to your device whenever you connect to a network, allowing communication and data exchange.

Understanding your IP address and how to check it is crucial for various reasons, including troubleshooting network issues, accessing geo-restricted content, or simply being aware of your online footprint.

This comprehensive guide explores various methods for uncovering your IP address, catering to different devices and operating systems.

IP (Internet Protocol) Address is the unique set of numbers that links your computer with all your online activities.

It is like an address for return delivery. For example, without an IP address, you can’t have access to any website you may be trying to access.

What You Should Know About IP Address?

  • Your PC is connected to the internet whenever you go online for any activity—your request to access a site.
  • Your PC network is configured with a set of networking standards and rules called ‘Protocols.’ One of your PC’s protocols is the Internet protocol, which is responsible for attaching an IP address to your PC. Internet protocol also addresses, delivers, and channels your requests to the website and back to your PC.
  • Every request you send online is attached with your IP (return address) for a perfect delivery.
  • Your IP address changes each time you connect to a different network. The IP address is assigned to your PC by your network provider or the network you’re connected to at home, office, and other public places.
  • It can also be used to protect your online privacy. For instance, a VPN can provide you with a different IP address for anonymity.

READ ALSO: Dos And Don’ts Of Using A Public Wi-Fi [Ultimate Guide]

Understanding IP Addresses: A Primer

There are two main types of IP addresses:

  • IPv4 (Internet Protocol Version 4): The most common type, consisting of four sets of numbers separated by periods (e.g., 192.168.1.1). However, the pool of available IPv4 addresses is nearing exhaustion.
  • IPv6 (Internet Protocol Version 6): The next-generation IP address format, offering a significantly larger address space represented by eight groups of hexadecimal digits separated by colons (e.g., 2001:0db8:85a3:0000:0000:8a2e:0370:7334).

Throughout this guide, we’ll focus on uncovering IPv4 and IPv6 addresses depending on the method used.

How To Check Your IP Address On Windows 10 & 11

Method 1: Check your IP address Using Network Connections

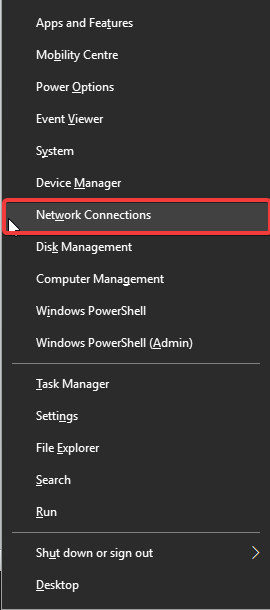
  • Press the Windows key + X and select ‘Network connections’ from the options displayed.check internet protocol
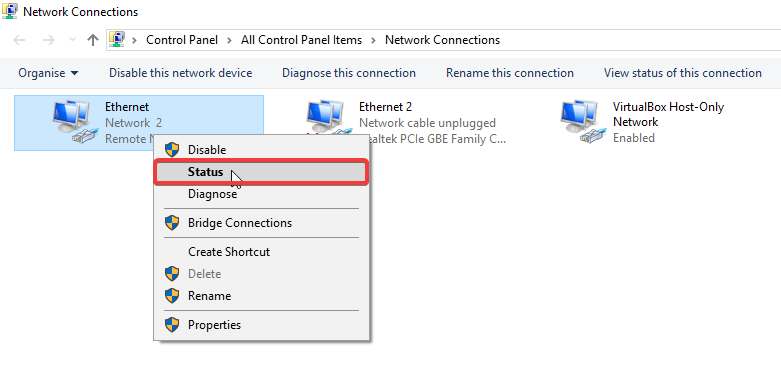
  • Select the network you’re connected to
  • Right-click and select status.ip address
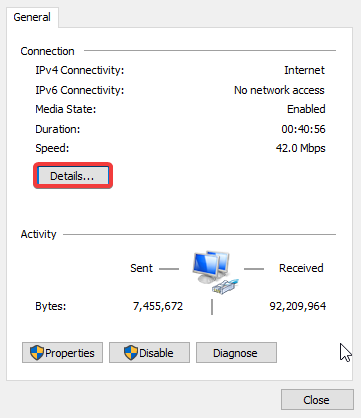
  • Click on ‘Details’check your ip address
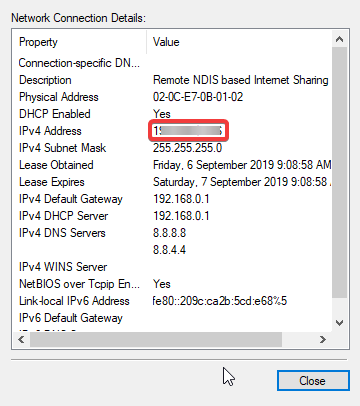
  • Details of your IP and address will be displayed.check internet protocol address

Method 2: Use the Command Prompt

  1. Open the Command Prompt by searching for “cmd” in the Start menu and pressing Enter.
  2. In the black command window, type ipconfig and press Enter.
  3. Locate the lines labeled “IPv4 Address” and “IPv6 Address” to find your respective IP addresses.

Method 3: Use the Taskbar Network Icon

  1. Right-click on the network icon on the taskbar in your screen’s bottom right corner.
  2. Select “Open Network & Internet settings.”
  3. Follow steps 3 and 4 from the “Settings App” method above.

READ ALSO: How To Run Command Prompt On Windows 11, 10, 8, 7, etc.

How To Check Your IP Address On A Mac

Here’s how to find your IP address on a Mac computer:

Method 1: Use System Preferences

  1. Click on the Apple icon in the top left corner of your screen and select “System Preferences.”
  2. Navigate to “Network.”
  3. Select the network connection you currently use (e.g., Wi-Fi or Ethernet) from the list on the left side.
  4. Click on the “Advanced” button.
  5. Under the “TCP/IP” tab, locate “IPv4 Address” and “IPv6 Address” to find your respective IP addresses.

Method 2: Use Terminal App:

  1. Open the Terminal app by searching for “Terminal” in Spotlight (press Command + Spacebar) and selecting it.
  2. In the Terminal window, type ifconfig and press Enter.
  3. Locate the lines labelled “inet addr” (for IPv4) and “inet6” (for IPv6) to find your respective IP addresses.

How To Check Your IP Address on a Smartphone or Tablet (Android & iOS)

Here’s how to find your IP address on your mobile device:

Android

The method for checking your IP address on Android devices can vary slightly depending on the specific device model and operating system version. Here’s a general guideline:

  1. Open the Settings app on your Android device.
  2. Navigate to “Network & internet” or “Wi-Fi” settings.
  3. Tap on the network you’re currently connected to (e.g., Wi-Fi network name).
  4. Look for options like “Advanced settings,” “Network details,” or similar wording.
  5. Your IP address (both IPv4 and IPv6, if available) should be displayed within these settings.

iOS

  1. Open the Settings app on your iPhone or iPad.
  2. Tap on “Wi-Fi.”
  3. Click on the information icon (i) next to the Wi-Fi network you’re connected to.
  4. Scroll down to find “IP Address” listed to view your IPv4 address. Unfortunately, iOS settings don’t natively display the IPv6 address. However, you can leverage a third-party app like “Network Analyzer” or a web-based tool to uncover your device’s IPv6 address.

READ ALSO: What Is Automated IP Address Management?

How To Check Your IP Address on Gaming Consoles and Smart TVs

Gaming consoles and smart TVs often connect to the internet, and you might need to know their IP addresses for network configuration or troubleshooting purposes. Here’s a general approach, but consult your device’s specific user manual for detailed instructions:

  • Gaming Consoles (PlayStation, Xbox): Navigate to the network settings section on your console. The location might vary depending on the model, but it’s typically found under “Settings” or “Network.” Look for options displaying “Connection Status,” “IP Address,” or similar wording within the network settings.

  • Smart TVs: Similar to consoles, access the network settings on your smart TV. This option is usually found under “Settings” or “Network.” Locate menus displaying “Network Information,” “IP Address,” or similar terms to find your device’s IP address.

How To Check Your IP Address Using Online Tools

There are a lot of sites where you can check your IP address. These websites work by accessing your device’s connection and identifying the IP address assigned by your internet service provider (ISP).

These websites not only show you your IP address, but they also show you other information like:

  • Hostname
  • ASN
  • ISP
  • Organization
  • Type
  • Continent
  • Country
  • State/region
  • City
  • Latitude
  • Longitude

Here are some popular online tools for checking your IP address:

  • WhatIsMyIP.com
  • IPify.org
  • MyIP.io

While convenient, remember that these websites only reveal your public IP address. This address identifies your entire network and not necessarily your specific device on the network.

Alternatively, you can type “what is my IP address” on Google from your web browser to get an accurate result.

READ ALSO: Best DNS, IP, and WebRTC Leaks Test Sites

Bottom Line

By understanding these methods and the different types of IP addresses, you’ll be well-equipped to check your IP address whenever necessary.

This knowledge can empower you to troubleshoot network issues, manage your online presence, or better understand how your device interacts with the vast internet landscape.

Note: This was initially published in September 2019 but has been updated for freshness and accuracy.


RELATED POSTS

15 Tips To Create A Strong HackProof Password

Today, we will show you some hackproof tips to create a strong password.

Passwords are needed to create accounts to access various online services such as email, communication, e-commerce, e-markets, academic content, online banking, etc.

In this digital age, passwords are needed to protect our accounts from unauthorized access, data theft, and other internet fraud.

Besides, several internet users have fallen victim to password hacking, which has caused them to lose significant amounts of money and other online valuables.

Tips To Create Strong Hackproof Password

To protect yourself from falling victim to password attack, here are some simple tips and tricks to keep your account safe from password theft or hacking.

1. Don’t use personal information for password

Private information like birthdays, pets, and family members’ names, addresses, workplace names, etc., should not be used as passwords or included in your password. This is because Hackers can ascertain this information efficiently from your social media information.

Also, if you have to fill in a security question and answer when creating an account, use security questions and answers that are not obvious to people.

2. Your password should contain uppercase and lowercase letters, numbers, and special characters or symbols

password managerPasswords with mixed cases, numbers, and special characters are hard to guess. When creating passwords, you can substitute the alphabet ‘S’ for five and toggle the last alphabet to upper case if your password is lower case.

Add other special symbols in the middle and end of your password to make it secure and easy to remember. Make your passwords at least eight characters long, and do not use passwords or phrases from favourite movies or videos.

READ ALSO: Best 10 Safety Tips for Online Shopping

3. Use non-sense phrases for passwords

Non-sense phrases containing special characters as passwords are hard for password hackers to crack. You can code a statement or phrase into a passphrase. For, John walks to school every day for thirty minutes, can code for Jw2sef=30. This makes it easy to remember.

Do not use the first, middle, or last row of letters on your keyboard as password. Also, avoid using slang, dictionary words, and names for passwords.

4. Keep your password a secret

Your password should be known only to yourself. Do not reveal your password to friends, colleagues at school or work, family members, technicians, etc.

Protect your password from prying eyes if you must log in to an account in public places. Also, do not tape your password to your computer or desk in your office.

Files containing password lists or hints should be given random unsuspecting names and hidden deep within sub-folders in other locations, not necessarily in documents or desktops.

5. Change passwords regularly

passwordsChanging passwords regularly is good for protecting sensitive accounts related to money or financial services online.

Changing passwords at least once every two months is recommended.

A note of warning: do not re-use changed passwords.

6. Do not use one password for several accounts

If you have several accounts online, remembering the correct password for each account can be pretty challenging. To solve this problem, you can use one password but with variations for each account. For example, some can have a number or symbol in the middle, or 0 can replace the letter ‘o” in some.

READ ALSO: Exclusive Tips to Stop Cyberbullying [For Teens and Parents]

7. Use a Password manager

Password managers automatically generate and store passwords in an encrypted location that can be accessed only with a master password.

Suggested password manager include 1password, LastPass, and KeePass.

8. Two-factor authentication (2FA)

Consider enabling 2FA whenever available. This adds an extra layer of security by requiring a second verification step, such as a code from your phone and your password when logging into an account.

This significantly reduces the risk of unauthorized access even if your password is compromised.

9. Phishing Awareness

Be cautious of phishing attempts. Phishing emails or websites can appear legitimate, trying to trick you into revealing your login credentials or clicking on malicious links.

Avoid entering your IP address or other sensitive information on websites you don’t trust.

10. Public Wi-Fi with Caution

Public Wi-Fi networks can be insecure. Avoid accessing sensitive accounts or transferring confidential information while connected to public Wi-Fi.

If you must use public Wi-Fi, consider using a VPN to encrypt your internet traffic for added security.

11. Beware of Social Engineering

Social engineering tactics involve manipulating users into divulging personal information or clicking on malicious links.

Be wary of unsolicited calls, emails, or messages requesting your IP address or other sensitive details. Legitimate companies typically won’t ask for your IP address through such methods.

12. Unique Passwords for Each Account

While managing multiple passwords can be challenging, resist the temptation to re-use the same password for different accounts.

A data breach on one website could compromise all your accounts if you use the same login credentials.

Consider using a password manager to help you generate and store strong, unique passwords for all your online services.

READ ALSO: How To Stay Safe Online During Black Friday LIKE A PRO!

13. Regular Password Updates

Develop a habit of updating your passwords periodically, especially for critical accounts like email and online banking.

Aim to change passwords every few months or whenever you suspect a security breach.

14. Beware of Spyware and Malware

Spyware or malware can lurk on your device, potentially capturing your keystrokes or other sensitive information, including your IP address.

Ensure you have installed reputable antivirus and anti-malware software and keep it up-to-date to protect your device from such threats.

15. IP Logging and Privacy

Be aware that some websites and services might log your IP address for various purposes, such as analytics or tracking your location.

Please review the privacy policies of websites you visit to understand how they handle your IP address and other data.

A Final Word

By following these tips and incorporating a healthy dose of caution, you can construct passwords that are formidable fortresses against cyberattacks.

Remember, a strong password is the first defence in safeguarding your online identity and valuable information.

What do you think about this? Let us know by dropping a comment below.


RELATED POSTS

SANS to host a Momentous Cybersecurity Training Event in the Gulf Region

0

Calling all cybersecurity professionals in the Gulf Region! The SANS Institute, a recognized leader in cybersecurity training and certifications, is hosting its biggest ever regional event in Dubai this November.

Two Weeks of Intensive Training (November 16th – 28th, 2019)

From November 16th to 28th, 2019, SANS will offer a comprehensive two-week program designed to equip security professionals with the critical skills they need to combat today’s cyber threats.

Ten intensive information security training courses will be delivered by SANS’ highly qualified and experienced instructors.

READ ALSO: Is Windows Defender Enough for 20240?

Addressing the Growing Need for Cybersecurity Expertise

The Gulf Region has witnessed a rapid rise in digitalization in recent years. Unfortunately, this progress has also made it a prime target for cybercriminals and nation-state hacktivists due to its strategic and geopolitical importance.

Empowering Regional Security Teams

The SANS Gulf Region event directly addresses this critical need. The program is designed to equip security experts across the GCC with the in-depth technical knowledge and practical skills necessary to stay ahead of cyber threats and protect regional organizations.

Course Highlights:

  • Comprehensive Curriculum: The course offerings will cover a wide range of essential security topics, including incident response, digital forensics, threat hunting, reverse engineering, hacker and network tools, forensics, and purple, red, and blue team skills.
  • Hands-on Learning: Participants will benefit from extensive hands-on lab time utilizing real-world malware samples and pre-built virtual machines, providing practical experience in investigating and analyzing cyber threats.
  • DFIR NetWars Tournaments: A unique feature of the event is the inclusion of two free DFIR NetWars tournaments. These tournaments, offered with any 4-6 day course registration, simulate real-world security incidents and help organizations identify areas where their response teams may need additional training.

READ ALSO: Video: How To Secure Your Digital Devices

Expert Instructors Leading the Way

The SANS faculty boasts renowned instructors with extensive real-world experience. Here are some featured courses and instructors:

  • SANS FOR610: Reverse-Engineering Malware: Malware Analysis Tools and Techniques (Taught by Jess Garcia): This course is specifically designed for incident responders, security engineers, and forensic investigators, providing them with the necessary skills to analyze and dissect malicious programs targeting Windows systems.

  • SEC599: Defeating Advanced Adversaries; Kill Chain Defenses and Purple Team Tactics (Taught by Erik van Buggenhout and Michel Coene): In today’s complex threat landscape, purely preventative security measures are no longer sufficient. This course equips participants with the skills to implement a holistic “kill chain” defense strategy, combining detection, response, and proactive measures to counter sophisticated cyberattacks.

  • SEC504: Hacker Tools, Incident Handling, Techniques, and Exploits (Taught by Chris Dale): Participants in this course will gain a fundamental understanding of attacker methods, tools, and exploit techniques used in real-world security breaches. This knowledge is critical for developing effective incident response strategies and staying ahead of evolving threats.

READ ALSO: SecureBlitz Ranked One of the Top Cyber Security Blogs in the World

Investing in the Future of Cybersecurity

SANS is committed to fostering a culture of self-reliance and advanced cybersecurity expertise within the GCC region.

By providing state-of-the-art training and industry-recognized GIAC certifications, SANS empowers individuals and organizations to protect themselves from cyberattacks and safeguard valuable assets.

Don’t miss this opportunity to gain the critical skills and knowledge needed to excel in today’s ever-evolving cybersecurity landscape. Register for the SANS Gulf Region event in Dubai this November!

Note: This was initially published in October, 2019 but has been updated for freshness and accuracy.


RELATED POSTS

AOMEI Partition Assistant Software Review – Benefits and Features

0

Do you need free partition manager software to solve your partition problems? AOMEI Partition Assistant offers the best services for partitioning-related activities.

Managing your computer’s storage space efficiently is crucial in today’s digital age. AOMEI Partition Assistant emerges as a popular contender in the disk management software market, offering a user-friendly interface and comprehensive features for novice and experienced users.

This AOMEI Partition Assistant review delves into the key functionalities, pros and cons, and various editions of AOMEI Partition Assistant to help you decide if it fits your data management needs correctly.

What is AOMEI Partition Assistant?

As its name suggests, Partition Assistant is a software used for partition management. These include creating, merging, parting, resizing, and deleting tasks.

The tech firm behind this tool is named AOMEI Technology. They are known for making tools that are often used to solve technical problems.

Various IT organizations recognize the usefulness of this free partition manager software by AOMEI. The tool simply resizes and clones disk without limitation.

It is utilized to migrate a complete system to a solid-state drive. The interface appears very friendly and easy to use.

Benefits Of AOMEI Partition Assistant

AOMEI Partition Assistant offers a variety of benefits that make it an attractive choice for managing your computer’s disk space and partitions:

  • Intuitive Interface: The program boasts a clean and user-friendly interface, making it accessible to users of all technical backgrounds. Clear icons and straightforward menus guide you through the various functionalities.
  • Detailed Explanations: Each feature comes with helpful explanations, eliminating confusion about what each function does.
  • Contextual Help: Readily available context-sensitive help menus provide additional guidance when needed.
  • Beyond Basic Management: AOMEI Partition Assistant goes beyond the limited functionalities built-in Windows disk management tools offer.
  • Wide Range of Features: It provides a robust toolkit for managing your hard drives and partitions effectively, including creating, deleting, resizing, merging, and formatting partitions.
  • Advanced Options: Paid editions unlock advanced features like partition alignment for SSD optimization, secure data erasure for privacy protection, and command-line support for automation.
  • Cost-Effective Option: The free edition offers a surprising amount of functionality, making it a valuable option for home users who need basic disk management capabilities.
  • Essential Tools Included: You can create, delete, format, resize, and merge partitions, addressing everyday disk management needs.
  • Scheduling for Automation: Even the free edition allows you to schedule specific tasks to run automatically, streamlining maintenance routines.
  • Data Security Focus: AOMEI Partition Assistant prioritizes data security during disk operations. Features like “Safe Mode” minimize the risk of data loss during partitioning tasks.
  • Rollback Option: A “Rollback” feature allows you to revert to a previous state if any unexpected issues arise during the process, offering an additional layer of protection.
  • Disk Cloning and OS Migration: Paid editions enable you to create an exact copy of a source disk for easy system migration to a new drive or transfer your operating system to a new hard drive or SSD.
  • Multilingual Support: The software caters to a global audience by offering support for multiple languages.
  • Scheduling and Automation: Schedule tasks like backups or disk optimization processes to ensure a streamlined approach to disk management.

Overall, AOMEI Partition Assistant offers a user-friendly and feature-rich solution for managing your computer’s disk space and partitions. The free version provides a solid foundation for basic needs, while paid editions cater to power users and IT professionals with advanced functionalities and centralized management capabilities.

First Impressions – User Interface and Ease of Use

AOMEI Partition Assistant immediately impresses with its clean and intuitive interface. The main menu displays clear icons for all core functionalities, such as creating partitions, resizing partitions, cloning disks, and migrating operating systems. Even for non-technical users, navigating through the various options feels effortless.

The software provides detailed explanations for each feature, eliminating confusion about what each function does. Contextual help menus are readily available within the interface, offering additional guidance.

Core Functionality: A Rich Toolkit for Disk Management

AOMEI Partition Assistant goes beyond built-in Windows tools’ basic disk management capabilities.

It provides a comprehensive set of features to manage your hard drives and partitions effectively:

  • Partition Management: This core functionality allows you to create, delete, format, resize, and merge partitions. Whether you need to carve out dedicated partitions for different operating systems or simply want to optimize your storage space, AOMEI Partition Assistant offers a user-friendly way to achieve your desired layout.
  • Disk Cloning: This feature creates a replica of a source disk onto a destination disk. This helps migrate your entire system to a new hard drive, creating a bootable backup of your system drive or upgrading to a larger storage capacity.
  • OS Migration: AOMEI Partition Assistant allows you to migrate your operating system, applications, and personal data to a new hard drive or SSD. This can be particularly beneficial when upgrading your storage hardware or transferring your system to a new computer.
  • MBR to GPT Conversion and Vice Versa: This feature enables you to convert between two standard disk partitioning schemes, Master Boot Record (MBR) and GUID Partition Table (GPT). Depending on your system configuration and desired outcomes, this conversion can be necessary for specific functionalities.
  • Data Recovery: AOMEI Partition Assistant offers an essential data recovery module to help retrieve accidentally deleted files or lost partitions. While not a substitute for dedicated data recovery software, it can be a handy tool for recovering lost data in specific scenarios.

Advanced Features for Power Users (Paid Editions)

The free version of AOMEI Partition Assistant provides a solid foundation for basic disk management tasks. However, the paid editions unlock advanced features catering to more demanding users:

  • Partition Alignment: This feature optimizes the alignment of partitions on your SSDs for improved performance and lifespan.
  • Wipe Partition: This tool allows you to securely erase data from a partition, permanently removing your sensitive information before repurposing the drive.
  • Command Line Support: Advanced users can leverage the command-line interface for scripting and automating disk management tasks.
  • Dynamic Disk Management: The Professional and Technician editions offer support for managing dynamic disks, a disk configuration used in specific server environments.

Scheduling and Automation for Effortless Maintenance

AOMEI Partition Assistant allows you to schedule specific tasks to run automatically. This is particularly useful for creating regular backups of your system partitions or automating disk optimization processes.

The software provides options for setting specific times and frequencies for scheduled tasks, ensuring your disk management routine is streamlined.

Security and Reliability

AOMEI Partition Assistant prioritizes data security during disk management operations. The software implements a “Safe Mode” environment to minimize the risk of data loss during partitioning tasks.

Additionally, features like “Rollback” allow you to revert to a previous state if unexpected issues arise.

Free vs. Paid Editions: Choosing the Right Fit

AOMEI Partition Assistant offers a free version with a surprising amount of functionality. This makes it a valuable option for home users who need basic disk management capabilities like creating, resizing, and formatting partitions.

Here’s a breakdown of the available editions:

Free Edition

  • Ideal for basic disk management tasks
  • Create, delete, format, resize, and merge partitions
  • Supports basic data recovery
  • Includes scheduling for automated tasks

Paid Editions (Standard, Professional, and Technician)

  • Unlock advanced features like partition alignment, secure erase, and command-line support.
  • Professional and Technician editions offer features like OS migration to dissimilar hardware and dynamic disk management.
  • The Technician edition caters to IT professionals with centralized management for partitions on multiple PCs.

AOMEI Partition Assistant Review: Pricing Plans

AOMEI Partition Assistant offers a tiered pricing structure with a free version and several paid editions catering to different user needs. Here’s a quick breakdown of the costs:

Free Edition

This free version offers basic disk management features like creating, deleting, formatting, resizing, and merging partitions. It also includes scheduling for automated tasks and a basic data recovery module.

Paid Editions

There are three main paid editions, each building upon the features of the previous one:

Standard Edition: Costs around $39.95 (one-time purchase for a single PC). This edition unlocks features missing in the free version, such as:

  • Incremental and differential backups for efficient storage usage
  • Image verification to ensure backups can be restored successfully
  • Partition alignment for optimizing SSD performance
  • Secure erase for permanently removing sensitive data

Professional Edition: Costs around $49.95 (one-time purchase for a single PC), or yearly subscription options might be available. This edition includes all the features of the Standard Edition, plus:

  • Disk cloning for migrating your data to a new hard drive or creating a bootable backup
  • OS migration to dissimilar hardware, allowing you to move your system to a computer with different hardware

Technician Edition: Costs around $499.00 (one-time purchase), or yearly subscription options might be available. This edition is designed for IT professionals and includes all the features of the Professional Edition, plus:

  • Centralized backup management for managing backups on multiple PCs from a single console
  • Command-line support for automating backup tasks

Note: Pricing is subject to change.

AOMEI Partition Assistant Review: Pros and Cons

Pros

  • User-Friendly Interface: The clean and intuitive interface makes AOMEI Partition Assistant accessible to users of all technical backgrounds.
  • Comprehensive Feature Set: The software offers many features, from essential partition management to advanced disk cloning and OS migration.
  • Free Version: The free edition provides a solid foundation for basic disk management tasks, making it a valuable option for casual users.
  • Scheduling and Automation: The ability to schedule tasks ensures a streamlined approach to disk management.
  • Data Security Features: AOMEI Partition Assistant prioritizes data security with features like Safe Mode and rollback options.
  • Multilingual Support: The software supports multiple languages, making it accessible to a global audience.

Cons

  • Limited Data Recovery: The data recovery module included in the free version is essential and may not be effective for complex data loss scenarios.
  • Advanced Features Require Paid Upgrades: Some essential features, like secure erase and partition alignment for SSDs, are only available in paid editions.
  • Limited Support for RAID Configurations: AOMEI Partition Assistant offers limited functionality for managing RAID configurations commonly used in server environments.

Who Should Consider AOMEI Partition Assistant?

AOMEI Partition Assistant is a versatile tool suitable for a wide range of users:

  • Home Users: The free edition caters to home users who must manage basic disk tasks like creating, resizing, and formatting partitions.
  • Power Users: The paid editions cater to power users who require advanced features like partition alignment, secure erase, and command-line support for automating disk management tasks.
  • IT Professionals: The Technician edition offers centralized management for managing partitions on multiple PCs, making it a valuable tool for IT professionals.

Best AOMEI Partition Assistant Alternatives

While AOMEI Partition Assistant is a compelling option, alternative disk management software solutions are available. Here are two notable competitors:

  • EaseUS Partition Master: This software offers a feature set similar to AOMEI Partition Assistant, with a user-friendly interface. It also boasts a free version with basic functionalities and paid editions with advanced features.
  • MiniTool Partition Wizard: Another popular option, MiniTool Partition Wizard, provides a free edition with essential features and paid editions with advanced functionalities like data recovery and dynamic disk management.

The Final Verdict: A Reliable Option for Disk Management

AOMEI Partition Assistant stands out with its user-friendly interface, comprehensive feature set, and a free version that caters to basic needs. The software prioritizes data security and offers scheduling capabilities for a streamlined approach to disk management.

While advanced features require paid upgrades, the overall value proposition makes AOMEI Partition Assistant a strong contender in the disk management software market.

Ultimately, the choice depends on your specific needs and budget. If you’re a home user looking for essential disk management tools, the free edition of AOMEI Partition Assistant is an excellent choice.

The paid editions offer a compelling value proposition for power users or IT professionals requiring advanced features and centralized management. Carefully consider your needs and explore alternative options before making your decision.

Download AOMEI Partition Assistant from the official website.

Note: This was initially published in September 2019 but has been updated for freshness and accuracy.


INTERESTING POSTS

VPN Tomato Review: Is VPN Tomato Safe? [+Best Alternatives]

0

A question came under our spotlight – is VPN Tomato safe? Read this VPN Tomato review post as I answer that question.

There are potential risks of exposing yourself online without using a VPN service to ensure your cybersecurity. However, it is worse when you use a shady VPN service that slows your internet connection, interrupts you with ads, keeps and uses logs, and exposes your device to cyberattacks.

VPN Tomato by IronMeta Studio is a VPN known for its free service. However, it is essential to see if it is safe for use, its cost, features, pros, and cons. In this article, we will give you a complete VPN Tomato review.

Is VPN Tomato Safe?

Yes, VPN Tomato appears safe, but I won’t recommend it. Besides, it doesn’t have a clear no-logs policy or use military-grade encryption technology. Furthermore, unlike other premium VPN services, it allows third-party ads and its servers are limited. 

However, it has a kill switch and uses OpenVPN servers with UDP and TCP protocols. It protects users when surfing the net, playing games online, or using public Wi-Fi hotspots.

Is VPN Tomato Safe

How Much Does VPN Tomato Cost?

VPN Tomato has a 100% free VPN with over 10,000 servers in over 30 countries. However, its website doesn’t state it, but VPN Tomato has a VIP subscription plan that is billed monthly and yearly. 

This is only realized after the app has been downloaded and installed. The VIP plan offers faster speed, worldwide locations, and no ads. The monthly plan costs $9.99, while the yearly plan costs $29.99 annually.

READ ALSO: Best VPN For 2023: Top Picks Reviewed by Our VPN Experts

Best VPN Tomato Alternatives

1. VPN Tomato vs PureVPN 

This is the number one among the best VPN Tomato alternatives. PureVPN protects 10 devices simultaneously, includes a no-logs policy, and other essential features that a VPN is meant to have. It doesn’t allow ads and costs $2.11 monthly for a 24-month Plan.

PureVPN
PureVPN
PureVPN is one of the best VPN service providers with presence across 150 countries in the world. An industry VPN leader...Show More
PureVPN is one of the best VPN service providers with presence across 150 countries in the world. An industry VPN leader with more than 6,500 optimized VPN servers. Show Less

Get PureVPN

2. VPN Tomato vs Surfshark VPN

Surfshark is not free, but it costs $2.29 monthly for a 24-month subscription. Unlike VPN Tomato, it doesn’t keep logs and protects unlimited devices simultaneously.

Surfshark
Surfshark
Surfshark is an award-winning VPN service for keeping your digital life secure. Surfshark VPN has servers located in...Show More
Surfshark is an award-winning VPN service for keeping your digital life secure. Surfshark VPN has servers located in more than 60 countries worldwide. Show Less

Get Surfshark VPN

3. VPN Tomato vs NordVPN 

NordVPN costs $3.09 monthly for a 2-year Plan and includes unique features that ensure users’ online privacy and security. It also includes a no-logs policy. 

NordVPN
NordVPN
The best VPN service for total safety and freedom.
The best VPN service for total safety and freedom. Show Less

Get NordVPN 

VPN Tomato Features

VPN Tomato alternatives

Free and Easy to Use

The VPN Tomato app is free-to-download and easy to use, and users can connect to the VPN with just one click. 

Anonymous Browsing and Privacy Protection

VPN Tomato hides users’ IP addresses and keeps them completely anonymous when browsing. 

Unblock Content

Users can easily bypass firewalls and access geo-restricted articles, services, and websites like YouTube, Snapchat, Twitch, Free Fire, Amazon, Twitter, Facebook, etc.

Available for Mobile Devices

VPN Tomato is available only for Android and iOS. It protects users’ phones and tablets and ensures their privacy. 

Ping Booster

VPN Tomato bypasses restricted online games and reduces game lags, high latency, and freezes. When connected to the servers, users can lower their ping in games. 

Wi-Fi Security

This VPN shields its users from the risks of public Wi-Fi connections like malware attacks. They can connect to any public Wi-Fi hotspot confidently and with no worries at all.

VPN Tomato Pros and Cons

VPN Tomato Pros and Cons

Pros 

  • It is easy to use.
  • Has a kill switch.
  • It has an auto-reconnect option.
  • Hides users’ IP addresses and allows anonymous connections.
  • Uses OpenVPN servers with UDP and TCP protocols.
  • Has a redirect IPv6 traffic option.

Cons

  • The free version has limited servers and allows ads.
  • Slow internet connection.
  • It keeps logs and personal information. 
  • Doesn’t use military-grade encryption technology.
  • It doesn’t allow P2P or torrenting.
  • Doesn’t unblock all major geo-restricted websites.
  • Protects only one device.

How To Get Started With VPN Tomato

  • Visit the VPN Tomato website and select either the Google Play or App Store icon to download the VPN. 
  • You can also visit the Google Play or App Store on your Android or IOS device and search for ‘VPN Tomato’ in the search bar. 
  • Click on Install and wait for the installation process to complete. 
  • Locate the app on your device and open it.

READ ALSO: How to Use a VPN to Protect Your Online Privacy

How To Delete VPN Tomato Account

How To Delete VPN Tomato Account

To delete VPN Tomato on an IOS device, 

  • Touch and hold the app, then tap Remove App. 
  • Next, tap on Delete App 
  • Confirm by selecting Delete.

On Android, 

  • Go to Settings and select Network & Internet or More Connections (depending on the type of Android device you are using).  
  • Click on VPN and then select the setting icon before VPN Tomato. 
  • Tap on Forget VPN and then click on Forget to confirm. 

Is VPN Tomato Worth It?

No, VPN Tomato is not worth it. In fact, I would prefer to use a premium VPN service like Ivacy, which costs about $1 per month for its 5-year plan, instead of using the free VPN Tomato service… 

Nevertheless, VPN Tomato is easy to use, prevents lags and high ping when gaming, and allows you to connect safely to public Wi-Fi. However, its cons are as much as its pros. 

It doesn’t allow P2P or torrenting, collects logs and personal information, and puts users at risk of malware attacks as it will enable many third-party ads.

Wrapping Up The VPN Tomato Review

In this VPN Tomato review, I answered the question –  Is VPN Tomato safe? As you should know, VPN Tomato, like other free VPNs, doesn’t provide quality security and privacy for its users. It might be free, but not safe. Besides, its usage is at the user’s risk. 

To boost your security and privacy, get better, trustworthy, and widely respected VPN Tomato alternatives like IPVanish VPN, NordVPN, Ivacy, and PureVPN.


RELATED POSTS

Irish Regulators Open Privacy Probe into Google Activities

0

Irish data protection regulators have opened a privacy probe into Google. This is a new one from the EU regulatory body, amid growing concerns about privacy infractions by Google, which has been accused of exploiting users’ private information for advertising purposes.

In a move with significant implications for Big Tech and data privacy, Ireland’s Data Protection Commission (DPC) has opened an official investigation into Google’s data collection practices.

Due to the company’s European headquarters in Dublin, the DPC, the lead regulator for Google in the European Union, will scrutinize how Google uses personal information for advertising purposes.

This probe comes amidst growing concerns over the vast amount of data collected by tech giants and how it’s utilized.

Privacy advocates have long raised alarms about the potential for misuse and the lack of transparency surrounding data collection practices.

The DPC’s investigation signals a potential turning point, holding Google accountable for its data practices and potentially setting a precedent for stricter regulations across the EU.

Irish Regulators Open Privacy Probe into Google Activities

Will this investigation affect me as a Google user?

The immediate impact on users is likely to be minimal. However, the outcome of the investigation could have long-term implications. If the DPC finds Google in violation of GDPR regulations, it could force Google to change how it collects and uses user data. This could potentially lead to increased transparency for users about data collection practices and potentially give them more control over their information.

Is this just about Google, or are other tech companies also at risk?

The Irish probe into Google is a significant development, but it’s not an isolated incident. Regulators around the world are increasingly scrutinizing data collection practices by Big Tech companies. This investigation sets a precedent and could prompt similar investigations into other tech giants that rely heavily on user data for advertising revenue. The outcome of the DPC’s investigation could pave the way for stricter data privacy regulations across the globe.

The Irish Data Protection Commission’s probe into Google’s data collection practices marks a turning point in the ongoing conversation about data privacy. This investigation holds significant implications for Big Tech companies and empowers users to take a more proactive approach in safeguarding their personal information. As the investigation unfolds, it will be crucial to monitor its outcome and the potential impact it has on the future of data privacy regulations and user control over their personal information.

Unveiling the Allegations: What’s Under Scrutiny?

The exact details of the probe haven’t been publicly disclosed, but reports suggest the DPC will be examining Google’s:

  • Data Collection Methods: Investigators will likely investigate how Google gathers user data across various platforms, including search engines, mobile apps, and online services like YouTube.
  • Data Sharing Practices: A key area of focus will be how Google shares user data with third parties, particularly for advertising purposes.
  • Transparency and Consent: The DPC will likely scrutinize whether Google adequately informs users about how their data is collected, used, and shared and whether users can easily opt out of data collection.

Why Ireland? The Seat of European Scrutiny

The European Union’s General Data Protection Regulation (GDPR) established a framework for data privacy and granted significant enforcement powers to national data protection authorities.

Since Google’s European headquarters are in Ireland, the DPC oversees the company’s data practices across the entire EU.

This unique position makes the Irish regulator a central figure in holding Big Tech accountable for data privacy violations.

Potential Outcomes: What Could Happen Next?

The DPC’s investigation could lead to a range of outcomes, including:

  • Changes to Google’s Data Practices: If the DPC finds Google violating GDPR, the company could be forced to modify how it collects, uses, and shares user data.
  • Fines: The GDPR empowers regulators to impose significant fines on companies found to be in breach of data protection laws. The potential for hefty penalties could act as a strong deterrent for non-compliance.
  • Setting a Precedent: The outcome of the DPC’s investigation could set a significant precedent for data privacy regulations across the EU and beyond. Other regulators might follow suit and launch similar investigations into Big Tech companies.

Why Ireland? The Seat of European Scrutiny

The Wider Impact: Beyond Google

The Irish probe into Google’s data practices is just one piece of a giant puzzle. This investigation serves as a wake-up call for all Big Tech companies that rely on user data for advertising revenue.

Regulators worldwide are increasingly scrutinizing data collection practices, and stricter regulations are likely on the horizon.

The outcome of the DPC’s investigation could have a domino effect, with other regulators taking a more proactive approach to enforcing data privacy laws.

This could lead to a significant shift in how tech companies operate, requiring them to be more transparent and accountable in their data collection practices.

The User’s Perspective: A Call for Empowerment

The Irish probe highlights the importance of data privacy for users. This investigation serves as a reminder that individuals have a right to control their personal information.

Users should know how their data is collected and used and can opt out.

The potential outcomes of the DPC’s investigation could empower users by:

  • Increased Transparency: Companies might be forced to be more transparent about data collection practices, allowing users to make informed choices.
  • Enhanced Control: Users might be given more control over their data, potentially including the ability to easily download, delete, or restrict the sharing of their personal information.

The Road Ahead: A Balancing Act

The tension between data privacy and innovation is a complex issue. Data is undoubtedly a valuable resource for businesses, allowing them to personalize services and deliver targeted advertising. However, this value proposition should not come at the expense of user privacy.

The DPC’s investigation into Google serves as a starting point for a crucial conversation. Striking a balance between fostering innovation and ensuring user privacy is paramount.

The outcome of this investigation, and the potential for stricter regulations, could shape the future of data collection practices and empower users to take greater control of their personal information.

Note: This was originally published on Aug 24, 2019, but has been updated for freshness and accuracy.


RELATED POSTS

Kaspersky Security Flaw Exposes Millions to Hacks

0

A security flaw in Kaspersky Antivirus software has been discovered that could expose millions of users to hacks. The flaw was discovered by German security researcher Ronald Eikenberg, who found that Kaspersky was injecting JavaScript code into websites.

If exploited by malicious actors, this code could act as a digital spy, tracking users’ browsing activity and potentially stealing their personal information.

Eikenberg’s research suggests the issue may have been present for a significant period, potentially since 2016. This raises concerns that millions of unsuspecting users might have been exposed. The potential consequences are dire.

Cybercriminals could leverage this vulnerability to track a user’s online movements and steal sensitive data like passwords. In a worst-case scenario, they could even install malware on compromised machines, giving them complete control over the system.

Kaspersky Labs has acknowledged the issue and released a patch in their latest software update. However, this doesn’t eliminate the risk.

Users who haven’t updated their software remain vulnerable. Kaspersky users must update their software immediately to benefit from the security fix and mitigate the risk of being targeted by malicious actors.

READ ALSO: The Best Antivirus Software

How To Protect Yourself

How To Protect Yourself

If you use Kaspersky Antivirus software, you should update to the latest version as soon as possible. You can also turn off the JavaScript feature in Kaspersky’s settings.

In addition, you should be careful about what websites you visit and what information you enter on those websites.

What to do if you have been affected

If you think that you may have been affected by the Kaspersky security flaw, you should change your passwords and monitor your accounts for any suspicious activity.

You should also contact your bank or credit card company to let them know about the potential breach.

This is a serious security issue, and it is important to take steps to protect yourself. By following the advice in this article, you can help to keep your personal information safe.

READ ALSO: Best VPN For 2023

What is JavaScript?

JavaScript is a programming language that is used to add interactivity to websites. It can track users’ browsing activity, steal personal information, or install computer malware.

How did the flaw work?

Kaspersky Security Flaw Exposes Millions to Hacks

The flaw in Kaspersky software allowed the company to inject JavaScript code into websites. This code could track users’ browsing activity and steal their personal information.

READ ALSO: Best Antivirus Deals For Christmas 2023

How many people were affected?

Millions of people were estimated to be affected by the Kaspersky security flaw.

What did Kaspersky do to fix the flaw?

Kaspersky Labs acknowledged the flaw and said it has been fixed in the latest software version. However, users still using older software versions are still at risk.

How can people protect themselves?

People using Kaspersky Antivirus software should update to the latest version immediately. They can also turn off the JavaScript feature in Kaspersky’s settings. In addition, they should be careful about what websites they visit and what information they enter on those websites.

READ ALSO: Best Antivirus For 2023

Here are some additional tips to help you protect yourself from cyber attacks:

  • Use strong passwords and change them regularly.
  • Be careful about what information you share online.
  • Only download software from trusted sources.
  • Keep your operating system and software up to date.
  • Use a firewall and antivirus software.

Following these tips can help keep your personal information safe from cyber-attacks.

READ ALSO: Full Review of Kaspersky Antivirus

Kaspersky Antivirus FAQs: Security Concerns and Alternatives

Kaspersky Antivirus FAQs: Security Concerns and Alternatives

Kaspersky Antivirus has long been a popular choice for computer security, but recent controversies have raised questions about its functionality and trustworthiness. Here are answers to some frequently asked questions:

Does Kaspersky protect against hackers?

Kaspersky Antivirus can still offer protection against some hacking attempts. It can detect and block malware, viruses, and phishing scams. However, the recent security flaw discovered by a researcher raises concerns about its effectiveness against certain types of attacks.

What is the controversy with Kaspersky Internet Security?

The controversy surrounds a security flaw discovered in Kaspersky software that allowed for injecting JavaScript code into websites. Hackers could potentially exploit this code to track user activity and steal personal information. Additionally, Kaspersky’s ties to Russia have raised concerns among some users, particularly in light of the ongoing geopolitical situation.

READ ALSO: 8 Best Antivirus with VPN

Can Kaspersky be trusted?

Your trust level in Kaspersky depends on your individual risk assessment and comfort level. The company claims the security flaw has been fixed, but some users may be wary due to the potential for past exposure and its Russian origins.

What do I replace Kaspersky with?

Several reputable antivirus alternatives are available, each with its strengths and weaknesses. Here are a few options to consider:

  • Surfshark Antivirus: Offers excellent malware protection and a user-friendly interface.
  • Norton 360: Provides comprehensive security features, including antivirus, anti-phishing, and identity theft protection.
  • AVG Free Antivirus: An excellent free option that offers essential malware protection.
  • ESET NOD32 Antivirus: Known for its lightweight design and effective malware detection.

Important Note: Before switching to a new antivirus solution, it’s crucial to uninstall Kaspersky first to avoid potential conflicts between the two programs.

Ultimately, whether to continue using Kaspersky or switch to another antivirus provider is a personal decision. Carefully weigh the potential risks and benefits based on your needs and comfort level.

Conclusion

The Kaspersky security flaw is a severe security issue that could have exposed millions of users to hacks. It is essential to protect yourself from this flaw and other cyber attacks.

Following the advice in this post can help keep your personal information safe.

Note: This was originally published on Aug 24, 2019, but has been updated for freshness and accuracy.


RELATED POSTS