In this post, I will talk about the secure cloud storage for photographers featuring smart RAW file compression technology.
Digital technology has made photographers produce huge quantities of data every day, particularly when they shoot in RAW formats, which preserve the best quality of images. The management, storage, and safeguarding these huge documents poses a number of challenges. The traditional storage options often do not provide security and efficacy.
The solution is RAW photo cloud storage solutions featuring innovative compressing RAW photo files technology. This technology provides photographers with safe, flexible and efficient storage solutions which transform how work is stored and accessible.
This article focuses on the value of safe cloud storage specifically designed specifically for photographers. It highlights the advantages of intelligent compression of RAW files, and outlines the most important features to be looking for in the latest cloud storage options.
No matter if you’re an experienced photographer or a casual enthusiast, knowing these techniques could help protect your photography while reducing costs and improving the workflow.
Table of Contents
Your Hard Drive Will Fail: Why Photographers Need Cloud Storage Built for RAW Files
RAW files are digital negatives from photography, comprising raw data straight from the camera’s sensor. They provide unmatched flexibility when editing however they come with huge files, often tens to hundreds of megabytes in each photo. The result is storage issues:
The volume of high-resolution shots are able to create hundreds of RAW images, rapidly consuming the local storage space.
The ability to access their images at any time, any time, and anywhere. They often work on multiple devices and in different locations.
Security: Raw images are an intellectual asset that is valuable and should be secured from destruction, theft or unauthorised access.
Backups: Having reliable backups is vital to avoid loss catastrophic because of hardware failure, as well as accidental deletion.
RAW photo cloud storage solutions meet these requirements by providing flexible, secure and easily accessible storage solutions specially designed to manage massive, high-quality image files.
The Challenge of Compressing RAW Images Files
Converting RAW images without losing quality can be a difficult task. In contrast to JPEGs RAW documents contain an abundance of information unprocessed that editing software utilizes to adjust. Standard compression methods could degrade these files, restricting the flexibility of post-processing and the quality of images.
The technology of smart compression that works with RAW images employs advanced algorithmic techniques to decrease file sizes and preserve the essential details needed to create high-quality editing. Methods like lossless or near-lossless compression preserve the image’s authenticity, allowing photographers to work with smaller images but without compromise to output.
This technology is essential for cloud storage because it lowers bandwidth use, speeds up upload and download time, and reduces costs for storage while keeping RAW editing benefits in place.
Key Features of Secure Cloud Storage for Photographers
If choosing a cloud storage option that includes compressing RAW images files, photographers must take into consideration the following attributes:
End-to-End Encryption
Security is of paramount importance. Cloud storage solutions that offer the best security protect files both during transfer and in rest. End-to-end encryption makes sure only those who have been authorized have access to the photos, while safeguarding them against hackers and data theft.
Lossless Compression Algorithms
Find storage companies which employ Lossless and near-lossless compression for RAW files. This preserves the original quality, and also ensures that flexibility in editing remains.
Scalable Storage Options
Photographers require storage that can grow in line with their portfolios. Flexible plans that permit quick upgrades mean you will never be short of storage space in important tasks.
Fast Upload and Download Speeds
Effective compression can reduce the size of files for faster transfer speeds. Cloud-based services must also be equipped with solid infrastructure as well as several data centers in order to reduce the amount of latency.
seamless integration with Editing Software
Integration with the most popular editing software such as Adobe Lightroom, Capture One as well as others make it easy to organize and edit images directly from the cloud.
Automated Backup and Versioning
Backups automatically and file versions ensure against accidental deletions or undesirable changes. Users are able to quickly restore versions from earlier versions.
User-Friendly Interface and Mobile Access
Clean, easy-to-use interface for users and mobile app support improve accessibility and allow photographers to manage their work, share, and preview images on the move.
Benefits of Smart RAW File Compression in Cloud Storage
The adoption of smart RAW compression technologies for files in cloud storage options has several advantages.
Cost Efficiency
Through reducing the size of files compression reduces storage demands and the bandwidth consumed. It results in lower costs for monthly services and speedier file transfers. This saves photographers cash over the long run.
Improved Workflow
smaller file sizes means faster uploads and downloads. This speeds up editing. Photographers will take less time waiting around and spend more time designing.
Enhanced Collaboration
In the RAW photo cloud storage solutions, the compressed files may be quickly shared with editors, clients as well as collaborators with no loss of quality.
Scalability and Flexibility
Compressing RAW photo files lets you store more pictures within the same storage space and allows photographers to store large portfolios with no need for frequent updates.
Reliable Data Protection
In conjunction with strong encryption features and backup options, compression of RAW data ensures that your valuable work is protected against theft and loss.
Leading Cloud Storage Providers Offering RAW File Compression
A number of cloud storage providers have adopted RAW images cloud storage solutions that utilize advanced compression technology. Below are a few noteworthy options:
1. Imagen AI Cloud Storage
Imagen AI offers a cloud storage service specifically created specifically for photographers. Its own algorithms for compression can reduce RAW size significantly, and preserve the quality of editing. Integrating AI-powered culling as well as editing tools make Imagen an all-encompassing system to manage workflows for photography.
2. Google Drive with Third-Party Compression Tools
Even though Google Drive itself doesn’t compress RAW files, several third-party AI software tools work with Drive to enhance RAW images prior to upload. This approach is beneficial to users who require cloud storage that is scalable and compression.
3. Adobe Creative Cloud
Adobe’s cloud storage is integrated perfectly to Lightroom along with Photoshop. Recently, Adobe has enhanced its storage features with smart compression which optimize RAW documents for cloud storage as well as syncing between different devices.
4. Dropbox Professional Edition with AI Compression plugins
Dropbox’s Professional tier allows the integration of AI compression tools specifically designed specifically for photographers. These plugins can compress RAW files from the client’s side, providing speedier syncing as well as lower storage cost.
5. SmugMug and Zenfolio
Platforms that focus on photography such as SmugMug or Zenfolio provide cloud storage that has integrated compression features and security. These platforms offer portfolio management and storage as well, perfect for photographers who are professional.
How to Choose the Right RAW Photo Cloud Storage
In deciding which storage system to choose take into consideration your particular demands:
The size of your portfolio: Pick an scalable size of storage that is appropriate for your future and current images.
Editing Workflow: Select tools that integrate with the editing software you use.
Budget: Balance costs with options like backup, compression as well as security.
Accessibility: Mobile access as well as collaboration tools can be essential dependent on the workflow you are using.
Security: Select providers with secure encryption that is robust and in compliance with privacy regulations.
Best Practices for Using AI Compression in Cloud Storage
For maximum benefits of compressing RAW photo files technology:
Keep the original RAW documents backed-up in a separate secure place before you rely on compressed versions.
Take a close look at compressed images to make sure the quality is in line with the professional standard before you remove the originals.
Modify AI compression settings according to your camera’s model and editing settings to get the most effective results.
Always keep up-to-date Your AI software and cloud storage software so that you get the most up-to-date enhancements and security options.
Combining cloud storage along with local backups to form an effective data security strategy protecting your photographic assets.
Check compression settings using an individual batch of images prior to applying them to your entire library, to ensure the desired quality.
Make use of metadata preservation options in compression to save vital information on images to allow it to be used in future editing and organizing.
Review storage usage and alter compression levels if necessary to maintain the quality of images and cloud storage efficiently.
Conclusion
Photography professionals, securing the large RAW files effectively while maintaining access and security is crucial. RAW photo cloud storage solutions that incorporate sophisticated compressing RAW photo files technology can be a game changer.
They can reduce costs for storage, increase upload speeds and downloads, as well as integrate seamlessly into workflows for editing. This technology lets photographers concentrate less on managing files instead of focusing on creative as well as client service.
Selecting the best cloud storage service with AI compression features ensures the security of your photos as well as being accessible and optimized for editing professionals.
In this post, I will talk about why top retailers switch to fully integrated product review management systems now.
The top retailers are in a disjointed technology environment today. They employ different tools to collect reviews, display their results, and analyze feedback. A tool is used to send review requests after purchase. A different tool displays stars for each product on product pages. The third platform is designed to analyse trends and sentiment. The disconnected systems result in data silos that hide valuable insight.
Teams spend hours switching data imports and exports across platforms. The data they collect is not consistent because feedback is stored in various places. Customer service is not able to discern what reviews say regarding product issues. Marketing is unable to access review information to conduct campaigns efficiently. The fragmentation of content costs time, money and competitive advantage. Retailers who are top of the line recognize this issue and take action.
An integrated e-commerce feedback platform connects reviews with marketing, inventory, as well as assistance tools. Teams can access all customer intelligence without manual work. They detect trends in thousands of feedback sources immediately.
They react to problems before issues get worse. A unified approach turns reviews of standalone components into an integrated business intelligence engine. Leading retailers have begun to move forward because their competitors are already taking advantage of these advantages each day.
Table of Contents
From Chaos to Control: Why Top Retailers Switch to Integrated Review Management
1. Unified Platforms Eliminate Manual Data Transfer Work
The transfer of data between tools that are not connected takes up thousands of hours each year. Marketing exports look over quotes to help with email campaign design. Support is manually searching for any feedback on customer tickets. Product teams require spreadsheets of the data they review weekly. Manual work is of no worth while using.
What is the significance of automation for team productivity? Every hour of processing data eats up time for strategic work.
Teams could use their analytical skills rather than exporting the results. Teams could develop campaigns rather than taking content and copying it. A product review management system eliminates this waste entirely.
2. Fragmented Tools Create Data Silos That Hide Insights
Retailers who use multi-tool review systems suffer from disconnecting data on a regular basis. The tool for collecting feedback stores it in a single database. The tool for display pulls data directly from an additional source.
The analytics platform needs manual exports in order to function. Customer service can’t read reviews to determine if there are product defects. Marketing is not able to get access to customer quotes for campaign creation quickly. Product teams aren’t aware of feedback patterns that drive improvements.
How does this imbalance affect the business’s performance? The data that is isolated tells a story inconsistency each time. Teams look at fragments of customer sentiment but never full view. They base their decisions only on a small portion of information. The competitors with integrated systems see patterns first, and react more quickly. Leading retailers cut down silos with full integration of platforms now.
3. Real-Time Visibility Requires Connected Systems
Problems with customers are spreading quicker than ever on social media. An unfavorable experience could cause damage to brand reputation quickly. Ineffective tools stop visibility until it’s too to be too late. Support receives information about the problem within days of reviews being published. Teams from the product team discover problems when the returns have already risen.
What is the reason real-time visibility protects brand reputation? The speed of the problem determines whether it will get worse or be resolved. Intervention at an early stage can prevent negative word-of-mouth from spreading.
Platforms that are connected notify all departments in real-time regarding emerging issues. The integrated e-commerce feedback platform ensures every team is not working in isolation. Retailers with the best reputations spot issues when they first begin to appear, not as they get worse.
4. Customer Service Needs Review Context Immediately
Support staff can resolve issues better after they have reviewed the history of reviews. Customers who complain about the size could have mentioned the issue in reviews. Someone else reporting issues may have shared photos from weeks earlier. The tools that are fragmented hide this information to agents in complete silence. They can resolve issues without regard to the valuable history of customers.
What is the reason why review context improves customer satisfaction? Agents with knowledge can solve issues faster and more effectively. They seek out feedback from previous customers without ever asking the customer.
They address issues that have been documented well. It is a personalized service that builds loyalty and decreases the likelihood of frustration. The unification of platforms allows you to review context directly inside support tools. This is done automatically.
5. Product Development Needs Feedback Patterns
Product teams refine their products by analyzing what their customers have to say. However, fragmented feedback conceals patterns in disconnected information. Size complaints are reported in reviews as quality issues fill support tickets. Teams are unable to connect the dots without having a unified system.
Why do patterns drive better product decisions? Unreliable feedback causes the wrong prioritization often. Teams correct sizing, and quality issues get worse, but they are not noticed. They do not see the connections that can reveal root causes.
An integrated e-commerce feedback platform combines the various feedback sources in the same view. Teams of product managers can view complete images before making decisions about what improvements to make.
6. Marketing Gains Authentic Content For Campaigns
Customer reviews are marketing’s most convincing material. The genuine words of buyers far surpass professional copy every time. However, fragmented tools bury this content in a place where marketing professionals cannot locate it. Teams look manually to find quotable reviews, which takes hours every week. The team members miss the perfect testimonials that are hidden within outdated exports.
Review access is a key factor in improving the performance of marketing? authentic content drives higher engagement and higher conversion emails that contain customer quotes see higher open rates.
Advertisements that include testimonials have a lower cost per acquisition. A product review management system surfaces instantly for use in marketing. It tags any content that is quotable, and instantly makes it available.
7. Inventory Management Benefits From Review Intelligence
The reviews reveal the products that clients love and those they will return. High return rates appear in feedback prior to inventory decisions. The praise for specific features indicates the items to be stocking up on. The tools that are fragmented hide this information from planners of inventory completely.
How can inventory management teams be sure to keep track of review information? Reviews forecast demand shifts before sales data confirms these. Positive reviews drive future purchases, which is worth stocking up on for.
Feedback that is negative indicates issues and requires hold on inventory. Platforms that are connected to the internet alert the planners to check trends on a regular basis. The top retailers match inventory to customer preferences continuously.
8. SEO Performance Depends On Fresh Review Content
Search engines prefer websites that provide new, original content that is updated regularly. Reviews from customers provide this type of content for free. The tools that display reviews in fragments make it difficult for search engines to be able to access reviews. Feedback is buried in places where crawlers can’t find it easily.
How important is visibility of reviews in organic traffic? Google shows star ratings on sites that have review markup. The rich snippets are more likely to be clicked on search result pages. Review content that is fresh keeps product pages updated continuously.
The product review management system optimizes review display for search visibility. Each testimonial is guaranteed to contribute towards organic growth consistently.
9. Customer Acquisition Costs Drop With Social Proof
Reviews are a form of Mian Fei social proof that converts skeptical customers. The products with the most reviews always get greater conversion rates. The fragmented nature of the collection limits the amount of reviews that companies can capture. Uncoherent processes can leave feedback to be left on the table for years.
How does review volume impact acquisition costs? Each review eases the process for customers who will be purchasing from you in the future. A higher level of proof is a sign of less questions and lower levels of hesitation.
More conversion rates mean the same traffic results in more profit. The unification of platforms can increase review collection through automated workflows. Leading retailers develop review libraries that lower customer acquisition costs constantly.
Conclusion
Leading retailers make the switch for integrated systems for ten reasons. The fragmented tools can produce data silos that hide insights. Platforms that are unification eliminate any manual work. In real-time, visibility gives a quick response to issues. Customer service can better resolve issues through review context. Marketing gets authentic content for higher engagement.
Product development identifies patterns across feedback sources. Management of inventory is aligned with preference. SEO enhances with fresh review content. The cost of acquiring customers decreases due to social proof. Competitive pressure demands immediate action.
It all boils to a single truth. The fragmentation of systems can lead to inefficiencies that cost millions of dollars. Integrated platforms give visibility to better choices. Each department is connected to the identical customer intelligence.
This is the reason why top retailers invest in a product review management system and use the integrated e-commerce feedback platform. The retailers who make the switch today are able to better serve their customers forever.
In this post, I will answer the question – is it safe to apply for a loan on public Wi-Fi?
Public Wi-Fi is convenient, but it is not designed for secure financial transactions. When someone applies for a loan, they submit identity details, income data, and banking information. Transmitting that data over an unsecured network increases exposure to interception, fraud, and identity theft.
Table of Contents
Public Wi-Fi and Loan Applications: What Is at Risk
Using public Wi-Fi for financial transactions carries a measurable security risk. The Federal Trade Commission outlines common vulnerabilities in its public Wi-Fi safety guidance, explaining how unsecured networks may allow third parties to intercept transmitted data.
A standard online loan application typically requires:
full legal name
residential address
date of birth
Social Security number or national ID
employment and income details
banking information for funding and repayment
This information is valuable because it allows criminals to build a complete identity profile. With it, attackers can attempt identity theft, account takeover, unauthorized withdrawals, or fraudulent credit applications.
The risk is not theoretical. Public networks often lack strong encryption and user isolation. That means other users on the same network may technically observe or interfere with traffic under certain conditions.
How Hackers Exploit Public Networks During Financial Transactions
Cybercriminals target public Wi-Fi because many users assume convenience equals safety.
Man-in-the-Middle Attacks
A man-in-the-middle (MITM) attack occurs when an attacker secretly intercepts communication between your device and a website.
Instead of your data traveling directly to the lender’s server, it passes through the attacker’s system. They may read, record, or even modify transmitted information. If encryption is weak or improperly implemented, sensitive fields such as login credentials or form data can be exposed.
Packet Sniffing
Packet sniffing involves capturing data packets moving across a network.
On unsecured public Wi-Fi, attackers can use monitoring tools to view unencrypted traffic. If a website does not enforce HTTPS properly, transmitted data may appear in readable form.
Encryption transforms information into encoded text. Without it, financial data may travel across the network in plain format.
Fake Hotspots and “Evil Twins”
Some attackers create fraudulent Wi-Fi networks that mimic legitimate ones. For example, instead of “Airport_Free_WiFi,” the fake network may be labeled “Airport-FreeWiFi” or “Airport_WiFi_Guest.”
Users connect without verifying authenticity. Their traffic then routes through the attacker’s system.
Red flags of a fake hotspot and safe checks:
slight spelling differences in network names
duplicate network names appearing simultaneously
no password requirement for a normally secured network
unexpected browser certificate warnings
forced redirects before accessing normal websites
unusually slow or unstable connection after login
automatic reconnection without user approval
captive portal pages that look poorly formatted
Always confirm the official network name with staff and disable automatic network joining on your device.
What Can Go Wrong If Your Data Is Exposed
When financial data is intercepted, последствия не всегда происходят сразу. Часто мошенничество развивается поэтапно.
Personal Data Leakage
If attackers gain access to identity and contact details submitted during a loan application, they may attempt identity theft. Even partial data sets — such as name, address, and date of birth — can be combined with other breached databases.
Credential Theft and Session Hijacking
If login credentials are captured, criminals may access the applicant’s account directly. In some cases, attackers hijack an active browser session without needing the password again.
This is especially risky if:
passwords are reused across platforms;
the user remains logged into email accounts;
multi-factor authentication is not enabled.
Follow-On Fraud
Data captured once may be used later.
Scenario example: A user applies for a loan using café Wi-Fi. An attacker intercepts login credentials or redirects the user to a cloned website. Weeks later, the borrower receives a realistic email referencing their application. The link leads to a fake portal, where additional financial information is entered. Unauthorized withdrawals or fraudulent applications follow.
Fraud often occurs in stages rather than immediately.
Why HTTPS Helps, but Does Not Remove All Risk
HTTPS encrypts data in transit between your browser and the website server. The padlock icon indicates that the connection is encrypted.
However, HTTPS has limits.
It protects data during transmission, but does not prevent:
connecting to a fraudulent website that also uses HTTPS;
malware on your own device;
phishing domains that resemble legitimate lenders;
saved credentials auto-filling on compromised networks.
Typing the lender’s domain manually into the browser reduces the risk of redirection. Avoid clicking financial links from unsolicited emails while connected to public networks.
Behaviors that increase exposure during loan applications:
automatic connection to public networks;
saving passwords in shared browsers;
ignoring certificate warnings;
submitting forms without checking HTTPS;
applying via shortened URLs;
remaining logged into multiple financial platforms simultaneously;
using shared or public computers.
Encryption reduces risk but does not eliminate it.
Safer Ways to Apply When You Need a Loan
The safest option is to avoid public Wi-Fi entirely for financial transactions.
Safer alternatives include:
using cellular data;
creating a personal mobile hotspot;
applying from a secured home network;
using a reputable VPN if public Wi-Fi is unavoidable;
disabling file sharing and auto-join features;
enabling multi-factor authentication;
using a password manager with unique credentials.
Before submitting your loan application:
confirm HTTPS and correct domain spelling;
close unrelated browser tabs;
log out of other financial accounts;
disable auto-fill if using a shared device;
turn off Bluetooth and sharing settings;
verify the lender’s official contact page;
review privacy disclosures;
disconnect from public Wi-Fi after submission.
These steps significantly reduce exposure.
What Secure Lending Platforms Recommend
Security experts warn that public networks can expose sensitive information during financial transactions. Experts from 300loan.com note that borrowers should avoid submitting personal or banking details over unsecured Wi-Fi and ensure the lending website uses HTTPS encryption and clear privacy disclosures.
This recommendation reflects a broader security principle: convenience should never override data protection when entering financial information. Transparent platforms typically explain how data is encrypted, stored, and protected before a borrower submits any application.
What to Verify on a Lending Site Before Entering Any Data
Before entering personal or banking details, verify several security indicators directly on the website:
HTTPS lock icon in the browser bar
correct domain spelling with no unusual characters
visible and detailed privacy policy
clear explanation of how personal data is used
secure login features such as multi-factor authentication
official contact and support page
transparent terms and repayment disclosures
automatic session timeout or logout instructions
Legitimate platforms prioritize clarity around both financial terms and cybersecurity protections.
If You Already Applied on Public Wi-Fi: Quick Damage Control
If you realize after submitting an application that you used public Wi-Fi, immediate action can reduce risk.
Start with access control:
change your email password first
update passwords for financial accounts
enable multi-factor authentication everywhere possible
Then monitor activity:
review recent bank and card transactions
set real-time transaction alerts
check login history for unusual access
Remain alert for follow-on phishing attempts. Fraudsters may reference your application to create urgency and request additional information.
Additional protective steps include:
placing a temporary fraud alert with credit bureaus if sensitive identity data was submitted
monitoring credit reports for unfamiliar accounts
contacting the lender directly using official website contact details if suspicious communication appears
Rapid response reduces the likelihood of secondary financial harm.
Final Consideration
Applying for a loan on public Wi-Fi increases exposure to interception risks such as man-in-the-middle attacks, packet sniffing, and fake hotspots. HTTPS encryption reduces some of that risk but does not eliminate it.
The safest approach is to submit financial applications over secure, trusted networks and verify platform security indicators before entering sensitive data. Financial convenience should never compromise personal data protection.
This post showcases the 25 best hacking movies for cybersecurity enthusiasts.
Cybersecurity is an exciting and ever-evolving field, and it’s no surprise that it has inspired many great films.
These hacking movies offer entertainment and provide insight into the real-world threats posed by hackers and the challenges faced by cybersecurity professionals.
Cybersecurity is an exciting and attractive subject in the cinema. It’s also a way to learn about new concepts you didn’t know existed in the computer world. We recommend some films that deal with this topic.
📝Editor’s Note: We highly recommend using the best VPN service to protect your browsing activities from hackers and snoopers.
BEST MARCH VPN DEALS FOR NETFLIX AND OTHER STREAMING SITES
Surfshark
Surfshark is an award-winning VPN service for keeping your digital life secure. Surfshark VPN has servers located in...Show More
Surfshark is an award-winning VPN service for keeping your digital life secure. Surfshark VPN has servers located in more than 60 countries worldwide. Show Less
CyberGhost VPN
CyberGhost VPN is a VPN service provider with more than 9,000 VPN servers spread in over 90 countries. Complete privacy...Show More
CyberGhost VPN is a VPN service provider with more than 9,000 VPN servers spread in over 90 countries. Complete privacy protection for up to 7 devices! Show Less
ExpressVPN
A dependable VPN service that works on all devices and platforms.
A dependable VPN service that works on all devices and platforms. Show Less
ProtonVPN
A swiss VPN service that goes the extra mile to balance speed with privacy protection.
A swiss VPN service that goes the extra mile to balance speed with privacy protection. Show Less
Private Internet Access
Private Internet Access uses world-class next-gen servers for a secure and reliable VPN connection, any day, anywhere.
Private Internet Access uses world-class next-gen servers for a secure and reliable VPN connection, any day, anywhere. Show Less
One of the best hacking movies for cybersecurity of all time is WarGames. It is one of the first films to address cybersecurity. David (Matthew Broderick) is a computer scientist who unintentionally connects his computer to the U.S. Department of Defense.
In this central server, reality becomes confused with the game, and David will have to rely on the help of his girlfriend and a computer friend to try to prevent a possible Third World War.
Sandra Bullock plays Angela in La Red, a computer expert in finding viruses and system irregularities.
Angela discovers a program that enables users to access secret databases. Her life changed from then on, getting involved in a conspiracy, and corruption was endangering her life and family.
Another best hacking movie for cybersecurity that should make our is list is Matrix (1 – 3). This science-fiction hacking movie stars a computer programmer (Keanu Reeves) who lives a double life: at night, he becomes a hacker using the alias Neo.
When acting as Neo, he comes into contact with Trinity (Carrie-Anne Moss), who puts him in touch with Morpheus (Laurence Fishburne) and with the actual reality of the Matrix: a social simulation of the world that represents the end of the 20th century.
Machines enslave humans; they are in suspension, and they have their minds connected to this simulation. Neo will join Trinity, Morpheo, and their group of rebels to fight the machines and free the enslaved humans.
Maintaining the number 4 on our list of the best hacking movies is Blackhat. In this cybersecurity movie, the Chinese and U.S. governments are forced to cooperate to stop a network of high-level cybercrime.
To do so, they will need the help of a hacker (Chris Hemsworth)- a prisoner, who will help them protect the national security of both powers in exchange for reducing his prison sentence.
Oliver Stone directs Joseph Gordon-Levitt in this film that tells part of Edward Snowden’s life. Snowden is an adaptation of Luke Harding’s book “The Snowden Files: The Inside Story of the World’s Most Wanted Man.”
This hacking movie plot took us to Hong Kong in 2013, when Edward Snowden joined journalists Glenn Greenwald, Ewen MacAskill, and documentary filmmaker Laura Poitras to publish in The Guardian classified and confidential documents that Snowden had acquired while working for the NSA (National Security Agency).
They also tell us about subsequent events and the impact the publication of these documents had on public opinion and Snowden’s life.
In turn, they tell us, through flashbacks to the past, previous events: when Snowden enlisted in the army, when he met his partner Lindsay Mills, and about his beginnings in the CIA and NSA.
There are a total of five films about the fictional character, former CIA agent Jason Bourne (Matt Damon). All are based on the novels written by Robert Ludlum and continued by Eric Van Lustbader with a series of sequels starring Bourne.
The protagonist, who mysteriously disappeared after revealing secret details of the CIA’s murder programs, struggles to recover his identity, becoming involved in networks of manipulation and murder. This latest installment, which premiered in 2016, deals with various topics related to cybersecurity.
Ghost in the Shell is a popular science fiction manga created by Masamune Shirow that has been adapted for television, video games, and cinema, but always in animation format.
On March 31, the adaptation of Ghost in the Shell, featuring live-action actors and actresses, arrives in Spanish cinemas.
Scarlett Johansson has been in charge of bringing to life the futuristic cyborg secret police (cybernetic organism), Major Motoko Kusanagi, who fights against technological crimes.
One of the best hacking movies for cybersecurity on our list is Sneakers, released in 1992. Robert Redford stars in Sneakers as Martin Bishop, a computer genius.
Martin leads a team of IT experts responsible for the security systems of large companies. All of them are involved in a situation that forces them to work for a secret agency, for which they must steal a black box capable of deciphering codes.
From the name, you should understand the concept behind this best hacking movie. In Hackers, Dade Murphy (Jonny Lee Miller) is a hacker who is not allowed to use any computer until he turns 18. This conviction stems from the fact that, in 1988, he caused the collapse of a large number of Wall Street servers.
When he comes of age, he moves to New York and meets another group of hackers, among them Kate (Angelina Jolie). It’s by hacking into the wrong person that they get into trouble.
The origin of Microsoft and Apple is the central plot of Pirates of Silicon Valley. Based on the book by Paul Freiberger and Michael Swaine, Fire in the Valley: The Making of the Personal Computer.
It explains the rivalry that existed between Steve Jobs and Bill Gates in the development of the personal computer. Several films about Steve Jobs have been directed, including Jobs (2013) with Ashton Kutcher and Steve Jobs (2015) with Michael Fassbender, both directed by Danny Boyle.
We have highlighted this in our list because it deals with Jobs’ relationship with one of the first hackers in history, John Thomas Draper, also known as Captain Crunch.
Thomas was an outstanding figure in telephone hacking and the creator of Bluebox, a device made with whistles that allowed users to make phone calls without incurring charges. Both Jobs and his colleague, Stephen Wozniak, co-founder of Apple, dedicated themselves to selling this invention for a while before founding Apple.
Also known as Hackers 2 and Track Down in the US. This take-down, best hacking movie is a film based on real events. The story is based on the book of the same name (Takedown) written by journalist John Markoff and by Tsutomu Shimomura, a computer security expert, who recounts his personal experiences in the book.
Takedown deals with how Tsutomu Shimomura helped the FBI capture Kevin Mitnick, a famous hacker who, even while on probation, tried to hack Shimomura’s computer security system. In short, an epic pursuit in cyberspace.
Also known as Hackers 3, Antitrust criticizes monopolistic practices in the 1990s. Milo Hoffman (Ryan Phillippe), a computer genius, is invited to work for one of the world’s largest technology companies.
After the death of his best friend, Milo begins to wonder if his new job has anything to do with it. The fictitious company Milo started working for was linked to Microsoft and its fictitious owner, Gary Winston, who was associated with Bill Gates.
Hugh Jackman, John Travolta, Halle Berry, and Don Cheadle starred in the movie Swordfish. Jackman is Stanley Jobson, a computer expert who has recently been released from prison.
Gabriel Shear (John Travolta), who leads an anti-terrorist group called Black Cell, offers him a large sum of money to decode a complex security code from a secret account, enabling him to steal a multimillion-dollar fortune in illegal government funds.
On the other hand is Ginger Knowles (Halle Berry), who works for Gabriel and FBI agent J.T. Roberts (Don Cheadle), who is in charge of watching Stanley after his release from prison and who is interested in reaching Gabriel.
Our list of best hacking movies for cybersecurity enthusiasts won’t be complete without this movie. Hacker is an action movie and one of the most current in this list on topics related to cybersecurity.
Alex (Callan McAuliffe) is a Ukrainian immigrant who financially supports his family with illegal jobs on the Internet. Alex undergoes a drastic change when his family gets into financial trouble.
With the help of Kira (Lorraine Nicholson), a young hacker, they create chaos in the financial market and capture the attention of Z, a mysterious masked figure, and the leader of an organization known as Anonymous, who is persecuted by the FBI.
This popular hacking action movie with Bruce Willis also includes many entertaining dialogues on cybersecurity, as well as some abuses against the most popular “hacker themes.”
Although some of the tricks employed in the film, such as remote access to Closed Circuit Television (CCTV) or traffic light control, are technically possible, it’s rather complicated to put them into practice, especially in the times and order shown in the film.
Moreover, it is rather challenging to remotely blow up something using the Internet. Although there are real cases of factories being compromised by malware, this is not the most practical approach to preventing factory explosions, especially when the operation must be carried out within a specific time frame.
However, critical infrastructures require special protection from hackers. We would like to thank Bruce Willis for bringing this issue to public attention.
Unlike other best hacking movies for cybersecurity on our list, Skyfall is a memorable one. We remember the Internet-controlled explosion and a whole series of brilliant ideas that are entirely feasible (theft of top-secret information is something that already happens on the Internet). Other thriving scenes include sabotaging the curious headquarters, built on a deserted island.
However, in reality, there is no convenience in making a data center on a remote island in Asia, as it is easily tracked down, and it is challenging to bring the broadband connection here on the island.
Real-world hackers often establish their headquarters in major cities, particularly in Asia, where they can leverage powerful connections and access all the necessary resources. Physical isolation does not help. The best protection is encryption.
The authors of WarGames also created this movie. The story revolves around a device that can decipher any password and break all cryptographic systems. Of course, the secret services of many countries are seeking such a device (the NSA has played a vital role in history).
In reality, such a device is impossible to build (otherwise, the NSA would not have worked with such passion for crypto-mail providers). But the social engineering tricks work perfectly – both in 1992 and 2013.
The Matrix trilogy has given popularity to the philosophy of “simulated reality.” But geeks like the film above all for its aesthetics. Indeed, the Wachowski brothers’ masterpiece stages numerous sabotage and hacker actions, but they are presented almost like magic, Harry Potter-like spells.
In general, the problem of “sandbox escape,” which the heroes of the Matrix must solve, really exists, and modern malware often exploits it in the form of exploits, as in the case of Adobe Reader. However, the film’s creators didn’t think about it. Thanks for showing us again how to use NMAP.
Many people prefer the film adaptation of the novel by Stieg Larsson, also known by the same name. This is certainly true for the scenes of computer piracy, where the protagonist of the film uses an old NMPA to scan the computers of people of interest. This part of the story is plausible because hacking has become one of the most effective ways to uncover a person’s secrets.
Such a system is often more accessible, less expensive, and safer than establishing a covert surveillance system or breaking into the victim’s apartment. But there is an even more effective way: stealing his smartphone. It will undoubtedly be full of secrets and private information that you can use to your benefit.
Here is another entry among our list of the best hacking movies for cybersecurity.
In March 2018, it was discovered that data of millions of people was shared on Facebook. It was the Cambridge Analytica scandal.
The Great Hacker is a documentary hack movie based on that true story. It premiered on July 24, 2019, on Netflix and examines the darker side of social networks, exploring how they utilized the personal data of 87 million people to influence the 2016 U.S. presidential election.
Harry Paul, a detective renowned for his expertise in surveillance and security systems, is commissioned by a tycoon to investigate his young wife. She must listen to his conversations with an employee of this man, with whom she seems to be in love.
The mission, for an expert of his category, is, at first sight, challenging, as the couple offers no interest outside the ordinary. However, when Harry finishes his work, he notices something strange behind the banality he has been investigating, as his client refuses to identify himself and always uses intermediaries.
Despite being an old movie, The Italian Job is one of the best hacking movies of our time. After leaving prison, a criminal devises a plan to steal a massive shipment of gold and successfully escapes. How? By creating an enormous traffic jam in Turin.
Thanks to the manipulation of the city’s computer traffic control system and three small Minis with which to escape with the loot. Cars and vulnerabilities in a connected downtown.
One of the best hacking movies you should consider is The IT Crowd. Of British origin, it has turned out to be one of the most popular cybersecurity TV series of the last decade.
It follows the daily life of two young geniuses who work for the technology department of a company, and their supervisor, in charge, learns from all their talent. You’ll have a lot of fun just watching the first chapter.
Come on. You got it. If you are a fan of the world of computer science and hacking, here are some of the best options in movies and series. You’ll know what to do during the weekend, so you won’t get bored. Enjoy!
Elliot Alderson is a gifted computer man who works during the day as a digital national security agent. While at night, he develops into a computer hacker with an enormous reputation.
His incredible computer skills and depressive condition make him debate between being one of the “good” or “bad.” Anyway, it is one of the best series of hackers, and it is also available on Netflix. Would you like to see it?
The Social Network movie is one of the best hacking movies for cybersecurity enthusiasts on our list. How much do you know about the creation of Facebook?
In The Social Network, the university life of its creator is portrayed. Mark Zuckerberg’s life is told stage by stage. This includes how, in one night, he created Facebook, which is now the most popular social network.
However, that’s not the most impressive aspect of this hacking movie. But all the drama around his project partners and those who tried to usurp his great idea. Look it up now, and you’ll know why it’s one of the best computer movies available.
Surfshark is an award-winning VPN service for keeping your digital life secure. Surfshark VPN has servers located in...Show More
Surfshark is an award-winning VPN service for keeping your digital life secure. Surfshark VPN has servers located in more than 60 countries worldwide. Show Less
CyberGhost VPN
CyberGhost VPN is a VPN service provider with more than 9,000 VPN servers spread in over 90 countries. Complete privacy...Show More
CyberGhost VPN is a VPN service provider with more than 9,000 VPN servers spread in over 90 countries. Complete privacy protection for up to 7 devices! Show Less
ExpressVPN
A dependable VPN service that works on all devices and platforms.
A dependable VPN service that works on all devices and platforms. Show Less
ProtonVPN
A swiss VPN service that goes the extra mile to balance speed with privacy protection.
A swiss VPN service that goes the extra mile to balance speed with privacy protection. Show Less
Private Internet Access
Private Internet Access uses world-class next-gen servers for a secure and reliable VPN connection, any day, anywhere.
Private Internet Access uses world-class next-gen servers for a secure and reliable VPN connection, any day, anywhere. Show Less
Best Hacking Movies For Cybersecurity Enthusiasts: Frequently Asked Questions
Is hacking in movies accurate?
No, hacking in movies is not usually accurate. Hollywood often portrays hacking as a fast-paced, exciting activity that involves flashy graphics and rapid typing. However, in reality, hacking is a much more methodical and time-consuming process. It often involves social engineering, research, and patience.
Here are some of the ways that Hollywood hacking differs from real-life hacking, according to programming experts from https://assignmentcore.com:
Timeline: In movies, hacks often happen in a matter of minutes or hours. In reality, hacks can take weeks, months, or even years to complete.
Technology: Hollywood often uses outdated or fictional technology to make hacking seem more dramatic. In reality, hackers use real-world tools and techniques.
Skills: Hollywood often portrays hackers as lone geniuses who can hack into anything. In reality, hacking is often a collaborative effort that requires a diverse range of skills.
Motivation: In movies, hackers are often motivated by revenge or greed. In reality, hackers can have a variety of motivations, including political activism, curiosity, and financial gain.
Here are some of the most common inaccuracies in movie hacking:
Green screens and fake graphics: Real hacking happens on a black screen with lines of code. The flashy graphics and animations often seen in movies are not realistic.
Split-screen windows: In movies, hackers often have multiple windows open on their screens simultaneously. In reality, hackers usually focus on one window at a time.
Rapid typing: In movies, hackers often type very quickly. In reality, typing speed is not a crucial factor for hacking.
Virus spreading: In movies, viruses often spread quickly and easily. In reality, viruses are not as easy to spread as they are often portrayed.
Zero-day exploits: In movies, hackers frequently employ zero-day exploits to gain unauthorized access to systems. Zero-day exploits are vulnerabilities that are unknown to the software vendor. In reality, zero-day exploits are rare and very valuable.
Despite the inaccuracies, there are a few movies that do a good job of portraying hacking in a more realistic way.
Some examples of realistic hacking movies include:
Mr. Robot: This TV series follows a young hacker who works as a cybersecurity engineer by day and a vigilante hacker by night. The show is praised for its realistic portrayal of hacking and the psychological impact it can have on individuals.
WarGames: This 1983 film follows a young hacker who accidentally gains access to a military supercomputer and inadvertently triggers a nuclear war scenario. The film is considered a classic and is still relevant today.
The Social Network: This 2010 film follows the creation of Facebook and the legal battle between its founders. The film is praised for its accurate portrayal of the early days of social media and the challenges of online privacy.
While hacking in movies is not usually accurate, it can still be entertaining. If you are interested in learning more about real-world hacking, numerous resources are available online and in libraries.
What do hackers say in movies?
Movie hackers are notorious for their dramatic pronouncements and witty one-liners. Here are some of the most common things hackers say in movies:
1. “We’re in.” This is the classic hacker line that nearly all movie hackers say. It’s a simple phrase that signifies that the hacker has successfully gained access to a system.
2. “I’m in.” Similar to “we’re in,” this variation is a movie hacker’s way of announcing to the world—or just to the empty room around them—that things are about to go off.
3. “I don’t play well with others.” Hackers are often portrayed as loners who are distrustful of others. This line is a way for the hacker to establish themselves as an independent operator.
4. “I couldn’t think as slow as you if I tried.” This line is a classic example of a hacker’s arrogance. It’s a way for the hacker to show that they are intellectually superior to the average person.
5. “I invented it.” Hackers are often portrayed as creative geniuses who devise innovative solutions to problems. This line allows the hacker to take credit for their work.
6. “Now the hunted becomes the hunter.” This line is often used by villains who are about to turn the tables on their pursuers. It’s a way for the villain to show that they are not afraid of the challenge ahead.
7. “I’m just getting started.” This line is often used by hackers who are about to unleash some serious havoc. It’s a way for the hacker to show that the worst is yet to come.
8. “I’m in your system.” This line is a classic way for a hacker to intimidate their victim. It’s a way for the hacker to show that they are in control and that the victim is at their mercy.
9. “I’m one step ahead of you.” This line is often used by hackers as a taunt to their pursuers. It’s a way for the hacker to show that they are always in control and that the victim will never catch up.
10. “Game over.” This line is often used by villains who have defeated their opponents. It’s a way for the villain to show that they have won and that there is no hope for the victim.
Of course, these are just a few of the many things that hackers say in movies. The specific lines that a hacker will use will depend on the character’s personality and the situation.
It’s essential to note that these portrayals in movies are fictional representations of hackers and may not be entirely realistic. Real-life hacking is often much more complex and requires a variety of skills and techniques. However, the lines above can still be entertaining and provide some insight into how hackers are portrayed in popular culture.
What movie is based on a true story hacker?
There are several movies based on true stories of hackers, each offering a unique perspective on the world of cybersecurity and the fascinating individuals who inhabit it. Here are a few of the most notable:
Takedown (2000): This film tells the story of Kevin Mitnick, a notorious hacker who spent years evading authorities before being captured in 1995. The movie portrays Mitnick as a brilliant yet troubled individual driven by a deep-seated need to challenge the establishment.
The Social Network (2010): This movie chronicles the creation of Facebook and the legal battle between its founders, Mark Zuckerberg, Eduardo Saverin, and the Winklevoss twins. While not strictly a hacking movie, it does delve into the world of computer programming and the ethical implications of online privacy.
Mr. Robot (2015-2019): This television series follows Elliot Alderson, a young hacker who works as a cybersecurity engineer by day and a vigilante hacker by night. The show is praised for its realistic portrayal of hacking and the psychological impact it can have on individuals.
WarGames (1983): This classic film follows a young hacker who accidentally gains access to a military supercomputer and inadvertently triggers a nuclear war scenario. While the technology depicted is outdated, the film raises important questions about the dangers of cyberwarfare.
Blackhat (2015): This film stars Chris Hemsworth as a convicted hacker who is released from prison to help track down a cybercriminal who is causing global chaos. While the film received mixed reviews, it does offer an interesting glimpse into the world of international cybercrime.
The Fifth Estate (2013): This film tells the story of WikiLeaks and its founder, Julian Assange. While not strictly a hacking movie, it does explore the ethical implications of information leaks and the role of whistleblowers in the digital age.
Sneakers (1992): This action-comedy follows a team of hackers who are hired to test security systems for a living. While the film is lighthearted and humorous, it does offer a glimpse into the early days of cybersecurity.
Hackers (1995): This cult classic follows a group of teenage hackers who become involved in a conspiracy to steal money from a large corporation. While the film is not particularly realistic, it does capture the spirit of early hacker culture.
The Matrix (1999): Although not specifically about hackers, this sci-fi action film delves into themes of reality, simulation, and the nature of information. It has become a cult classic and has had a significant influence on popular culture.
Snowden (2016): This biographical drama tells the story of Edward Snowden, a former NSA contractor who leaked classified documents that revealed the extent of the government’s surveillance programs. The film raises important questions about privacy, security, and the role of whistleblowers in the digital age.
These are just a few of the many movies that feature hackers. Each film offers a unique perspective on this fascinating and complex subject.
How many types of hackers are there in cyber security?
There are many ways to categorize hackers, but some of the most common types include:
1. White hat hackers
White hat hackers are also known as ethical hackers. They are security professionals who use their skills to identify and fix vulnerabilities in computer systems and networks.
They typically work for companies or organizations that want to improve their security posture. White hat hackers are often considered the “good guys” of the hacking world.
2. Black hat hackers
Black hat hackers are also known as crackers. They are criminals who exploit vulnerabilities using their skills for personal gain.
They may steal data, install malware, or launch denial-of-service attacks. Black hat hackers are often considered the “bad guys” of the hacking world.
3. Grey hat hackers
Grey hat hackers operate between the lines of white-hat and black-hat hackers. They may use their skills for both good and bad purposes.
For example, a grey hat hacker might discover a vulnerability in a system and disclose it publicly without permission from the owner. Grey hat hackers can be challenging to categorize, as their motivations vary.
4. Script kiddies
Script kiddies are people who use hacking tools and scripts created by others. They often lack the technical skills to understand how the tools work and may use them for malicious purposes without fully understanding the consequences. Script kiddies are often considered the “wannabes” of the hacking world.
5. Hacktivists
Hacktivists are individuals who utilize hacking techniques to advocate for a political or social cause. They may launch cyberattacks against government agencies, corporations, or other organizations that they believe are doing harm. Hacktivists often see themselves as digital Robin Hoods, fighting for justice and equality.
6. Green hat hackers
Green hat hackers are a newer breed of hackers who are motivated by a desire to learn and improve their skills. They often participate in bug bounty programs or “capture the flag” competitions.
Green hat hackers are considered a valuable asset to the security community, as they help to identify and fix vulnerabilities before they can be exploited by malicious actors.
7. Blue hat hackers
Blue hat hackers are individuals who hack for personal enjoyment or intellectual challenge. They may not have any malicious intent, but their activities can still be disruptive or harmful.
Blue-hat hackers are often viewed as a nuisance by security professionals, but they can also offer valuable insights into new vulnerabilities and emerging attack techniques.
8. Red hat hackers
Red hat hackers are government-sponsored hackers who are employed to conduct offensive cyber operations. They may target foreign governments, critical infrastructure, or other high-value targets.
Red hat hackers are often shrouded in secrecy, and their activities can have a significant impact on national security.
9. State-sponsored hacker
State-sponsored hackers are individuals employed by a government agency to conduct cyber operations. They may be tasked with conducting espionage, sabotage, or other forms of cyberwarfare.
State-sponsored hackers are often well-funded and have access to sophisticated tools and techniques.
10. Organized crime groups
Organized crime groups are increasingly turning to cybercrime as a means of generating revenue. They may use hacking to steal money, launder money, or launch cyberattacks against businesses or individuals.
Organized crime groups are often ruthless and well-organized, posing a serious threat to cybersecurity.
These are just a few of the many types of hackers that exist. The threat landscape is constantly evolving, and new types of hackers are emerging all the time.
It is essential for organizations to be aware of the various types of hackers and to implement measures to protect themselves from potential attacks. Also, you can check out our guide on how to become an hacker.
What Are The Best Hacker Movies Released in 2023?
Here is a list of some of the best hacker movies released in 2023:
Blackwater: This South Korean action thriller follows a skilled hacker who is framed for cybercrime and must go on the run to clear his name.
Cypher: This American science fiction thriller follows a group of hackers who discover a dangerous conspiracy.
Unlocked: This French thriller follows a woman who is targeted by a hacker who has gained access to her phone.
No Escape: This American action thriller follows a family who is targeted by a group of hackers while on vacation in a remote island.
These are just a few hacker movies 2023 of the many great hacker movies that were released in 2023. I hope you enjoy watching them!
Bottom Line
Our preferred best hacking movie is: The Social Network
The Social Network transcends the genre of hacking films. It chronicles the birth of a digital behemoth – Facebook – and the man behind it: Mark Zuckerberg.
From a Harvard dorm room to global domination, witness the transformation of a student into the youngest billionaire, a testament to both ambition and the transformative power of the internet.
Which movie did not make our list of the best hacking movies for cybersecurity? Comment below.
Here is the cloud storage guide for businesses and individuals.
In today’s data-driven world, organizations and individuals alike are generating and consuming vast amounts of information.
Traditional storage methods, such as external hard drives and physical servers, are becoming increasingly inadequate to handle the growing volume and complexity of data.
Cloud storage has emerged as a revolutionary solution to managing, storing, and accessing this ever-growing volume of data.
Cloud storage has transformed the way businesses and individuals store and access their valuable information.
It offers a plethora of benefits, including scalability, accessibility, cost-effectiveness, and disaster recovery, making it an indispensable tool for organizations of all sizes and individuals with diverse data needs.
Without further ado, let’s get started with the cloud storage guide.
Table of Contents
Cloud Storage Guide: What Is Cloud Storage?
Cloud storage is a service that allows users to store data remotely on servers hosted by a third-party provider.
This model eliminates the need for individuals and businesses to maintain their own physical storage infrastructure, offering a scalable, cost-effective, and accessible solution for data management.
Imagine a vast warehouse filled with countless shelves, each holding a piece of your data. Instead of having to personally manage this warehouse, you entrust it to a professional storage provider.
They handle the organization, security, and maintenance of your data, ensuring its safety and accessibility whenever you need it. That’s essentially how cloud storage works.
TOP CLOUD STORAGE DEALS
Paragon Backup & Recovery
Your best backup and recovery solution for home and business use.
Your best backup and recovery solution for home and business use. Show Less
pCloud
Offers collaborative solutions for your cloud storage needs.
Offers collaborative solutions for your cloud storage needs. Show Less
Carbonite
Carbonite offers reliable and automatic cloud backup solutions, ensuring your critical data is protected and easily...Show More
Carbonite offers reliable and automatic cloud backup solutions, ensuring your critical data is protected and easily recoverable, so you can have peace of mind and focus on what matters most. Show Less
How Does Cloud Storage Work?
Cloud storage operates through a distributed network of data centers, where data is stored and replicated across multiple servers. This distributed architecture ensures redundancy and protection against data loss.
When a user uploads data to the cloud, it is fragmented and distributed across these servers, creating multiple copies of the same data. This redundancy ensures that even if a server fails, the data remains accessible from other servers.
Picture your data as a puzzle scattered across multiple servers. When you access your data, the cloud storage service seamlessly reassembles the puzzle from its various pieces, providing you with the complete information you need.
Now, for this cloud storage guide, let me talk about its benefits.
Benefits of Cloud Storage
Cloud storage offers a multitude of benefits for businesses and individuals, transforming the way they manage and access their data:
Scalability
Cloud storage seamlessly scales to meet changing data storage needs, accommodating both small and massive data volumes without the need for upfront hardware investments.
Unlike traditional storage methods that require physical expansion, cloud storage provides a virtual warehouse with unlimited shelf space. As your data grows, the cloud seamlessly expands to accommodate it, ensuring you never run out of storage.
Accessibility
Cloud storage enables users to access their data from any device with an internet connection, promoting mobility and flexibility.
With cloud storage, you’re not tied to a specific device or location. Whether you’re using a laptop, smartphone, or tablet, you can access your data from anywhere in the world with an internet connection.
Cost-effectiveness
Cloud storage eliminates the costs associated with maintaining physical storage infrastructure, providing a pay-as-you-go model that aligns with data usage.
Instead of investing in expensive hardware and software for data storage, you pay for the storage you actually use with cloud storage. This pay-per-use model aligns your expenses with your data usage, ensuring cost efficiency.
Disaster Recovery
Cloud storage ensures data resilience against physical disasters or hardware failures by replicating data across multiple data centers.
In the event of a disaster, such as a fire or flood, your data remains safe and accessible from other data centers. Cloud storage acts as a virtual backup, safeguarding your valuable information from unforeseen events.
To proceed with the cloud storage guide, I will show you the types of cloud storage that we have.
Here is an overview of the different types of cloud storage available in the market:
1. Public Cloud Storage
Public cloud storage is the most common type of cloud storage, offered by third-party providers such as Amazon Web Services (AWS), Microsoft Azure, and Google Cloud Platform (GCP).
These services provide a vast pool of storage resources that users can access over the internet.
Key Characteristics of Public Cloud Storage
Scalability: Public cloud storage is highly scalable, allowing users to quickly and easily add or remove storage capacity as needed.
Accessibility: Public cloud storage can be accessed from anywhere with an internet connection, providing users with flexibility and mobility.
Cost-effectiveness: Public cloud storage typically follows a pay-as-you-go model, where users only pay for the storage they consume, making it a cost-effective option.
Examples of Public Cloud Storage Providers
Amazon S3 (Simple Storage Service)
Microsoft Azure Blob Storage
Google Cloud Storage
2. Private Cloud Storage
Private cloud storage is a dedicated cloud storage infrastructure deployed within an organization’s own data center. This type of storage offers greater control over security, data privacy, and customization.
Key Characteristics of Private Cloud Storage
Security: Private cloud storage provides greater control over security measures, physical access, and data privacy.
Customization: Private cloud storage can be customized to meet specific requirements and integrate with existing IT infrastructure.
Control: Organizations have complete control over their data and can manage resources without relying on a third-party provider.
Examples of Private Cloud Storage Solutions
VMware vSAN
OpenStack
Microsoft Hyper-V
3. Hybrid Cloud Storage
Hybrid cloud storage combines the elements of public and private cloud storage, offering a balance between scalability, security, and cost-effectiveness.
Organizations can store sensitive data on their private cloud while utilizing public cloud storage for non-critical data or for scaling purposes.
Key Characteristics of Hybrid Cloud Storage
Flexibility: Hybrid cloud storage provides flexibility in choosing the most suitable storage environment for different data types and workloads.
Cost-optimization: Organizations can optimize costs by storing infrequently accessed data on public cloud storage while keeping sensitive data on private cloud infrastructure.
Scalability: Hybrid cloud storage can seamlessly scale to meet fluctuating data storage needs by leveraging both public and private cloud resources.
Examples of Hybrid Cloud Storage Solutions
AWS Storage Gateway
Azure Arc for Data Services
Google Cloud Anthos Storage
4. Object Storage
Object storage is a type of cloud storage that treats data as discrete objects, each with its own unique identifier and metadata.
This architecture enables efficient storage and retrieval of large volumes of unstructured data, such as images, videos, and logs.
Key Characteristics of Object Storage
Scalability: Object storage is highly scalable and capable of storing petabytes or even exabytes of data efficiently.
Durability: Object storage replicates data across multiple servers, ensuring high durability and data protection against hardware failures.
Cost-effectiveness: Object storage is typically more cost-effective for storing large amounts of unstructured data compared to traditional block or file storage.
Examples of Object Storage Solutions
Amazon S3
Microsoft Azure Blob Storage
Google Cloud Storage
5. File Storage
File storage is a type of cloud storage that mimics the structure of a traditional file system, allowing users to store, organize, and access files in a familiar way.
This type of storage is suitable for storing structured data, such as documents, spreadsheets, and presentations.
Key Characteristics of File Storage
Familiarity: File storage mirrors the file system structure, making it easy for users to understand and navigate.
Ease of Use: File storage is generally easy to use and manage, requiring minimal technical expertise.
Compatibility: File storage is compatible with a wide range of applications and operating systems.
Examples of File Storage Solutions
Google Drive
Dropbox
Microsoft OneDrive
6. Block Storage
Block storage is a type of cloud storage that divides data into fixed-size blocks, each with a unique address.
This architecture provides efficient access to individual blocks of data, making it suitable for applications that require fast and consistent data access.
Key Characteristics of Block Storage
Low Latency: Block storage offers low latency and consistent performance, making it suitable for real-time applications.
Block-level Access: Block storage allows direct access to individual blocks of data, enabling efficient data manipulation.
Volume Flexibility: Block storage volumes can be resized or expanded to meet changing storage requirements.
Examples of Block Storage Solutions
Amazon EBS (Elastic Block Store)
Microsoft Azure Disk Storage
Google Cloud Persistent Disk
In this cloud storage guide, I will also reveal the best cloud storage services.
Recommended Cloud Storage Services
Here is a detailed overview of the recommended cloud storage services:
Carbonite is a leading provider of cloud-based backup and disaster recovery solutions for businesses and individuals.
Their cloud storage service offers a comprehensive suite of features, including:
Automated backups: Schedule regular backups of your data to protect against accidental deletion or hardware failure.
File recovery: Easily restore files or folders to their original state from any point in time.
Ransomware protection: Safeguard your data from ransomware attacks with advanced encryption and file versioning.
Mobile access: Access and manage your files from anywhere using their mobile apps for iOS and Android.
Carbonite offers various pricing plans to suit different needs, including individual plans, small business plans, and enterprise plans.
Carbonite
Carbonite offers reliable and automatic cloud backup solutions, ensuring your critical data is protected and easily...Show More
Carbonite offers reliable and automatic cloud backup solutions, ensuring your critical data is protected and easily recoverable, so you can have peace of mind and focus on what matters most. Show Less
Acronis is a comprehensive cybersecurity and data protection provider offering a range of cloud storage solutions for businesses and individuals. Their cloud storage service features:
Universal data protection: Protect all types of data, including files, systems, applications, and mobile devices.
Disaster recovery: Recover your systems and data quickly in the event of a disaster or cyberattack.
AI-powered protection: Leverage AI to detect and prevent ransomware attacks and other threats.
Hybrid cloud storage: Combine cloud storage with on-premises storage for a hybrid protection strategy.
Acronis offers various pricing plans tailored to specific needs, including individual plans, small business plans, and enterprise plans.
Acronis Cyber Protect (Formerly True Image)
Acronis Cyber Protect provides data protection for personal users, including backup, archive, access, and recovery for...Show More
Acronis Cyber Protect provides data protection for personal users, including backup, archive, access, and recovery for Windows, macOS, iOS, and Android operating systems. Your all-in-one solution for cybersecurity. Show Less
Paragon is a leading provider of data management and backup solutions, offering a cloud storage service with a focus on data loss prevention. Their key features include:
Advanced backup options: Schedule backups based on various criteria, such as file changes, time intervals, or event triggers.
Data replication: Replicate your data to multiple cloud storage locations for enhanced redundancy.
Data migration: Easily migrate your data from one cloud storage provider to another.
Virtual machine support: Protect and manage virtual machines stored in the cloud.
Paragon offers various pricing plans for individuals and businesses, with flexible options for different data protection needs.
Paragon Backup & Recovery
Your best backup and recovery solution for home and business use.
Your best backup and recovery solution for home and business use. Show Less
Proton Drive is a cloud storage service from Proton Technologies, known for its commitment to privacy and security. Their key features include:
Zero-knowledge encryption: Proton has no access to your encryption keys, providing a high level of privacy.
Secure cloud storage: Store your data securely in Switzerland, with strong data protection laws.
End-to-end encrypted file sharing: Share files securely with others using end-to-end encryption.
Support for multiple platforms: Access your files from anywhere using their apps for iOS, Android, Windows, macOS, and Linux.
Proton Drive offers individual and business plans, with monthly and annual payment options.
ProtonVPN
A swiss VPN service that goes the extra mile to balance speed with privacy protection.
A swiss VPN service that goes the extra mile to balance speed with privacy protection. Show Less
7. Google Drive
Google Drive is a popular cloud storage service from Google, integrated with Google Workspace and various Google apps.
Its key features include:
Seamless integration with Google Workspace: Easily access and manage your files within Google Docs, Sheets, Slides, and other Google apps.
Real-time collaboration: Collaborate on documents and files in real-time with others.
Offline access: Access your files even without an internet connection.
Mobile apps: Manage your files from anywhere using their mobile apps for iOS and Android.
Google Drive offers various storage plans, including a free tier with limited storage and paid tiers with more storage and advanced features.
Choosing the Right Cloud Storage Provider
Selecting the right cloud storage provider involves evaluating factors such as:
Pricing
Compare pricing models and ensure they align with your storage and usage needs. Analyze the different pricing tiers offered by providers to find the most cost-effective option for your specific needs.
Security
Assess the provider’s security measures, including data encryption, access controls, and compliance certifications. Ensure the provider employs robust security protocols to protect your data. Check for certifications such as SOC 2 and ISO 27001 to verify their commitment to security.
Scalability
Evaluate the provider’s ability to scale with your growing data needs. Choose a provider that can accommodate your future storage requirements. Consider their track record of handling increasing data volumes.
Customer Support
Ensure the provider offers responsive and reliable customer support. Prompt and knowledgeable support is crucial when dealing with data management issues. Check customer reviews and inquire about their support channels and responsiveness.
Data Redundancy and Availability
In addition to security measures, assess the provider’s approach to data redundancy and availability. A reliable cloud storage provider should have robust systems in place to ensure the redundancy of your data across multiple locations.
This redundancy not only safeguards your data against potential hardware failures but also enhances its availability, minimizing the risk of data loss due to unforeseen circumstances.
Integration Capabilities with Third-Party Services
Consider the ease with which the cloud storage provider integrates with third-party services. Compatibility with a wide range of applications, development frameworks, and tools can significantly enhance your workflow efficiency.
Look for providers that offer seamless integration with popular services and tools relevant to your organization, whether it’s collaboration software, analytics platforms, or development environments.
Data Transfer and Retrieval Speeds
The speed at which you can transfer data to and retrieve it from the cloud storage service is crucial, especially for organizations dealing with large datasets.
Evaluate the provider’s network infrastructure, available bandwidth, and data transfer protocols to ensure efficient and timely data transfers. Additionally, inquire about any potential bottlenecks that might affect data retrieval speeds during peak usage times.
While cloud storage offers convenience and scalability, security remains a critical concern. Organizations and individuals should consider the following:
Data Encryption
Encrypting data at rest and in transit protects sensitive information from unauthorized access.
Encryption serves as a digital lock for your data, making it unreadable to anyone without the proper key. This ensures that only authorized users can access your sensitive information.
Access Control Mechanisms
Implementing strong access controls, such as role-based access control (RBAC), restricts access to authorized users only.
RBAC acts as a security guard, defining who can access what data and what actions they can perform. This prevents unauthorized individuals from accessing or manipulating your data.
Compliance Requirements
Ensure compliance with relevant data privacy regulations, such as GDPR and CCPA.
Data privacy regulations protect individuals’ personal information and require organizations to handle it responsibly. Cloud storage providers must adhere to these regulations to ensure data privacy and compliance.
Cost Considerations for Cloud Storage
Cloud storage pricing varies depending on the provider, storage usage, data transfer rates, and bandwidth requirements. Common pricing models include:
Pay-as-you-go: Users pay for the storage they consume, offering flexibility for fluctuating data needs. With pay-as-you-go pricing, you only pay for what you use, making it a cost-effective option for businesses with unpredictable data growth.
Tiered Pricing: Storage costs are based on usage tiers, with lower rates for higher usage levels. Tiered pricing provides a discount for consistent usage, making it attractive for organizations with stable data needs.
Now, in this cloud storage guide, I will compare cloud storage vs cloud computing.
Cloud Storage vs Cloud Computing
Cloud storage and cloud computing are often used interchangeably, but they are distinct concepts.
Cloud storage is a specific type of cloud computing service that provides a way to store data remotely on servers that a cloud provider manages. This allows users to access and manage their data from anywhere in the world with an internet connection.
Cloud storage is typically used for storing large amounts of data that need to be accessed frequently, such as documents, photos, and videos.
Cloud computing is a broader term that encompasses a wide range of services that are delivered over the Internet. These services can include cloud storage, but they can also include other services such as computing power, database storage, and software development platforms.
Cloud computing is typically used for running applications and storing data that requires more processing power or storage capacity than a traditional on-premises solution.
Here is a table summarizing the key differences between cloud storage and cloud computing:
Feature
Cloud Storage
Cloud Computing
Purpose
Store data remotely
Deliver a wide range of services
Data access
Access from anywhere
Access from anywhere
Data processing
Minimal processing
Can require significant processing
Storage capacity
Stores large amounts of data
Can store a wide range of data types
Examples
Amazon S3, Google Cloud Storage
Amazon Web Services (AWS), Microsoft Azure, Google Cloud Platform (GCP)
In general, cloud storage is a good choice for storing data that needs to be accessed frequently, while cloud computing is a good choice for running applications or storing data that requires more processing power or storage capacity.
Here are some additional points to consider when deciding whether to use cloud storage or cloud computing:
Cost: Cloud storage is typically more affordable than cloud computing for storing large amounts of data that does not require significant processing power.
Security: Both cloud storage and cloud computing can be secure, but it is important to choose a reputable cloud provider that has strong security measures in place.
Complexity: Cloud storage is generally less complex to set up and manage than cloud computing.
Also, in this cloud storage guide, I will compare cloud storage vs cloud computing.
Cloud Storage vs Online Backup
Cloud storage and online backup are both methods of storing data remotely, but they serve different purposes and have distinct characteristics.
Cloud storage is primarily designed for storing and accessing files and data on a regular basis. It offers a convenient way to keep your files accessible from anywhere with an internet connection, making it ideal for collaboration, sharing, and personal file management.
Online backup, on the other hand, is specifically focused on protecting your data from loss or damage. It creates copies of your files and stores them securely in the cloud, providing a safety net in case of hardware failures, ransomware attacks, or accidental deletions.
Here’s a table summarizing the key differences between cloud storage and online backup:
Feature
Cloud Storage
Online Backup
Primary purpose
Store and access files
Protect data from loss or damage
Data access
Frequent access
Infrequent access
Data synchronization
Real-time synchronization
Regular backups
Data retention
Long-term retention
The retention period depends on the plan
Storage capacity
Large amounts of data
Typically smaller amounts of data
Examples
Google Drive, Dropbox, Amazon S3
Carbonite, Backblaze, CrashPlan
Choosing between cloud storage and online backup depends on your specific needs:
If you prioritize convenient file storage and access, Cloud storage is the better option. It offers easy access to your files, seamless synchronization, and collaboration features.
If you prioritize data protection and disaster recovery, Online backup is the better choice. It creates regular backups of your data, ensuring you have a reliable copy in case of data loss events.
In some cases, you may need both cloud storage and online backup. Cloud storage can handle your everyday file management needs, while online backup provides an extra layer of protection for your critical data.
Here’s a summary of when to use cloud storage and online backup:
Use cloud storage when:
You need to access your files frequently from different devices.
You want to collaborate on files with others.
You want to store large amounts of data.
Use online backup when:
You want to protect your data from loss or damage.
You want to make sure you can restore your data in case of a disaster.
You have a large amount of critical data that you cannot afford to lose.
How Safe Is Cloud Storage?
Cloud storage is generally considered to be safe, but it is important to choose a reputable cloud provider with strong security measures in place.
Reputable cloud providers invest heavily in security, use industry-standard encryption, and have multiple layers of security to protect data from unauthorized access.
Here are some of the security measures that reputable cloud providers use:
Data encryption: Data is encrypted both at rest and in transit, so it is unreadable to anyone who does not have the decryption key.
Access control: Users are granted access to data based on their permissions, and access logs are monitored for suspicious activity.
Physical security: Cloud data centers are physically secure, with access restricted to authorized personnel.
Vulnerability management: Cloud providers regularly scan for and patch vulnerabilities in their systems.
Incident response: Cloud providers have a plan in place for responding to security incidents, such as data breaches.
Despite these security measures, there is always some risk that data stored in the cloud could be compromised. This is because cloud providers are constantly facing new threats from hackers and other malicious actors.
Here are some ways to protect your data in the cloud:
Choose a reputable cloud provider: Do your research and choose a cloud provider that has a strong reputation for security.
Use strong passwords: Use strong, unique passwords for all of your cloud accounts.
Enable two-factor authentication (2FA): 2FA adds an extra layer of security by requiring a second verification step, such as a code from your phone, in addition to your password.
Be careful about what data you store in the cloud: Do not store sensitive data in the cloud unless you need to.
Regularly back up your data: Even if you trust your cloud provider, it is still a good idea to back up your data to an external hard drive or another cloud storage provider.
By following the tips in this cloud storage guide, you can protect your data in the cloud and minimize the risk of a security breach.
Wrapping Up The Cloud Storage Guide
To conclude this cloud storage guide, I will say that cloud storage has revolutionized data management, offering businesses and individuals a secure, scalable, and cost-effective solution for storing and accessing their valuable information.
By understanding the benefits, types, security considerations, and cost factors, individuals and organizations can make informed decisions about adopting cloud storage and harness its power to manage their data effectively.
Leave a comment below on this cloud storage guide.
This post will show you the CyberGhost Private Browser review.
To protect our data and online activities from tracking and monitoring, we opt for private browsers, and the CyberGhost Private Browser is one of such browsers.
In today’s review, we will be telling you all about the CyberGhost Private Browser. We will look at its features, pricing, customer support, how it works, and how you can download and install the application.
Is it safe? Is it legit? Is it free? Read on to find out.
Table of Contents
What Is CyberGhost Private Browser?
CyberGhost Private Browser is a Chromium-based browser that makes it easy for users to surf the internet without third parties tracking their online activities. It is a software application by Kape Technologies.
The CyberGhost Private Browser works as a better and more secure alternative to the normal incognito browser. It doesn’t store any of your data and includes a one-tap history remover to ensure that you remain anonymous online and hidden.
How To Download And Install CyberGhost Private Browser
The CyberGhost Private Browser application can be installed on Windows 64-bit versions, macOS, and iOS. It is however not available for Android platforms.
To download and install CyberGhost Private Browser on your iPad or iPhone, simply go to your App Store and search for ‘’CyberGhost private browser’’, click on the installation icon, and the application should be downloaded and installed directly on your iOS device.
To download and install the application on your desktop or laptop, follow the steps below.
Visit the CyberGhost Desktop Private Browser download page.
Scroll down to look for and click on the direct download link. With this, the application should start downloading.
Once the download is over, open the downloaded file in your Downloads folder.
Double-click on the file and then click Yes at the prompt.
Click on Accept to accept the Terms and Conditions. This should begin the installation process.
After the installation is complete, your CyberGhost Private Browser should open.
84% OFF
CyberGhost VPN
CyberGhost VPN is a VPN service provider with more than 9,000 VPN servers spread in over 90 countries. Complete privacy...Show More
CyberGhost VPN is a VPN service provider with more than 9,000 VPN servers spread in over 90 countries. Complete privacy protection for up to 7 devices! Show Less
The application doesn’t support Android, but it supports Windows, macOS, and iOS. It allows users to browse freely and peacefully knowing that no one is watching them. For extra protection, the iOS application has biometric bookmark security.
Chromium-Based (Build 86)
The browser is a secured Chromium-based browser that allows you to be in control and remain anonymous online. As a Chromium-based browser, you get to add all your favorite Chrome add-ons to it directly from the Chrome Store.
Zero Google Integrations
CyberGhost Private Browser has zero Google integrations and so it is fully out of Google’s sights. Your data is safe and can’t be used by Google, which demands and uses a lot of users’ data.
Built-in Ad-blocker and Tracker blocker
CyberGhost Private Browser is privacy-focused and so its ad-blocker and tracker blocker takes care of ads and software that can monitor you online.
Fast Browsing
Ads usually use up most of the loading time of pages. CyberGhost Private Browser is totally ad and tracker-free so you won’t experience slow browsing.
One-Tap History Removal
There is a button placed on the main screen that makes it easy for you to just tap and all traces of your browsing activity is removed. You can also automate the browser to automatically delete all the data from your browsing session once you close the application.
Customer Support & Resources
The CyberGhost Private Browser users enjoy the same support as the CyberGhost VPN. It provides customer support 24/7 via the CyberGhost live chat or email in more than four different languages. You can even submit a request online.
There are FAQs and product guides on how to install the application on iOS and desktops. However, the CyberGhost Private Browser doesn’t make many resources available to users.
CyberGhost Private Browser Pricing
You may be wondering if the CyberGhost Private Browser is free or premium. Well, the good news is that CyberGhost Private Browser is 100 percent free. It doesn’t require any form of subscription after installation. However, only users of the CyberGhost VPN can use the CyberGhost Private Browser.
84% OFF
CyberGhost VPN
CyberGhost VPN is a VPN service provider with more than 9,000 VPN servers spread in over 90 countries. Complete privacy...Show More
CyberGhost VPN is a VPN service provider with more than 9,000 VPN servers spread in over 90 countries. Complete privacy protection for up to 7 devices! Show Less
Is CyberGhost Private Browser Safe?
This is a question that is mostly asked by internet users who are looking for a secured application that prioritizes privacy. Yes, CyberGhost Private Browser is safe. It has unique features like the ad blocker and tracker blocker that protect users’ data while browsing, ensure fast browsing, and fewer data consumption.
Is CyberGhost Private Browser Legit?
The answer is yes. Yes, CyberGhost Private Browser is legit and is a reliable private browser that ensures that your privacy is protected. It doesn’t make use of or keep your data, neither does it allow for third-party monitoring.
I Already Have CyberGhost VPN, How Can I Add the CyberGhost Private Browser to My Subscription?
Adding the CyberGhost Private Browser to your CyberGhost VPN subscription is very easy. All you need to do is install the CyberGhost Private Browser application on your device following the detailed steps above. Once the installation is complete, input your registered CyberGhost VPN username and password to log in and you can start enjoying the service immediately.
Wrapping Up The CyberGhost Private Browser Review
If you want to secure your online activities and stop all forms of online monitoring, the CyberGhost Private Browser is right for you. It is easy to download and also easy to use. Furthermore, it is free, safe, fast, and 100 percent privacy-focused.
84% OFF
CyberGhost VPN
CyberGhost VPN is a VPN service provider with more than 9,000 VPN servers spread in over 90 countries. Complete privacy...Show More
CyberGhost VPN is a VPN service provider with more than 9,000 VPN servers spread in over 90 countries. Complete privacy protection for up to 7 devices! Show Less
In this post, I will talk about how AI-Driven governance is changing enterprise cybersecurity.
Cybersecurity has traditionally focused on protecting networks from unauthorized access. Organizations deployed firewalls, monitoring tools, and endpoint protection systems to detect threats once attackers attempted to breach infrastructure.
However, modern cyber threats have become far more sophisticated. Attackers now rely on identity compromise, reconnaissance, and infrastructure mapping before launching ransomware or data-exfiltration attacks.
As a result, enterprises are shifting their security strategy toward governance-driven cybersecurity, where infrastructure, access policies, and compliance frameworks are managed through centralized platforms designed to prevent exposure rather than react to threats.
Platforms that combine secure workspaces, Zero Trust access, AI-driven governance, and invisible networking are increasingly becoming the foundation of this new security model.
Table of Contents
The Governance Challenge in Modern IT Environments
Enterprise IT environments have grown significantly more complex in recent years. Organizations now operate across hybrid cloud infrastructure, remote work environments, and distributed teams.
This complexity introduces several governance challenges.
Managing identity and access across multiple systems
Maintaining visibility into user activity and data usage
Ensuring compliance with regulatory frameworks
Preventing unauthorized data access or exfiltration
Monitoring vendors and third-party connections
Without centralized governance, security teams often struggle to maintain full visibility and control over these environments.
This is why modern cybersecurity architecture increasingly relies on integrated governance platforms rather than disconnected security tools.
The Role of Secure Workspaces in Governance
Secure workspace environments are becoming an important component of governance-focused cybersecurity strategies.
A secure workspace is a controlled digital environment where users access applications and data without direct network exposure. Instead of connecting directly to internal systems, users interact with applications through secure sessions hosted in protected infrastructure.
This architecture offers several advantages for governance and security.
Sensitive data is never stored on endpoint devices
Access permissions can be tightly controlled
User activity can be logged and monitored
Compliance audit trails are automatically generated
By centralizing how users interact with systems, secure workspace platforms give organizations far greater control over access and activity monitoring.
Zero Trust as the Foundation of Access Control
Secure workspace environments are typically built on Zero Trust security architecture.
Zero Trust operates on the principle that no user or device should be trusted automatically. Every access request must be authenticated and verified before it is granted.
Key components of Zero Trust include:
Identity verification for every login session
Role-based access control limiting privileges
Continuous monitoring of user behavior
Segmentation of sensitive workloads
Secure access for remote employees and partners
This approach ensures that access policies are enforced consistently across the organization.
Even if credentials are compromised, attackers cannot easily move laterally through the environment.
Eliminating Attack Surfaces Through Invisible Infrastructure
In addition to controlling access, many organizations are focusing on reducing the visibility of infrastructure itself.
Traditional networks often expose servers, applications, and communication paths to the internet. Attackers can scan these systems to identify vulnerabilities and plan attacks.
Invisible infrastructure removes these exposed entry points.
One technique used to achieve this is stealth networking, which fragments data traffic and disperses it across multiple encrypted paths. This prevents attackers from mapping infrastructure or reconstructing communications.
By hiding network paths and dispersing data across multiple routes, organizations dramatically reduce the number of opportunities attackers have to identify targets.
How ShieldHQ Combines Security, Governance, and Compliance
ShieldHQ integrates several advanced cybersecurity technologies into a single platform designed for enterprise and regulated industries.
The platform combines:
Secure cloud workspaces
Zero Trust identity-based access
AI-driven governance and monitoring
Compliance automation
Stealth networking powered by Dispersive®
ShieldHQ’s architecture is designed to make infrastructure effectively invisible to attackers while enforcing strict governance policies across users, applications, and data.
The platform also provides built-in compliance support for frameworks such as:
HIPAA and HITRUST
SOC 2 Type II
NIST and CMMC
PCI-DSS and GDPR
By integrating compliance monitoring directly into infrastructure, organizations can simplify regulatory reporting while improving security posture.
Leadership Behind the Platform
ShieldHQ was developed by Mindcore Technologies, a cybersecurity and IT solutions provider with more than 30 years of experience helping organizations protect sensitive infrastructure and data.
The platform is led by Matt Rosenthal, CEO of Mindcore Technologies, who designed ShieldHQ to eliminate traditional network attack surfaces and help enterprises operate securely without relying on legacy VPN infrastructure.
This infrastructure-first philosophy reflects a broader industry trend toward proactive cyber defense.
Building the Governance-Driven Security Model
As organizations adopt hybrid work, cloud infrastructure, and distributed systems, governance and visibility will become even more important components of cybersecurity.
Forward-thinking enterprises are increasingly adopting platforms that combine:
Secure workspace environments
Zero Trust access controls
AI-driven governance and monitoring
Stealth networking technologies
Compliance-ready security architecture
These technologies work together to create environments where sensitive systems remain protected, users operate within controlled access policies, and organizations maintain full visibility into activity and compliance.
In the evolving cybersecurity landscape, the organizations that succeed will be those that treat security not as a collection of tools, but as an integrated infrastructure designed for resilience and control.
In this post, I will show you why CRM data protection should be a priority for growing businesses.
Your customer relationship management (CRM) system is essentially the nervous system of your company. It is where your most prized asset, customer information, is stored. It contains everything from customer contact information to communication history, as well as purchase history and sales pipelines. Furthermore, it is where your business growth strategy is fueled. The more your business grows, the more customer information is stored in your CRM, making it a prized asset that must be well secured.
Many businesses, especially ones that are in a growth phase, often make the mistake of thinking that their CRM, as well as their customer information, is well secured just because it is stored in a cloud environment. The security provided by a cloud service provider is not a guarantee against every security threat, whether it is one that is perpetrated from within or outside a company. The first step to securing your company’s future is to get to know the intricacies of CRM security.
Table of Contents
The Rising Stakes of Data Breaches
As your company continues to grow, your online footprint continues to grow as well. The more your online footprint grows, the bigger a target you become for online criminals. The risks that a company faces in the event that a data breach were to occur far exceed the technical challenges that a company would face in recovering lost information.
For a company that is still in a growth phase, a data breach could be disastrous. The damage to a company’s reputation, should a security breach occur, is potentially catastrophic. It takes years to build a company’s reputation, yet it only takes a few minutes for it to be destroyed.
Should a company be unable to inspire trust among their customer base, then they will lose that customer to a competitor. The downtime that a company faces in the event that a security breach were to occur could potentially cripple a company that is still in a growth phase.
Navigating the Maze of Compliance
No longer is data protection simply a matter of following best practices; it is now the law. Laws such as the EU’s General Data Protection Regulation (GDPR) and the US’s California Consumer Privacy Act (CCPA) have set the bar high for businesses to comply with data protection regulations.
These are not just laws that large corporations must comply with. Even growing businesses must comply with these laws or face the financial consequences of failing to do so. Ignorance of the law is no excuse. Ensuring that your CRM data handling processes are compliant with data protection laws helps protect your bottom line from financial penalties and sends a powerful message to your international customer base that you take their data privacy rights seriously.
Implementing Robust Security Strategies
Ensuring the security of your CRM system requires more than just a password policy. You need a comprehensive security strategy that considers the possibility of human error, malicious intent, and system failures. A good place to begin is by understanding the ‘Shared Responsibility Model’ that most SaaS providers adhere to. For example, Salesforce offers a guarantee of the security of their platform. However, the customer is responsible for the data that is stored within the system.
The best approach is investing in dedicated Salesforce data backup solutions and tools. It is not advisable to rely on the recycle bin feature and manually exporting data. Dedicated data backup tools guarantee your business’s preparedness to recover data in the event of accidental deletion, corruption, or a ransomware attack. Access control is another approach to securing your data.
It ensures that employees are only privy to the data they need to perform their tasks, reducing the risk of data leaks. Lastly, providing your employees with adequate security training equips your business with a human firewall that prevents potential cyber threats.
Securing Your Future Growth
Making CRM data security a top priority is an investment in the long-term success of your business. Recognizing the dangers of data breaches, as well as adhering to regulations, will give you a strong base to build your business on.
Don’t wait until disaster strikes, and you see the flaws in your system; take control of your data security today and ensure the continued growth of your business without interruptions!
Here, I will show you the best Firefox Lockwise alternatives. Read on.
On December 13, 2021, Mozilla ended its support for the Firefox Lockwise app on Android and iOS devices. This implies that internet users can no longer install Firefox Lockwise on these devices but the application may continue to work on your devices.
As a result, Firefox users are left wondering what they should do next.
Well, life continues they say.
In this post, we will reveal the 8 best Firefox Lockwise alternatives that you can pick from to continue managing your passwords and enjoy other advanced features.
Table of Contents
Best Firefox Lockwise Alternatives
1. 1Password
1Password is the most popular alternative to Firefox Lockwise. It creates unique and strong passwords, remembers them, and restores them all directly from your web browser.
This best Firefox Lockwise alternative stores unlimited passwords and allows you to log into your websites with a single click. 1Password supports Mac, iOS, Windows, Android, Linux, and Chrome OS. Browser Add-ons like Chrome, Firefox, Safari, Edge, and Brave are equally available.
It provides 24/7 friendly email support and there’s 1 GB for document storage per user. There has two-factor authentication for an extra layer of protection, so you don’t have to worry about your security. And more, it has a mobile app.
It has different packages that suit individuals plus families and teams plus businesses. You can choose to first try any package for free for up to 14 days.
The Team & Business package has three plans that you can subscribe to;
Teams Starter Pack: for up to 10 users at $19.95 monthly
Business: for advanced business needs at $7.99 per user monthly
Enterprise: for large enterprise at a custom price, depending on the size of the enterprise. It contains all the features of the Business pack plus other features.
The Personal and Family package includes:
1Password families: for a family of 5 at $4.99 per month when billed annually.
1Password: for an individual at $2.99 per month when billed annually.
If you are looking for a password manager that would protect your privacy then Abine Blur is the right alternative to choose.
With Abine Blur you can encrypt passwords, block ads, auto-fill forms, mask emails, and block hidden trackers.
It is free but you can upgrade to the premium package to enjoy features like a masked credit card, masked phone, backup, and syncing of passwords securely access all your devices.
Premium is $39 yearly (Basic), $14.99 monthly (Unlimited), and $99 yearly (Unlimited). It is a bit pricey than other password managers but that’s because of the extra features.
Like 1Password, it has a mobile app that is available only on Google Play.
Norton Password Manager is a password manager software that is part of the Norton 360 Security Suite but it can be gotten separately. It is however free for users but it requires that you download it just like Firefox Lockwise. You can download it from Google Play and Apple App Stores.
It allows you to export and import passwords, secure logins, spot weaknesses in logins, create complex passwords, auto-fills passwords, sync, and encrypt your data before it leaves your device.
Norton Password Manager is easy to use, provides customer support and two-factor authentication.
Here is another best Firefox Lockwise alternative. This password manager generates strong and unique passwords and stores them for you. It goes further to check reused or weak passwords and notifies you if an online account has been hacked. With it, you can automatically log into your online accounts.
It requires that you first register for free. It has a mobile app available on Google Play and a Chrome extension. Although it doesn’t automatically fill forms or secure sharing like Firefox Lockwise, it is perfect for generating, storing, and auto-filling passwords.
Kaspersky is a known brand when it comes to cybersecurity. Kaspersky Password Manager helps to manage your passwords and your documents by keeping them in a private but secured vault.
What’s exciting is that you can access these passwords and documents from any of your devices with just one click just like you can on Firefox Lockwise.
It has a free and paid subscription for $17.49. You will need to download it. You can find out the price in different currencies based on your location on the Kaspersky website.
Kaspersky Password Manager supports Windows, macOS, iOS, and Android devices. It has a mobile app available on Google Play and Apple App Stores.
With it, you can auto-fill logins, online forms, addresses, and credit card information for payments.
It features ultra-strong encryption, zero-knowledge principle, and one password, face or touch ID entry.
Tenorshare 4uKey is a password manager made specifically for iOS, macOS, and Windows devices. It doesn’t include Android devices like Firefox Lockwise.
It is an iOS password finder. You can use it to get credit card information and mail accounts, import and export passwords, recover passwords, find Wi-Fi password, view Apple ID account, and so on.
It is a paid password manager but there is a free trial period and a 30 days moneyback guarantee. You get free customer support, auto-renewal, and free updates. The pricing is as follows:
This is an open-source password manager suitable for business and personal use. Like Firefox Lockwise, Bitwarden works with several devices and browsers: Windows, Mac, Linux, iOS, Android, Chrome, Firefox, Safari, and Edge.
Bitwarden has a free-forever account for single users and 2-Person organizations, and a paid subscription for families and businesses. The pricing is as follows:
Premium personal account: $10 per year
Families Organization: $3.33 per month
Teams Organization: $3 per month/per user with a free trial
Enterprise Organization: $5 per month/per user with a free trial
Bitwarden provides two-factor authentication, strong encryption, and double hosting options. You can use it to monitor password breaches and edit password security.
RoboForm is free to download for all devices and also has an in-built password generator like Firefox Lockwise. With it, you don’t need to remember or type any password as it would do that for you. It also has a mobile app.
It is a password manager for websites and mobile devices. It allows you to securely share files and folders, save, store and manage passwords as you browse, and you can be assured of 100% hassle-free logins in just one click.
It is suitable for freelancers, large enterprises, small and medium businesses and is available for Android, iOS, Windows, and Mac.
RoboForm has a subscription for individuals, families, and businesses. There is a free package for single users with unlimited logins, password sharing, two-factor authentication, encrypted password, and auto-fill forms. The pricing for paid subscriptions are as follows:
Everywhere – $1.99 per month when billed annually
Family – $3.98 per month when billed annually
Business – $3.35 per month when billed annually
Get RoboForm
Wrapping Up – What Is The Best Firefox Lockwise Alternative?
Amongst all, 1Password is recommended as the overall best Firefox Lockwise alternative. Apart from its cross-platform apps and browser extensions, it also has similar features like Firefox Lockwise. Not to mention, it is actively maintained and supported, unlike Mozilla Firefox.
To not leave your devices unguarded or end up using weak or the same passwords for all your logins and websites you can try any of these best Firefox Lockwise alternatives. Choose the one that suits your budget or makes use of a free software, anyone, just make sure that it meets your needs.


![25 Best Hacking Movies For Cybersecurity Enthusiasts [2025 List]](https://secureblitz.com/wp-content/uploads/2020/01/man-watching-movie.jpg "25 Best Hacking Movies For Cybersecurity Enthusiasts [2025 List]")


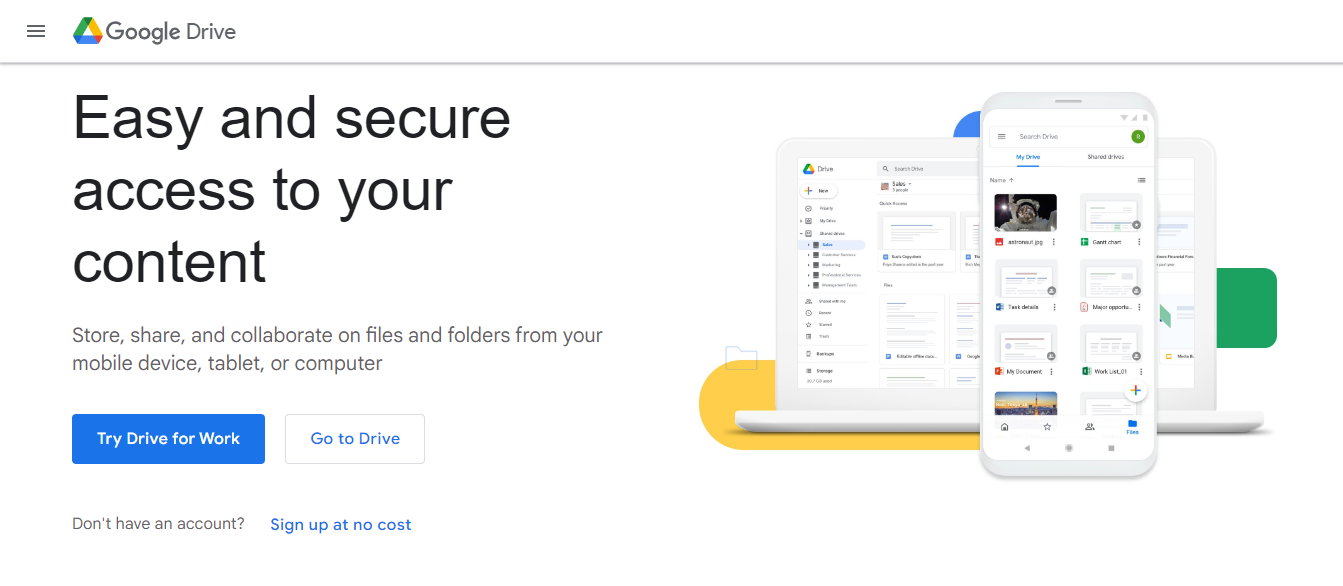


![8 Best Firefox Lockwise Alternatives [Tested, Reviewed & Ranked]](https://secureblitz.com/wp-content/uploads/2022/01/8-Best-Firefox-Lockwise-Alternatives-768x402.png "8 Best Firefox Lockwise Alternatives [Tested, Reviewed & Ranked]")


