Learn how to build a well-balanced crypto portfolio in this post.
Cryptocurrencies can rise and fall by tens of percent within one day, but it is important to pay attention not only to profitability. Let’s discover how to effectively combine digital assets to create the optimal crypto portfolio.
What Is A Crypto Portfolio?
A crypto portfolio is a systematic combination of digital assets of various types in volumes and proportions that correspond to an investment strategy or expectations.
The main task of the portfolio is to provide an investor with the maximum return on investment with minimal risk.

Why Do You Need A Crypto Portfolio?
A well-designed crypto portfolio allows you to compensate for the impact of high volatility, which is inherent in almost all crypto assets. Even the most fundamental and stable cryptocurrencies can lose or add half of their value per day.
Such fluctuations carry significant risks for investors, whereas a cryptocurrency portfolio enables them to diversify risks and allocate capital in a way that achieves their investment goals.
No matter how stable the value of coins may seem, it will always fluctuate. Therefore, only with proper asset distribution will investors be able to protect their capital from market swings. This approach is applicable to both large and small investments.
Asset Selection For Your Portfolio
When choosing coins for your portfolio, consider the following criteria:
- historical and current price;
- market capitalization;
- popularity and scope;
- volatility;
- prospects.
Cryptocurrencies behind the scenes fall into several categories:
- major least risky cryptocurrencies (usually ranked in the top 15 rankings);
- popular altcoins with high liquidity;
- new altcoins with an uncertain outlook;
- penny cryptocurrencies with growth prospects.
READ ALSO: How to Take Your First Step into Cybersecurity
Major Low-Risk Cryptocurrencies

It is believed that the assets that comprise the top 15 cryptocurrencies’ ratings are the least risky.
These include coins such as Bitcoin, Ethereum, BNB, XRP, Cardano, DogeCoin, and others. This category also includes stablecoins, assets pegged to fiat currencies, such as USDT, USDC, BUSD, and others.
Compared to others, these coins have a more stable exchange rate and high liquidity. If you started thinking about buying all 15 top coins, don’t rush. This will not be the best idea, although it may seem otherwise.
Where to buy
Since we are discussing the most in-demand coins, they are listed on all reputable crypto exchanges and platforms, and you can purchase them using any common fiat currency.
Popular Altcoins
More reliable assets tend to lack the ability to increase sharply. Their rate is growing, but it takes longer, sometimes years. Therefore, they are better suited for long-term investments.
Another thing is mid-risk assets, which sometimes shoot up in minutes, increasing by hundreds, thousands of percent. Therefore, by investing in them, you take on risks, but at the same time, increase the chances that the value of your portfolio will increase more rapidly.
For example, Monero (XMR) could be a contender for your portfolio in this category. The altcoin is slightly lower in the ranking, at 24 positions, but its cryptographic technology allows transactions to be completely anonymous, which Bitcoin cannot offer. Accordingly, the XMR tokens will be in demand, which means their value should increase.
Where to buy
Due to its privacy properties, which can be used in illegal transactions, Monero coins are not listed on some major exchanges, such as Coinbase. As a result, you may need to convert your fiat to Bitcoin and use a smaller trading platform to swap BTC to XMR.
READ ALSO: Creating A Successful Trading Plan: 7 Things To Consider
Low-Cost Promising Coins
There are also penny or inexpensive cryptocurrencies that investors sometimes overlook, while they shouldn’t.
It is undervalued assets that often reward their owners by increasing their capital by hundreds and thousands of percent, as happened with Shiba Inu, for example. Moreover, such growth sometimes occurs suddenly in a matter of minutes.
It is expected that, with the development of the metaverse, tokens used in the virtual world will gain popularity.
Metaverse tokens include Decentraland (MANA), The Sandbox (SAND), Theta Network (THETA) and others. The tokens are now worth around $1, but they have good growth prospects, so investors should consider them when planning their portfolio.
Where to buy
It will not be difficult to acquire assets that contribute to the virtual universe. If you have the first cryptocurrency, you can exchange it for THETA using the BTC to THETA exchange, or for another coin you prefer.
New Crypto Projects
The last category comprises entirely new crypto projects that have not yet proven themselves, but show promise. Such currencies are the most risky and often fail.
While investing in such assets is increasingly akin to buying a pig in a poke, some crypto enthusiasts are taking that risk by dedicating a small portion of their portfolio to projects with a murky future. Whether or not to acquire such assets depends on how much risk you can afford.
New crypto projects are those that are either on pre-sale now or will be launched in the near future. Among the most promising are the P2E Meta Masters Guild (MMG) project with the $MEMAG token, the move-to-earn Fight Out project with the FGHT native crypto token, C+Charge, an environmentally friendly project with the $CCHG token, and others.
Where to buy
You can find out the conditions and opportunities for obtaining fresh assets on the official website of the project you are interested in or in the official community groups.
Investment Strategy Selection
When designing a crypto portfolio, each investor needs to focus on those strategies that better match their financial expectations and capabilities. Such strategies mainly differ in the volume, risk degree, and the time horizon (short-term, medium-term, or long-term).
The diagrams show two common and effective ways to allocate assets in a portfolio:
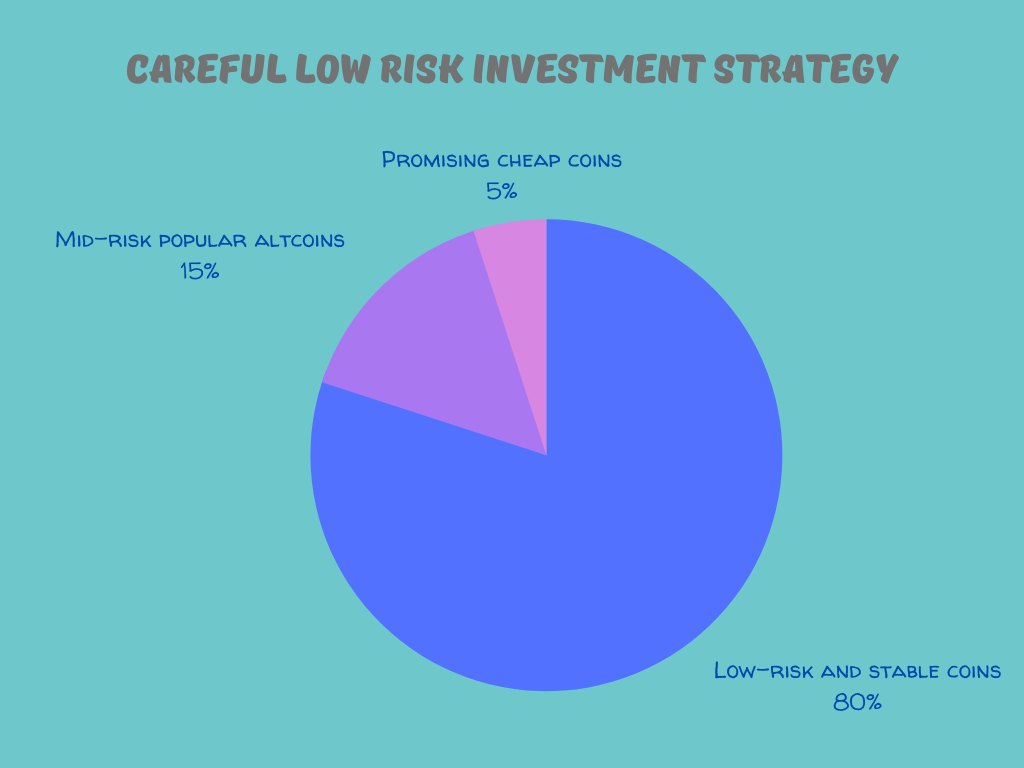
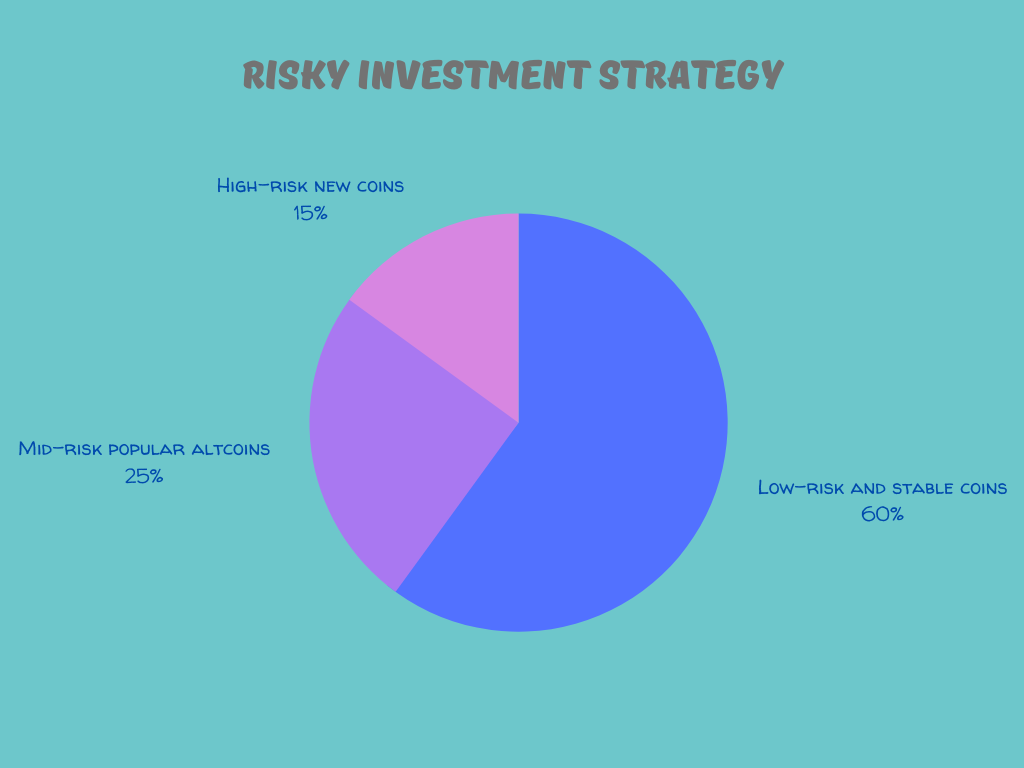
In addition to personal goals, when arranging assets, an investor should consider the current state of the crypto market. A portfolio during a bear market will differ from a portfolio during a bull market, with more stablecoins and fewer high-risk assets.
How To Build A Well-Balanced Crypto Portfolio: Frequently Asked Questions
Navigating the world of cryptocurrency can be overwhelming, especially when it comes to building a portfolio. Here are answers to some common questions to help you get started:
How do I make a good crypto portfolio?
There’s no one-size-fits-all answer, as the “good” depends on your individual goals, risk tolerance, and financial situation. However, here are some key steps:
- Define your goals: Are you looking for short-term gains, long-term growth, or a combination of both?
- Assess your risk tolerance: How comfortable are you with potential losses? Crypto is inherently volatile, so be honest with yourself.
- Research different cryptocurrencies to Understand the underlying projects, technology, and potential applications.
- Diversify your portfolio: Don’t put all your eggs in one basket. Spread your investments across different types of cryptocurrencies.
- Start small and invest responsibly: Only invest what you can afford to lose.
What is a good balanced crypto portfolio?
Balance refers to managing risk by diversifying across different assets with varying risk profiles. Here’s a possible approach:
- Large-cap (e.g., Bitcoin, Ethereum): Established coins with relatively lower volatility but potentially lower growth potential. Allocate 30-50%.
- Mid-cap (e.g., Polkadot, Chainlink): Growing coins with higher potential returns but also higher risk. Allocate 20-30%.
- Small-cap (e.g., Filecoin, Cosmos): High-risk, high-reward potential with the possibility of significant losses. Allocate 10-20%.
- Stablecoins (e.g., USDC, USDT): Peg to fiat currencies for stability and liquidity. Allocate 10-20%.
How many crypto coins should you have in your portfolio?
There’s no magic number, but experts generally advise against holding too many. A portfolio of 5-10 well-researched coins can be manageable for most investors. That is more than enough to make it difficult to track and analyze individually.
How big should your crypto portfolio be?
Crypto should be a small part of your overall investment portfolio, typically 3-5%. Consider your financial goals and emergency fund before allocating funds to crypto.
What is the best crypto portfolio for beginners?
A beginner portfolio might prioritize larger, established coins with lower volatility while allocating a smaller portion to explore high-potential but higher-risk options. Always research thoroughly before investing.
What is the 12 20 80 strategy?
This is a possible diversification strategy allocating 12% to Bitcoin, 20% to Ethereum, and 80% to other diversified cryptocurrencies. Please note that this is just an example, and the ideal allocation depends on your specific circumstances.
Takeaways
By diversifying the portfolio with various assets, a crypto investor expands their income base and maintains stability. Even a well-balanced portfolio requires regular review and adjustments in response to the current market situation.
Some assets are gradually leaving the market or losing their positions, while new, promising, and profitable ones take their place. Therefore, a crypto investor should be aware of market trends, events and innovations at all times.
INTERESTING POSTS