


Want a free backup utility for Windows 11/10/8/7? Check this out!
Picture this: years of family photos, vital work projects, and system files gone in seconds—wiped out by a hard drive crash, malware, or a simple mistake. Don’t think data loss only happens to others; you’re just as vulnerable. The upside? Safeguarding your files doesn’t have to cost you a dime.
In this guide, I’ll walk you through the best free backup utility and show you exactly how to set it up step by step.
Table of Contents
Key Factors to Look for in a Free Backup Utility

Not every free backup tool is built the same, and picking the right one can make all the difference. The best software should give you peace of mind that your files are safe, easy to restore, and managed without hassle.
Here are the top things to keep in mind when choosing:
Multiple Backup Options
A good backup tool should do more than just copy a few files and folders. Look for one that can handle full system images, disk images, or even partition backups. That way, whether you just need a single document or your entire system restored, you’re covered.
Scheduling & Automation
Let’s be real—nobody remembers to run manual backups every time. That’s why automation is key. Choose software that lets you:
- Set custom schedules (daily, weekly, or when certain events happen)
- Run incremental backups (saving only the changes instead of everything all over again, which saves both time and storage)
Flexible Storage Destinations
The best backup software gives you options on where to keep your data safe. You might prefer local backups to an external hard drive, NAS, or a second internal disk. Or maybe cloud storage—like Google Drive, Dropbox, or OneDrive—fits your lifestyle better.
Easy-to-Use Interface
Powerful doesn’t have to mean complicated. A solid backup tool should be simple enough for beginners yet still offer advanced settings for those who want more control. And when it’s time to restore your files, the process should be straightforward, not a maze of confusing menus.
File Versioning
Ever saved over an important file by mistake? Or worse—had your documents locked up by ransomware? That’s where versioning comes in. It lets you roll back to earlier versions of your files, so you’re never stuck with just the latest (and possibly broken) copy.
Performance & Reliability
Just because it’s free doesn’t mean you should settle for slow or unstable software. Look for a tool that delivers:
- Quick backup and restore speeds
- Little to no impact on system performance
- Solid reliability, with error handling and easy-to-read logs
When it comes to hitting all the marks, AOMEI Backupper really stands out. Whether you’re backing up a single folder or your entire system, it gives you the flexibility, features, and peace of mind you need—without spending a cent.

How to Back Up Windows OS (Step by Step)
Backing up your whole Windows system is like creating a safety net—you’ll be able to bounce back from crashes, hardware failures, or even ransomware without the headache of reinstalling everything.
The best part? With free Windows backup software – AOMEI Backupper, the process is quick and simple. Here are the steps to back up your Windows OS:
Step 1: Download & Install AOMEI Backupper
- Head over to the official AOMEI website and grab the latest version of AOMEI Backupper.
- Run the installer and follow the on-screen prompts—it only takes a minute.
- Once installed, launch the program to get started.
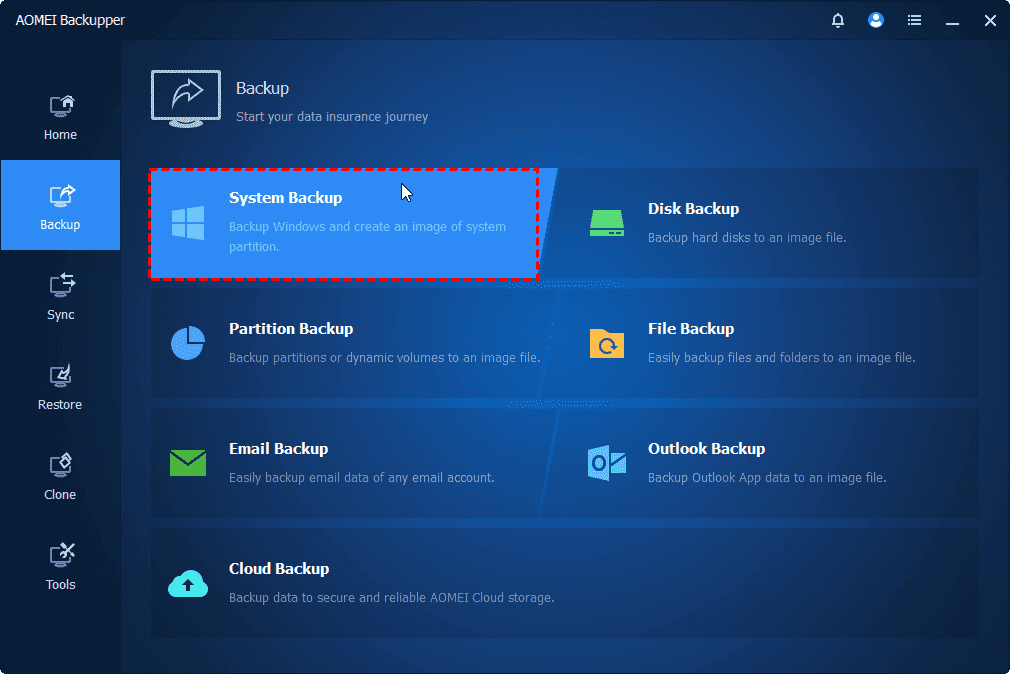
Step 2: Select “System Backup”
- In the main dashboard, click on the Backup tab on the left.
- Choose System Backup. AOMEI will automatically detect and select the system partitions you need (usually your C: drive plus the required boot files).
Step 3: Choose a Backup Destination
Decide where you’d like to save your backup. Storage options include: external HDD/SSD (highly suggested), portable USB, network volume, or another installed drive.
💡 Pro Tip: Make sure the destination has enough free space to store the entire system image.
Step 4: Adjust Optional Settings
Want a little more control? AOMEI lets you customize things before running the backup:
- Schedule Backup – Enable automatic backups to occur daily, weekly, or monthly.
- Options – Fine-tune your backup with compression settings, email alerts, or exact sector-by-sector backup.
Step 5: Start the Backup
When you’re ready, click Start Backup. Then take a break as AOMEI does the work. The time it takes will depend on how large your system is and where you’re saving it.
Summary
Having a dependable backup tool is key to keeping your data safe in the event of system crashes, malware attacks, or accidental deletions.
In this guide, we’ve covered the features to look for in a free backup utility and walked you through backing up your Windows OS step by step using AOMEI Backupper. Give it a try—you’ll have peace of mind knowing your files are fully protected!
INTERESTING POSTS
- Product Review: SFWare USB Data Recovery Tool
- AOMEI Backupper Software Review – Benefits and Features
- Biggest Christmas Giveaway By AOMEI [Worth $521 For Free]
- #WorldBackupDay GIVEAWAY: Free AOMEI Products Worth $669
- AOMEI Partition Assistant Software Review – Benefits and Features
- Your Guide For Dealing With MacBook Malware
About the Author:
Daniel Segun is the Founder and CEO of SecureBlitz Cybersecurity Media, with a background in Computer Science and Digital Marketing. When not writing, he's probably busy designing graphics or developing websites.


